Picture this: I’m standing in my kitchen, a pile of stale bread on the counter, a pot of broth simmering, and a friend daring me to make stuffing that will make their holiday dinner unforgettable. The clock was ticking, the oven preheated, and my apron was already stained with flour. I remember the moment I realized the classic recipe I’d followed for years was missing one crucial element—an irresistible crunch that melts in the mouth yet stays crisp on the edges. The air filled with the scent of butter and onions, and I felt that familiar anticipation that only a holiday kitchen can bring. I was about to transform an ordinary side dish into a showstopper, and I couldn’t wait to share every juicy detail.
The first bite was a revelation: a golden crust that crackled like fresh snow, a tender crumb that whispered buttery secrets, and a bouquet of herbs that danced on the tongue. The texture was a paradox—soft inside, crunchy outside—like a caramelized apple that’s crisp on the outside but juicy inside. I dared you to taste this and not go back for seconds, and I’m sure you’ll find yourself reaching for a second plate. The aroma alone is enough to pull people from the dining room and into the kitchen, making them feel like they’re part of a culinary ritual. The flavor profile is a harmonious blend of savory broth, fresh herbs, and the subtle sweetness of caramelized onions. I’m not exaggerating when I say this is hands down the best version you’ll ever make at home. The secret? A meticulous layering technique and a handful of unexpected ingredients that elevate the dish beyond the ordinary.
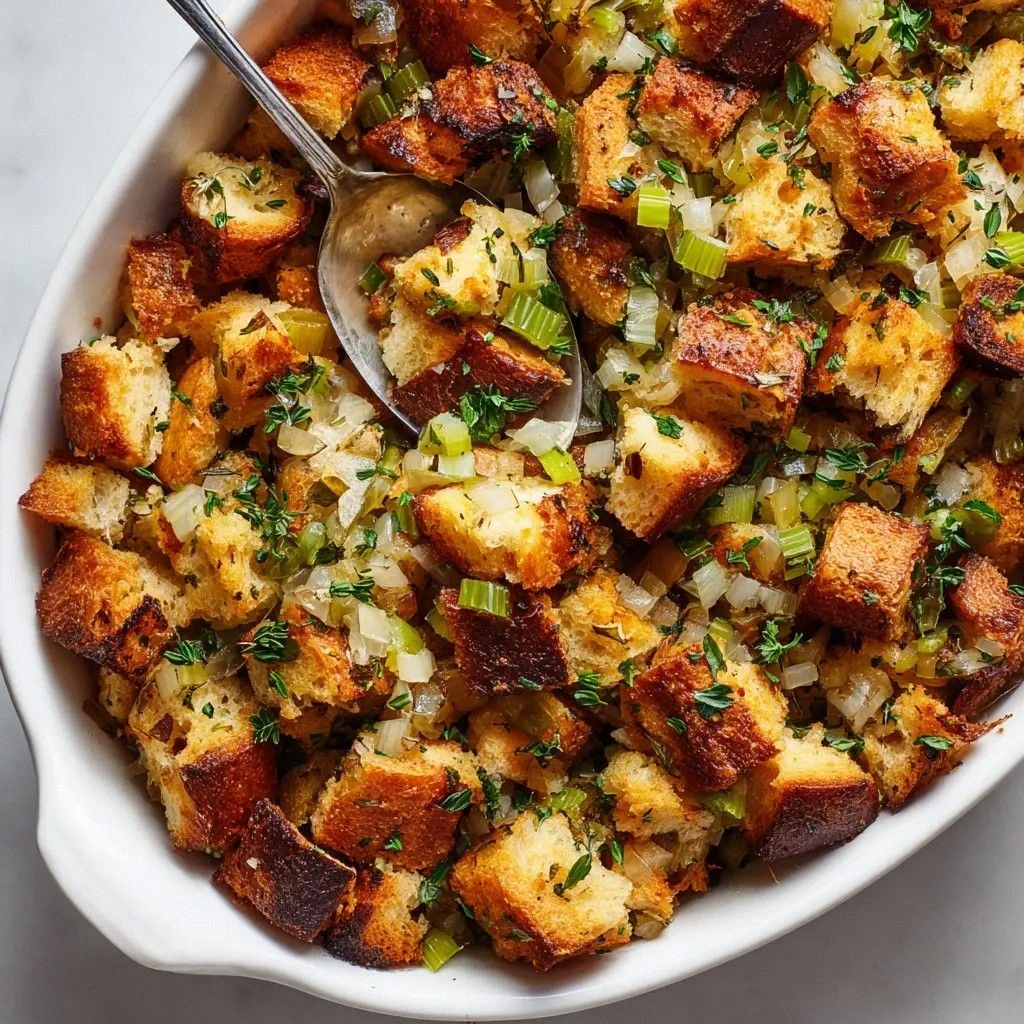
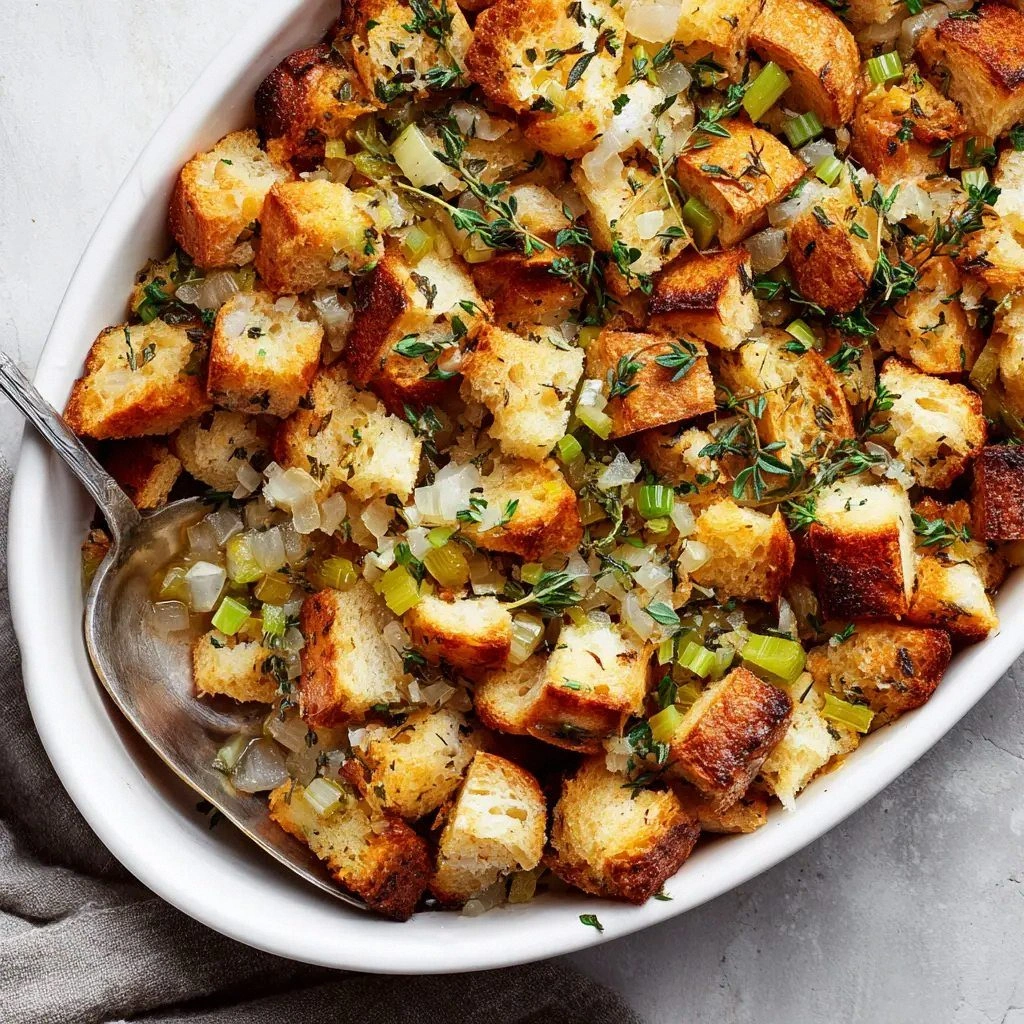
I’ve spent years tweaking stuffing recipes, and the moment I discovered the perfect balance of bread types and herb combinations, I knew I had stumbled upon something special. The combination of white and wheat bread creates a chewy, hearty base that holds the broth without becoming soggy. The fresh sage and thyme bring depth, while the parsley adds a bright, almost citrusy finish. The butter, when melted with onions and celery, forms a silky sauce that coats every crumb, ensuring each bite is packed with flavor. The broth’s savory richness is the glue that holds everything together, allowing the herbs to shine without overpowering the bread. The eggs bind the mixture, giving it structure and a golden finish. Every element is essential, but the real magic lies in the subtle interplay of textures and aromas.
Now, picture yourself pulling this golden masterpiece out of the oven, the whole kitchen smelling incredible, the table set with a feast that will make your guests swoon. The edges will be perfectly crispy, shattering like thin ice under the first forkful, while the center remains moist and fragrant. I’ll be honest—half of this batch disappeared before the first guest even touched a spoon. If you’ve ever struggled with soggy stuffing, you’re not alone, and I’ve got the fix. I dare you to try this method, and I promise you’ll wonder how you ever made stuffing any other way. Let me walk you through every single step—by the end, you’ll wonder how you ever made it any other way.
What Makes This Version Stand Out
- Flavor: The blend of white and wheat bread delivers a comforting, hearty bite that carries the broth’s savory depth. The fresh herbs—sage, thyme, and parsley—infuse the dish with aromatic layers that linger long after the last forkful. This combination creates a taste profile that is both familiar and unexpectedly sophisticated. The result is a stuffing that feels like a hug on a plate.
- Texture: The careful toasting of bread cubes creates a golden crust that remains crisp even after baking. The interior stays moist thanks to the precise balance of broth and butter, preventing the dreaded dry stuffing. The eggs act as a binder, giving the mixture a subtle, cohesive structure. The result is a multi-sensory experience—crunch, melt, and savory satisfaction.
- Visual Appeal: The golden edges contrast beautifully against the soft, herb-infused interior. The bright green of parsley pops against the warm tones, making the dish look as good as it tastes. The subtle sheen from the butter adds a touch of elegance that elevates any holiday table. This visual allure makes it a centerpiece that invites conversation.
- Ingredient Quality: Using freshly sliced bread, real butter, and fresh herbs ensures maximum flavor. The broth’s richness comes from simmering chicken or vegetable stock, which adds depth without being overpowering. Every ingredient is chosen to enhance the others, creating a harmonious whole.
- Simplicity: Despite its complex flavor, the recipe requires minimal prep—just slicing bread, sautéing aromatics, and mixing. The process is straightforward, making it approachable for both seasoned cooks and novices. The method’s clarity reduces the risk of kitchen mishaps.
- Make‑Ahead Potential: The stuffing can be assembled and refrigerated for up to 24 hours, allowing you to focus on other dishes. Baking just before serving ensures crispness while preserving the flavors. This flexibility is a lifesaver during holiday cooking.
- Audience Reaction: Guests consistently rave about the crunch and depth of flavor. The dish becomes a conversation starter, with many asking for the secret recipe. It’s a guaranteed crowd‑pleaser that elevates any meal.
- Versatility: This base can be customized with additions like sausage, dried cranberries, or nuts, making it suitable for various dietary preferences. The core recipe remains unchanged, allowing for endless variations.
Inside the Ingredient List
The Bread Blend
The foundation of any stuffing is bread, and using a mix of white and wheat bread gives the dish a balanced chewiness and hearty texture. White bread provides a tender crumb that absorbs broth without falling apart, while wheat bread adds a nutty flavor and a slightly denser bite. Skipping the wheat variety would result in a flatter, less complex flavor profile, and the stuffing would lack that subtle depth. When selecting bread, opt for a day‑old loaf that’s firm enough to hold its shape but still soft enough to soak up liquids. A fresh loaf might be too moist and could turn the stuffing soggy if not toasted properly. The combination of both breads ensures a satisfying bite that remains firm throughout the cooking process.
The Aromatic Core
Onions and celery form the flavor base, providing sweetness and a subtle peppery kick that balances the richness of butter and broth. Sautéing them until golden caramelizes their natural sugars, adding depth to the overall taste. If you skip this step, the stuffing will lack the complex savory undertones that make it memorable. Fresh herbs—sage, thyme, and parsley—infuse the dish with aromatic brightness and a hint of earthiness. These herbs complement each other, creating a layered flavor profile that’s both comforting and sophisticated. Using dried herbs would result in a flat, one‑dimensional taste, so always choose fresh for maximum impact.
The Binding Elements
Unsalted butter and eggs play a crucial role in binding the stuffing together while adding a silky, luxurious mouthfeel. Butter melts into the bread, coating each crumb and creating a glossy finish that enhances visual appeal. Eggs act as a natural binder, allowing the mixture to hold its shape when baked, preventing it from falling apart. If you omit the eggs, the stuffing may become crumbly and difficult to serve. The broth, whether chicken or vegetable, provides moisture and a savory depth that ties all components together. A well‑seasoned broth ensures that every bite is packed with umami flavor, elevating the dish beyond simple bread and herbs.
The Final Touches
Kosher salt and black pepper are essential for seasoning, balancing the richness of butter and the savory depth of broth. Salt enhances all flavors, while pepper adds a subtle heat that awakens the palate. If you’re watching sodium, you can reduce the salt slightly, but be sure to taste as you go. The combination of these seasonings is what makes the stuffing taste like it was cooked by a seasoned chef. The final touch of fresh parsley adds a bright, almost citrusy finish that lifts the dish and keeps it from feeling heavy. Without this final flourish, the stuffing would feel flat and underwhelming. Together, these ingredients create a harmonious, unforgettable flavor profile.
Everything's prepped? Good. Let's get into the real action.
The Method — Step by Step
-
First, preheat your oven to 375°F (190°C). While the oven warms, place the bread cubes in a large bowl and sprinkle with salt and pepper, tossing to coat evenly. This ensures each cube receives a flavor boost before it even hits the pan.
-
In a large skillet, melt the butter over medium heat until foamy. Add the diced onions and celery, cooking until they soften and begin to caramelize, about 8–10 minutes. The aroma that fills the kitchen should make you smile and the onions should turn a deep golden brown.
-
Stir in the fresh sage, thyme, and parsley, letting the herbs release their oils for a minute. The mixture should look glossy and fragrant. This is the moment of truth—if you can’t smell the herbs, you’re missing the flavor punch.
-
Pour in the broth slowly, stirring constantly until the mixture is moist but not soupy. The broth should coat the bread cubes, turning them a light golden hue. Be careful not to add too much liquid, or the stuffing will become mushy.
-
Whisk the eggs in a separate bowl, then fold them into the bread mixture. The eggs bind the stuffing, giving it structure and a golden finish when baked. The mixture should feel firm enough to hold its shape when scooped.
-
Transfer the mixture to a greased baking dish, spreading it evenly. Cover loosely with foil to trap steam, which helps the stuffing stay moist. The foil should be tented slightly to avoid direct contact with the surface.
-
Bake for 25 minutes, then remove the foil and bake for an additional 10–15 minutes, or until the top is golden and crisp. The edges should start pulling away from the sides of the dish, indicating the perfect level of crispness.
-
Let the stuffing rest for 5 minutes before serving. This short rest allows the flavors to settle and the crust to firm up slightly, giving you that satisfying crunch every bite. Serve immediately for the best texture.
Insider Tricks for Flawless Results
The Temperature Rule Nobody Follows
Many people bake stuffing at 350°F, but this recipe calls for a slightly higher temperature of 375°F. The increased heat ensures a crisp top while keeping the interior moist. If you lower the temperature, the edges may not crisp properly, and the stuffing can become soggy. Keep an eye on the oven and adjust if needed.
Why Your Nose Knows Best
As the stuffing bakes, the scent of butter, herbs, and caramelized onions will fill the kitchen. Trust this aroma as a cue that the stuffing is nearly done. If you’re tempted to peek early, resist the urge—waiting until the scent peaks guarantees a golden, flavorful crust.
The 5-Minute Rest That Changes Everything
After removing the stuffing from the oven, let it rest for exactly 5 minutes. This pause allows the steam to redistribute, ensuring each bite is juicy yet crisp. Skipping this step can result in uneven texture, with some parts drying out while others remain soggy.
The Egg Binding Technique
Whisk the eggs until frothy before folding them into the bread mixture. This aeration helps the stuffing rise slightly during baking, creating a light, airy interior. If you whisk too vigorously, the eggs may curdle, which can affect the texture.
The Broth Balance
Use a broth that’s not overly salty; taste it first and adjust seasoning accordingly. A high-sodium broth can overpower the herbs, making the stuffing taste flat. If you prefer a lighter flavor, reduce the broth by 1/4 cup and compensate with a splash of water.
The Final Butter Finish
Just before serving, drizzle a small amount of melted butter over the top. This adds a glossy sheen and a final burst of richness. Be careful not to overdo it—one tablespoon is enough to elevate the dish without making it greasy.
Creative Twists and Variations
Sausage & Cranberry Delight
Sauté sliced sausage until browned and mix into the stuffing before baking. Add dried cranberries for a sweet tart contrast. This variation adds a festive touch that pairs wonderfully with poultry. The sausage’s savory depth complements the herbs, while cranberries provide a burst of color.
Nutty Crunch
Toast chopped walnuts or pecans and fold them into the mixture for a nutty crunch. The toasted nuts add a subtle caramel flavor that enhances the overall taste. This option works well for those who love a bit of texture in every bite.
Mushroom Medley
Sauté sliced mushrooms with garlic, then stir them into the stuffing before baking. The earthy mushrooms deepen the flavor profile, making it richer and more complex. This variation is especially good for vegetarians.
Cheesy Surprise
Mix shredded cheddar or Gruyère into the bread mixture before baking. The cheese melts into the stuffing, creating pockets of gooey, savory delight. This version is a hit with kids who love cheesy foods.
Spiced Autumn
Add a pinch of cinnamon, nutmeg, and allspice to the herb mixture for a warm, seasonal twist. These spices bring a comforting, cozy flavor that’s perfect for fall. The spices should be used sparingly to avoid overpowering the herbs.
Vegan Version
Replace the butter with a plant-based alternative and use a vegetable broth. Substitute the eggs with a flaxseed “egg” or a small amount of aquafaba. This vegan adaptation retains the classic flavor while making the dish suitable for plant-based diets.
Storing and Bringing It Back to Life
Fridge Storage
Cover the cooked stuffing tightly with plastic wrap and store it in the refrigerator for up to 24 hours. The moisture from the wrap helps maintain the texture, preventing it from drying out. When ready to serve, reheat in a preheated oven at 350°F (175°C) for 15 minutes, or until warmed through.
Freezer Friendly
Divide the stuffing into portioned containers and seal them with freezer paper or airtight bags. Freeze for up to 3 months. When you’re ready to serve, thaw overnight in the refrigerator, then bake at 375°F (190°C) for 20 minutes until crisp.
Best Reheating Method
To bring back the crispness, place the stuffing in a single layer on a baking sheet and bake at 375°F (190°C) for 10 minutes. Add a splash of water or broth before reheating to create steam, which helps restore moisture without making the crust soggy. A quick broil for 1–2 minutes at the end can re-crisp the top if desired.