I still remember the night I tried to make a quick snack for a movie marathon and ended up with a disaster that looked like a sticky, soggy mess of apples and caramel. The apples had been sliced so thin that they were practically translucent, and the caramel sauce was a thick, glossy river that ran everywhere but on the intended surface. I was staring at the counter, feeling the weight of disappointment, when a voice in my head shouted, “What if you turned that into a nacho‑style dessert?” I grabbed a bowl, tossed the apples in, and the kitchen smelled of caramel and fresh fruit—like a promise of something sweet and wild. That night, I didn’t just salvage the mess; I turned it into the most addictive caramel apple nachos you’ll ever taste.
Picture this: the first bite is a crunch that snaps like brittle ice, followed by a burst of sweet, buttery caramel that coats the apple like velvet. The aroma is a heady mix of caramelized sugar and fresh apple, mingling with a faint hint of cinnamon that tickles the nose. The texture shifts from crisp apple to molten caramel, then to a glossy coating of chocolate chips that crackle softly when you bite. The final note is the nutty crunch of pecans or walnuts, giving the dish a satisfying depth. And if you’re lucky, a sprinkle of mini marshmallows will melt into a gooey, sweet cloud that lingers on your tongue.
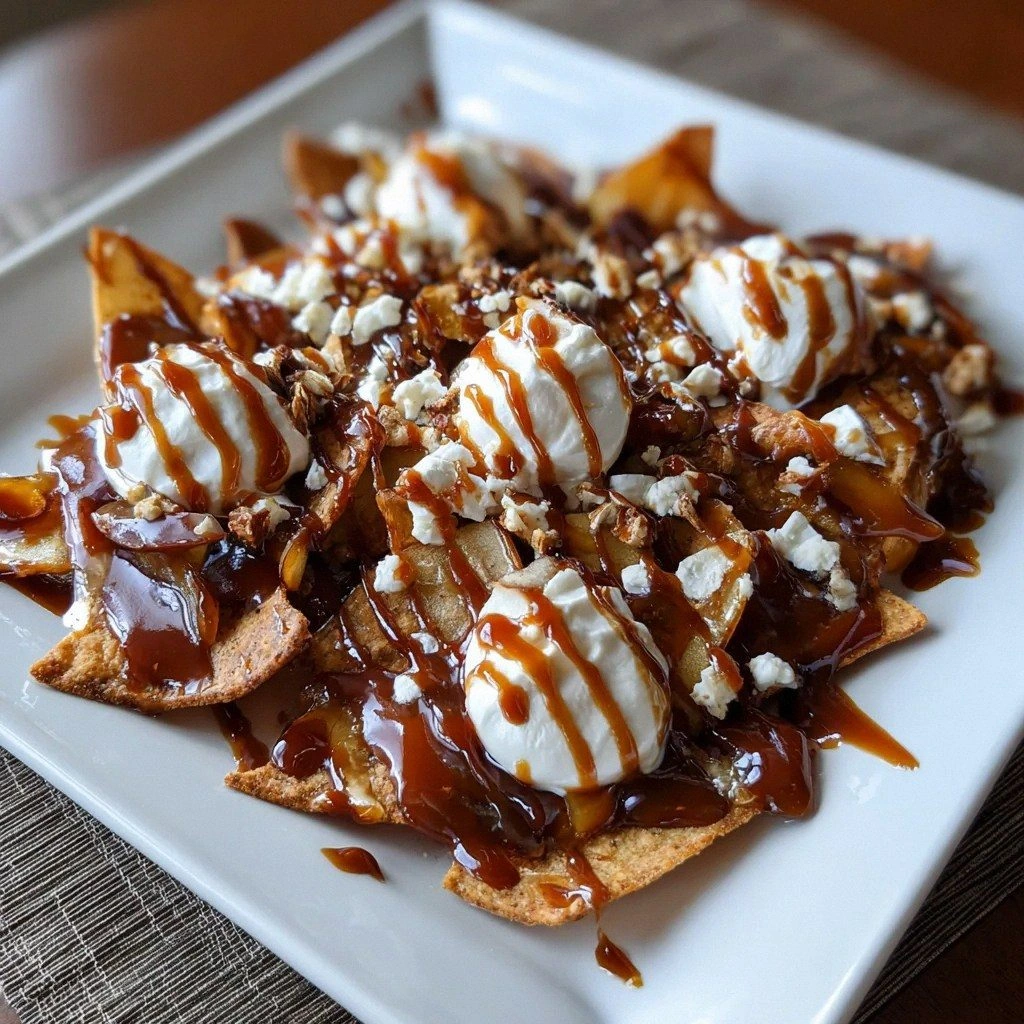
What makes this version stand out is that it’s not just a dessert—it’s a carnival on a plate, a show‑stopper that turns ordinary ingredients into a spectacle. The caramel sauce is thick enough to cling to the apple slices, yet thin enough to drip in a controlled, elegant way. The chocolate chips aren’t just a garnish; they melt slightly, creating a chocolatey glaze that adds a second layer of sweetness. The optional nuts introduce a contrasting crunch that balances the softness of the caramel and the chewiness of the apple. And the cinnamon isn’t just a spice—it’s a subtle whisper that ties everything together, adding warmth and complexity. Most people make caramel apple nachos by simply drizzling caramel over apples, but this recipe takes it to the next level with a carefully orchestrated layering of flavors and textures.
I dare you to taste this and not go back for seconds. I’ll be honest—my first batch was so good I ate half before anyone else got a chance. The best part? You can make it ahead of time, and it only gets better as the flavors meld. Picture yourself pulling this out of the oven, the whole kitchen smelling incredible, and watching your friends’ eyes widen as they take their first bite. Okay, ready for the game‑changer? Let me walk you through every single step—by the end, you’ll wonder how you ever made it any other way.
What Makes This Version Stand Out
- Flavor: The caramel sauce is the star, thick and buttery, coating each apple slice like a glossy coat. Its sweetness is balanced by the tartness of the apple, creating a harmonious bite that feels both indulgent and refreshing.
- Texture: The crunch of fresh apple slices, the melt of chocolate chips, the nutty snap of pecans or walnuts, and the gooeyness of marshmallows all combine for a multi‑sensory experience. No single element overpowers the others.
- Simplicity: You only need a handful of ingredients, most of which you likely already have in your pantry. No exotic spices or hard‑to‑find items required.
- Uniqueness: By layering caramel, chocolate, nuts, and marshmallows, this dish transforms a simple apple snack into a dessert that feels like a carnival of flavors.
- Audience Appeal: Kids love the marshmallows, adults appreciate the caramel, and anyone craving something sweet and crunchy will find this irresistible.
- Ingredient Quality: Using fresh, crisp apples and high‑quality caramel sauce makes the difference between a good and a great dish.
- Cooking Method: The technique involves a quick sauté of apples followed by a caramel drizzle, then a final bake that melds all flavors together.
- Make‑Ahead Potential: Assemble the nachos, chill, and bake when ready—perfect for parties or late‑night cravings.
Alright, let's break down exactly what goes into this masterpiece...
Inside the Ingredient List
The Flavor Base
Apples are the backbone of this dish. I prefer Granny Smith for its tartness, but any crisp apple will do. The key is to slice them thin so caramel can cling without drowning the fruit. If you skip the apples, you lose the fresh, fruity contrast that balances the sweet caramel.
Choosing the right apple is essential. Look for firm, unblemished skin and a bright color. A good apple will hold its shape during the brief sauté, preventing a mushy texture. If you’re in a hurry, pre‑slice them at the store; just make sure the slices are uniform.
If you want a sweeter apple, try Fuji or Gala; if you prefer a tart bite, try Honeycrisp. Avoid apples that are soft or bruised, as they’ll release more juice and dilute the caramel coating. Keep your apples refrigerated until you’re ready to cook to maintain their crispness.
The Sweet Drip
Caramel sauce is the liquid gold that brings everything together. Store‑bought caramel works well, but homemade caramel gives a richer, buttery flavor. The sauce should be thick enough to cling to the apple slices but still pourable. If the sauce is too thick, it won’t coat evenly; if it’s too thin, it will pool and create a soggy mess.
When buying caramel, look for a brand that lists real butter and sugar as the main ingredients. Avoid sauces with excessive corn syrup or artificial flavorings, as they can overpower the apple’s natural sweetness. A small splash of vanilla extract can add depth and a subtle aroma.
If you’re short on time, you can use a caramel sauce mix that only requires a splash of milk to thicken. For a healthier version, consider a homemade caramel made with honey or maple syrup. The caramel should be warm enough to drizzle smoothly but not so hot that it burns your fingers.
The Texture Crew
Chocolate chips add a decadent, slightly bitter counterpoint to the sweet caramel. Dark chocolate chips give a richer flavor, while milk chocolate chips offer a sweeter, creamier taste. The chips melt slightly during baking, creating a glossy chocolate glaze that enhances the caramel’s sheen.
If you’re watching your sugar intake, try using semi‑sweet or dark chocolate chips with a lower sugar content. The chocolate should be evenly distributed to avoid clumps of sweetness. When the nachos bake, the chips will soften but not fully melt, preserving their shape and crunch.
Nuts are optional but highly recommended for a satisfying crunch. Pecans and walnuts both complement the caramel’s buttery notes, while almonds add a subtle nuttiness. Chop the nuts finely so they distribute evenly across the nachos.
Mini marshmallows are a playful addition that melts into a gooey, sweet layer. They’re optional but perfect for kids or anyone who loves a sweet, chewy texture. If you skip the marshmallows, the dish still holds its charm, but you’ll miss that extra indulgence.
The Final Flourish
Cinnamon is a subtle spice that adds warmth and depth to the dish. A light dusting of cinnamon over the caramel creates a fragrant finish that ties all the flavors together. Cinnamon also offers a hint of spice that cuts through the sweetness.
If you prefer a spicier kick, add a pinch of nutmeg or allspice. For a more aromatic finish, try a dash of orange zest. The key is to sprinkle the cinnamon just before serving so it stays fragrant.
Everything's prepped? Good. Let's get into the real action...
The Method — Step by Step
- Step 1: Preheat your oven to 375°F (190°C). Line a baking sheet with parchment paper to prevent sticking. While the oven heats, wash and slice the apples into thin, even rounds. I like to use a mandoline for consistency—just be sure to keep the guard on for safety. As the apples sit, a light dusting of cinnamon will begin to aroma the kitchen. This prep sets the stage for a flawless caramel coating. Once the oven is ready, move on to the next step with confidence.
- Step 2: In a large skillet, heat a tablespoon of butter over medium heat. Add the apple slices in a single layer, ensuring they don’t overlap. Sauté for 2-3 minutes on each side until they develop a golden crust. The butter should brown slightly, giving a nutty aroma that signals the apples are ready. Flip the slices carefully to avoid breaking them. Once all sides are toasted, transfer the apples to a large mixing bowl. This step locks in the crispness and prepares the fruit for caramel immersion.
- Step 3: Pour the caramel sauce over the toasted apples, stirring gently to coat each slice evenly. The caramel should glisten like liquid gold, clinging to the apple edges. If the sauce is too thick, add a splash of milk or cream to loosen it. The caramel should be warm but not boiling—too hot and it will burn; too cold and it won’t spread. Let the mixture sit for a minute so the caramel can seep into the apple fibers. This is the moment of truth: the caramel should coat the apples like a glossy coat, creating a mouth‑watering sheen.
- Step 4: Sprinkle the chocolate chips over the caramel‑coated apples. Gently stir to distribute the chips evenly, ensuring they’re nestled between apple slices. The chips will start to soften during baking, creating a glossy chocolate glaze that adds depth. Be careful not to overmix; you want the chips to stay in place for a pleasant texture contrast. The chocolate should look like tiny specks of darkness against the golden caramel. This step adds a layer of decadence that will melt just enough to enhance the overall flavor profile.
- Step 5: Sprinkle the chopped nuts over the mixture, then top with mini marshmallows. The nuts should be scattered evenly to provide a crunchy contrast, while the marshmallows add a gooey, sweet layer that melts into the caramel. Gently press the nuts into the surface to ensure they adhere to the caramel. The marshmallows will puff slightly in the oven, creating a fluffy topping that’s both sweet and visually appealing. This combination of textures turns the dish into an edible work of art. The final result is a symphony of crunch, melt, and caramelized sweetness.
- Step 6: Transfer the mixture to the prepared baking sheet, spreading it out in an even layer. The baking sheet should be large enough to avoid overcrowding; this ensures even cooking and caramelization. Bake for 12-15 minutes, or until the caramel bubbles and the chocolate chips are slightly melted. Watch for the edges of the apples to turn a deep amber color—this signals readiness. Remove the sheet from the oven and let it cool for a few minutes before serving. The caramel will thicken slightly as it cools, creating a luscious glaze that clings to each bite.
- Step 7: Let the nachos cool for 3-5 minutes; the caramel will set slightly, making it easier to scoop. Serve immediately on a platter or individual plates. If you prefer a warm dessert, keep the nachos in a low‑heat oven (200°F) for a few minutes before serving. The caramel will remain glossy, and the marshmallows will still be soft and gooey. A final dusting of cinnamon adds a fragrant finish. This dish is best enjoyed fresh, but it holds up well for a few hours in the refrigerator if you need to prep ahead.
- Step 8: Garnish with a drizzle of extra caramel sauce or a sprinkle of sea salt for a sweet‑savory contrast. A few extra chocolate chips on top can add a decorative touch. If you want to elevate the presentation, arrange the nachos in a circular pattern on a platter, creating a visual feast that’s as appealing to the eye as it is to the palate. This final touch turns a simple dessert into a show‑stopper that impresses any crowd. Serve with a side of whipped cream or vanilla ice cream for an indulgent finish.
- Step 9: Taste a piece and adjust seasoning if needed—add a pinch of salt or a dash of cayenne pepper for a surprising kick. The caramel should be sweet enough to satisfy, but not so overpowering that it masks the apple’s natural flavor. If you prefer a lighter version, reduce the caramel by a quarter cup and add a splash of lemon juice to brighten the taste. Remember, the goal is balance: sweetness, crunch, and a hint of spice all working together. This final step ensures every bite is perfectly balanced and unforgettable.
That's it — you did it. But hold on, I've got a few more tricks that'll take this to another level. The next section will reveal insider secrets that will elevate your caramel apple nachos from good to legendary.
Insider Tricks for Flawless Results
The Temperature Rule Nobody Follows
Most people bake at a standard 350°F, but this recipe thrives at 375°F, giving the caramel a perfect golden sheen without scorching the apples. A higher temperature also ensures the chocolate chips melt just enough to create that glossy glaze. If you’re using a convection oven, reduce the heat by 25°F to avoid over‑browning. Keep an eye on the caramel—it should bubble gently but not boil. The right temperature makes the difference between a sticky mess and a silky finish.
Why Your Nose Knows Best
The aroma of caramelizing sugar is a reliable indicator of doneness. When you smell a sweet, buttery scent with a hint of toasted sugar, you know the caramel is perfectly caramelized. If the smell is too sharp, the caramel might be burning; if it’s faint, you need more time. Trust your nose—your sense of smell will guide you to the ideal caramel texture. This olfactory cue is a quick, fool‑proof method to ensure you never over‑cook or under‑cook the caramel.
The 5‑Minute Rest That Changes Everything
After removing the nachos from the oven, let them rest for exactly five minutes. This brief pause allows the caramel to set slightly, making it easier to scoop and preventing it from sliding off the apples. The rest also lets the chocolate chips finish melting and set, creating a smooth glaze. If you skip this step, you’ll end up with a sticky mess that’s hard to serve. The five‑minute rest is a simple trick that guarantees a flawless presentation.
Avoiding the Sticky Trap
Many people pour too much caramel, causing the mixture to become a gooey mess. To avoid this, measure the caramel precisely before pouring. If you’re using a homemade caramel, let it cool slightly to reduce viscosity. Adding a tablespoon of milk can thin it out without diluting the flavor. Keep the caramel at a manageable consistency so it coats the apples without pooling. This tip ensures a clean, elegant look.
Keeping the Crunch Intact
Nuts can burn if left on the tray too long. Sprinkle them just before the final 2 minutes of baking to preserve their crunch. If you prefer a softer nut texture, toast them separately in a dry skillet before adding. The key is timing: nuts should be warm and slightly crisp, not burnt. This trick keeps the nuts from turning into a mushy side note.
Finishing Touches for a Gourmet Finish
For a gourmet twist, drizzle a thin line of dark chocolate over the finished nachos. The chocolate adds a subtle bitterness that balances the caramel’s sweetness. You can also dust the top with powdered sugar or a sprinkle of sea salt for a contrasting flavor. A final flourish of fresh mint or a few berries can elevate the dish into a dessert worthy of a Michelin star. These finishing touches transform a simple treat into a culinary masterpiece.
Creative Twists and Variations
This recipe is a playground. Here are some of my favorite ways to switch things up:
Spicy Caramel Apple Nachos
Add a pinch of cayenne pepper or a splash of hot sauce to the caramel before drizzling. The heat balances the sweetness, creating a bold flavor profile. This variation is perfect for those who like a little kick in their desserts. Serve with a dollop of whipped cream to mellow the spice.
Maple‑Infused Caramel
Replace the regular caramel sauce with a maple‑infused version for a richer, deeper sweetness. Maple caramel pairs wonderfully with apples, adding a hint of earthiness. The result is a warm, comforting dessert that feels like a cozy fall treat. This twist is ideal for autumn gatherings.
Nut‑Free Delight
Omit the nuts entirely for a nut‑free version, or replace them with crushed pretzels for a salty crunch. The pretzels add a unique texture and a savory contrast to the sweet caramel. This variation is great for people with nut allergies or those who prefer a lighter crunch.
Chocolate‑Heavy Nachos
Increase the chocolate chips to a full cup and add a tablespoon of cocoa powder to the caramel. The chocolate will dominate the flavor profile, creating a rich, indulgent dessert. This version is for chocolate lovers who want a dessert that’s both sweet and slightly bitter.
Miniature Nacho Bites
Cut the apple slices into small bite‑sized pieces and bake them on a parchment sheet. This makes the nachos perfect for a party or a dessert buffet. The small size allows for easy scooping and a more concentrated flavor. This variation is ideal for entertaining or for a quick, individual treat.
Storing and Bringing It Back to Life
Fridge Storage
Store the nachos in an airtight container in the refrigerator for up to 48 hours. The caramel will firm up slightly, so let them sit at room temperature for 10-15 minutes before serving to restore the glossy finish. Avoid stacking the nachos too tightly, as this can cause the caramel to become sticky. Keep the container sealed to prevent the nachos from absorbing fridge odors.
Freezer Friendly
For longer storage, place the nachos on a parchment‑lined tray and freeze them flat. Once frozen, transfer them to a freezer bag or container. They’ll keep for up to 2 weeks. When ready to serve, thaw at room temperature for 30 minutes. The caramel may become slightly less glossy, but a quick bake at 350°F for 5 minutes will revive the shine.
Best Reheating Method
Reheat the nachos in a preheated oven at 350°F for 5-7 minutes, or until the caramel is warm and slightly bubbly. If you’re in a hurry, use a microwave on medium power for 30-45 seconds, but be careful not to overheat and burn the caramel. Adding a splash of water before reheating helps steam the caramel back to a silky texture. Finish with a quick dusting of cinnamon for a fresh aroma.