Why you'll love this recipe
- 30-minute prep, under an hour total
- Crowd-pleaser that disappears in minutes
- Make-ahead friendly for party planning
- Kid-approved with cheesy, mild flavor
- Restaurant-quality at home without fancy gear
I still remember the first time I plated these mushrooms: the kitchen lights caught the glossy golden tops, and my roommate shouted, “What’s that aroma?” The scent of garlic and toasted breadcrumbs filled the hallway, and we all dove in with eager forks. From that night onward, they became my go‑to for impromptu gatherings, always earning the first round of applause. A few months later, I taught my niece how to carefully scoop out the stems, and she giggled as the caps filled up. Seeing her eyes light up when she tasted the first bite reminded me why simple, well‑executed dishes stay in family tradition.
The story
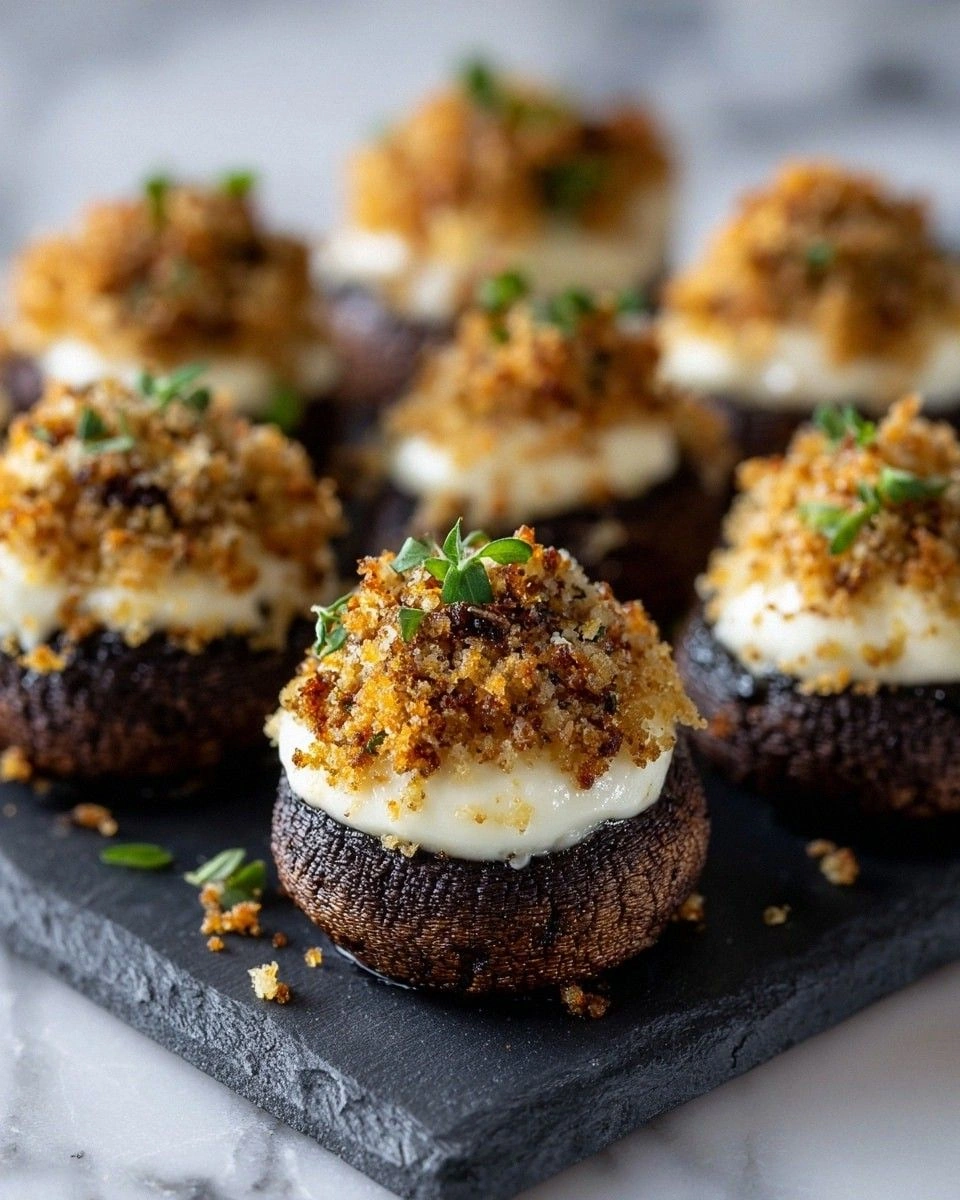
The kitchen fills with the earthy scent of mushroom caps as they roast, their tops turning a buttery golden hue that crackles under a light tap. A quick bite releases a burst of umami, the buttery crumb topping giving way to a tender, juicy interior. You can almost hear the soft sigh of steam escaping each cap.
I first stumbled on this recipe while helping my sister prep for her tiny backyard soirée; she whispered that the mushrooms were her secret weapon. I watched the oven glow, the crumb topping popping, and the guests devouring them before I could even set the table. That night, the stuffed mushrooms became the unofficial star of every gathering in my family.
What sets this version apart is the deliberate toast of the breadcrumbs in olive oil before they ever meet the mushroom stems, creating a deeper crunch and richer flavor than a plain mix. I also keep the stems finely chopped instead of discarding them, turning what’s often waste into a moisture‑rich binder that keeps the filling from drying out.
Each bite balances salty Parmesan, aromatic garlic, and the nutty bite of toasted breadcrumbs against the natural earthiness of the mushroom caps. The contrast between the crisp, golden crown and the soft, savory interior makes every mouthful a textural adventure, while a whisper of pepper adds just the right finish.
These bite‑size wonders shine on a cocktail party platter, paired with a crisp arugula salad or a loaf of crusty sourdough for scooping. They’re also perfect for a quick weeknight starter that feels upscale without the fuss, and you can even prep the filling ahead for stress‑free entertaining.
Don’t let the idea of “stuffed mushrooms” intimidate you; the only technique you need is a good chop and a hot oven. In under 35 minutes you’ll have a restaurant‑quality appetizer that looks and tastes like it belongs on a chef’s table, not just a home kitchen.
I’ve baked these dozens of times—my kids have devoured three caps each, and my grandmother swears the golden crust reminds her of her Italian trattoria. So grab a tray, preheat that oven, and let’s get those caps stuffed and sizzling.
Why This Recipe Works
- Finely chopped stems act as a natural binder, keeping the stuffing moist.
- Breadcrumbs absorb olive oil, creating a crisp, golden crust while preventing soggy caps.
- Baking at 375°F cooks the mushrooms evenly without over‑drying the interior.
Ingredient notes & substitutions
12 large mushrooms
Provides a meaty, umami‑rich vessel that soaks up the stuffing.
1/2 cup breadcrumbs
Creates a crunchy texture and absorbs oil for a golden crust.
1/4 cup grated Parmesan cheese
Adds salty, nutty depth and helps bind the filling.
2 cloves garlic, minced
Imparts aromatic warmth that lifts the mushroom flavor.
2 tablespoons olive oil
Moistens breadcrumbs and helps them brown evenly.
Equipment you'll need
Ingredients
- 12 large mushrooms
- 1/2 cup breadcrumbs
- 1/4 cup grated Parmesan cheese
- 2 cloves garlic, minced
- 2 tablespoons olive oil
- Salt and pepper to taste
Before You Start
- Preheat oven to 375°F (190°C)
- Line baking sheet with parchment paper
- Trim mushroom stems and set aside
- Gather all filling ingredients
- Pat caps dry with paper towel
Instructions
- 1Step 1
Preheat the oven to 375°F (190°C) to ensure it reaches the perfect temperature for baking the mushrooms.
- 2Step 2
Remove the stems from the mushrooms carefully and chop the stems finely. This will be used to add texture and flavor to the stuffing.
- 3Step 3
In a bowl, combine the chopped mushroom stems, breadcrumbs, grated Parmesan cheese, minced garlic, olive oil, salt, and pepper. Mix well until all ingredients are evenly incorporated.
- 4Step 4
Fill each mushroom cap generously with the prepared stuffing mixture, pressing slightly so the filling stays in place. Arrange the stuffed mushrooms on a baking sheet.
- 5Step 5
Place the baking sheet in the preheated oven and bake for 20 minutes, or until the mushrooms are tender and the stuffing is golden brown on top.
- 6Step 6
Remove the mushrooms from the oven and serve hot. Enjoy these flavorful stuffed mushrooms as a delightful appetizer or side dish.
Pro tips
Preheat oven fully
A hot oven ensures the caps bake evenly and the topping crisps quickly.
Toast breadcrumbs first
Sauté breadcrumbs in olive oil until golden for extra crunch.
Finely chop stems
Small pieces blend into the stuffing, preventing gaps.
Pat caps dry
Removing moisture helps the filling stay in place and the tops brown.
Don’t overfill caps
A generous mound is fine, but too much spills and burns.
Use a spoon, not hands
Even portions keep cooking time consistent.
Serve immediately
Mushrooms soften fast; plating hot preserves the crisp topping.
Variations to try
Italian Herb Version
Swap the plain breadcrumbs for Italian‑seasoned crumbs and stir in fresh basil for a Mediterranean twist.
Spicy Cajun Twist
Add a pinch of Cajun seasoning to the stuffing and finish with a dash of hot sauce.
Gluten‑Free Adaptation
Replace breadcrumbs with crushed gluten‑free crackers or almond meal for a safe alternative.
Vegan Swap
Use nutritional yeast instead of Parmesan and olive oil‑toasted oat flour for the crumb base.
Serving Suggestions
Troubleshooting
Filling falls out
Cool caps slightly before serving; the topping will set and stay in place.
Mushrooms dry out
Brush caps with a little olive oil before baking to retain moisture.
Top doesn’t brown
Increase oven temperature by 10‑15°F or broil for the last 2 minutes.
Storage & make-ahead
Refrigerator
Transfer cooled mushrooms to an airtight container; keep for up to 3 days.
Freezer
Freeze in a single layer on a tray, then bag; lasts 2 months. Reheat after thawing in the fridge.
Best way to reheat
Reheat in a preheated 350°F oven for 10‑12 minutes until warmed and the topping re‑crispes.
Make-ahead
Prepare the stuffing and fill caps, cover, and refrigerate up to 12 hours before baking.
Ingredients
- 12 large mushrooms
- 1/2 cup breadcrumbs
- 1/4 cup grated Parmesan cheese
- 2 cloves garlic, minced
- 2 tablespoons olive oil
- Salt and pepper to taste
Instructions
- 1Preheat the oven to 375°F (190°C) to ensure it reaches the perfect temperature for baking the mushrooms.
- 2Remove the stems from the mushrooms carefully and chop the stems finely. This will be used to add texture and flavor to the stuffing.
- 3In a bowl, combine the chopped mushroom stems, breadcrumbs, grated Parmesan cheese, minced garlic, olive oil, salt, and pepper. Mix well until all ingredients are evenly incorporated.
- 4Fill each mushroom cap generously with the prepared stuffing mixture, pressing slightly so the filling stays in place. Arrange the stuffed mushrooms on a baking sheet.
- 5Place the baking sheet in the preheated oven and bake for 20 minutes, or until the mushrooms are tender and the stuffing is golden brown on top.
- 6Remove the mushrooms from the oven and serve hot. Enjoy these flavorful stuffed mushrooms as a delightful appetizer or side dish.