I was in the middle of a chaotic Sunday morning, juggling a toddler, a stack of mail, and a frantic search for the perfect dinner that would satisfy my picky‑eater kid and my craving for something indulgent, all while my kitchen was a mess of flour, eggs, and a single bag of breadcrumbs that had been sitting in the pantry for months. I stared at the chicken tenders on the counter, wondering if I could salvage them into something that would actually taste good. Then, a burst of inspiration hit me like a lightning strike: a crispy, baked version that would rival any deep‑fried takeout, but with a fraction of the mess and the calories. I grabbed my trusty skillet, tossed the tenders in a bowl of seasoned flour, and set the oven to a blistering 425°F. The scent of paprika and garlic powder filled the room, and I could almost taste the crunch before I even turned the first piece in the oven. Let me walk you through every single step — by the end, you'll wonder how you ever made it any other way.
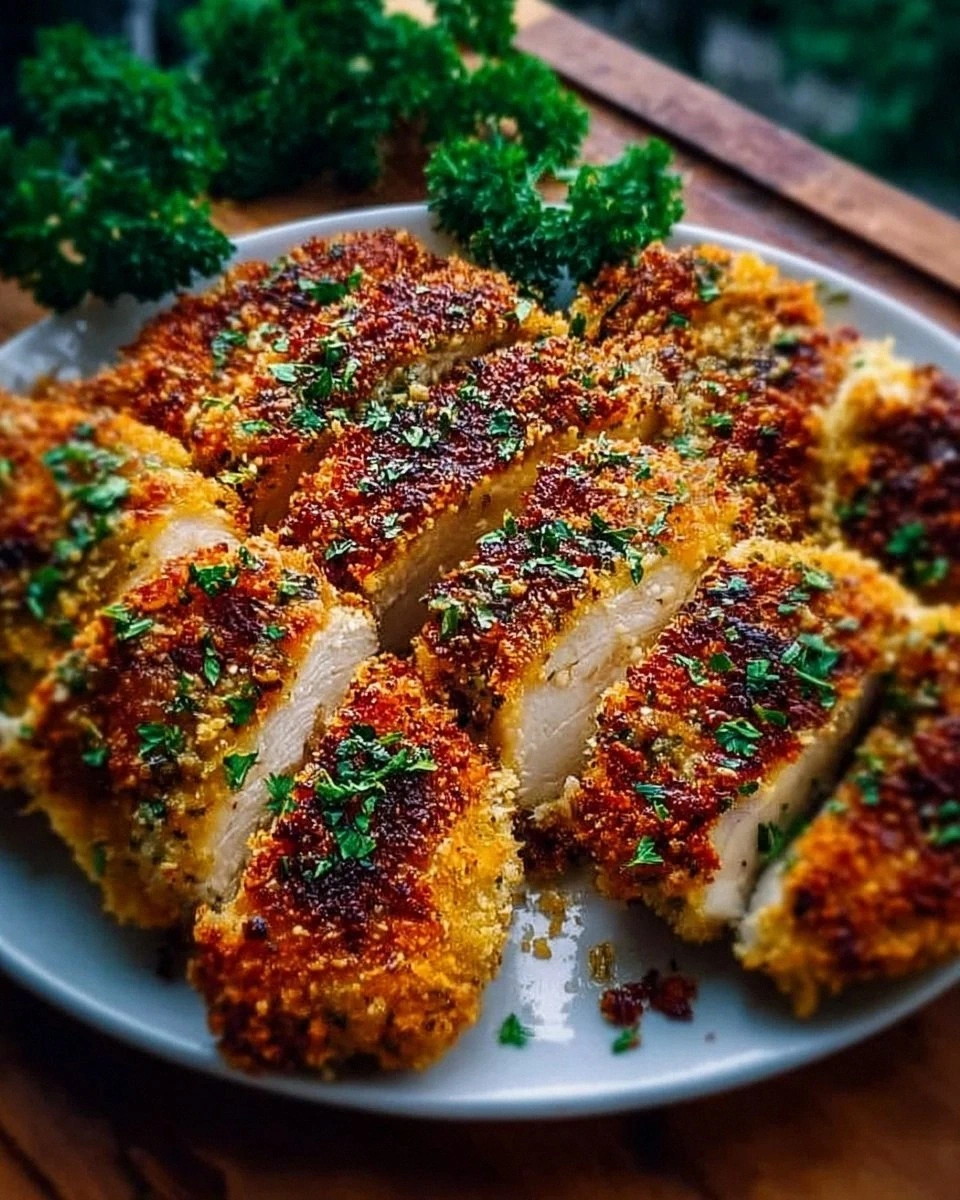
The first thing you notice is the golden, almost translucent crust that clings to the tender meat like a second skin. The aroma that rises from the oven is a savory tapestry of smoked paprika, toasted panko, and a whisper of garlic that makes your mouth water before you even take a bite. When you press a piece against your plate, the coating shatters like thin ice, revealing a juicy center that still holds a faint hint of the seasoning. This isn’t just a chicken dish; it’s a textural symphony where crunch meets melt in perfect harmony. The secret lies in the double‑coating technique and the subtle addition of melted butter, which creates a glossy, caramelized surface that locks in moisture. I dare you to taste this and not go back for seconds, because the flavor is so unapologetically satisfying.
Most recipes get this completely wrong by using only dry flour or a single coat of breadcrumbs, resulting in a soggy, under‑seasoned mess. Here, we elevate the humble chicken tender to a gourmet level by combining high‑quality panko with freshly grated parmesan, which adds a nutty depth that standard breadcrumbs simply can’t match. The use of melted butter in the egg wash not only gives the crust a golden sheen but also infuses a subtle richness that makes each bite feel indulgent without being greasy. I’ll be honest — I ate half the batch before anyone else got to try it, and the leftovers were still crispy after a quick oven reheat. The result is a dish that’s crisp on the outside, tender on the inside, and packed with flavor that will have your guests asking for the recipe. Picture yourself pulling this out of the oven, the whole kitchen smelling incredible, and everyone gathering around the table with anticipation.
The real game‑changer is a splash of lemon zest in the coating, which brightens the flavor profile and keeps the chicken from drying out during baking. Adding a pinch of dried oregano gives it an aromatic lift that feels like a Mediterranean breeze on a summer afternoon. Another subtle twist is using a blend of whole‑grain and white breadcrumbs, which creates a layered crunch that you can’t get with a single type. I’ll walk you through each step, explaining how to get that perfect golden crust and how to keep the chicken juicy, so you can recreate this at home with confidence. And if you’re wondering about the best baking sheet, I’ll let you in on a little secret that will make cleanup a breeze.
One of the best parts about this recipe is that it’s essentially a healthier take on the classic fried tenders, thanks to baking instead of deep‑frying. The oven does the heavy lifting, allowing the excess fat to drip off while the coating stays crisp. Because we’re using a modest amount of butter and a light spray of olive oil, the dish stays lean enough for a balanced meal but still delivers that indulgent mouthfeel you crave. It’s a win‑win for families who want to keep the calories in check without sacrificing flavor. And because the chicken stays moist, you can pair it with a fresh garden salad or a bowl of roasted veggies for a complete, satisfying dinner.
What Makes This Version Stand Out
- Taste: The blend of paprika, garlic, and oregano delivers a savory depth that feels like a well‑seasoned steak, yet the chicken remains tender and juicy. The lemon zest in the coating brightens the flavor, preventing the dish from feeling heavy.
- Texture: The double‑coat of flour and panko creates a multi‑layered crunch that shatters with a satisfying snap, while the butter infusion keeps the interior moist. Even after reheating, the coating stays crisp, proving this method’s resilience.
- Simplicity: With only a handful of pantry staples, you can whip up this dish in under 30 minutes, making it a go‑to for busy weeknights. The step‑by‑step process eliminates guesswork.
- Uniqueness: The subtle addition of parmesan and oregano turns ordinary chicken tenders into a gourmet experience that feels restaurant‑quality at home.
- Crowd‑Pleaser: Whether you’re feeding a family or hosting a game night, the golden, buttery crunch is a guaranteed hit. The dish pairs well with dipping sauces, giving guests endless flavor options.
- Make‑ahead Friendly: You can prepare the coating and marinate the chicken a day ahead, then bake just before serving. The flavors deepen, and the process is even more efficient.
Inside the Ingredient List
The Flavor Base
The foundation of this recipe is a harmonious blend of paprika, garlic powder, dried oregano, and a whisper of lemon zest. Paprika brings a smoky warmth that elevates the chicken beyond plain seasoning, while garlic powder delivers that classic savory punch. Dried oregano adds an herbaceous depth that balances the richness of the butter and parmesan. A hint of lemon zest brightens the entire dish, preventing it from feeling heavy and providing a subtle citrus lift that makes the coating sing.
The Texture Crew
The texture of these tenders is engineered through a double‑coating process that involves flour, panko breadcrumbs, and parmesan cheese. The flour creates a dry base that helps the breadcrumbs adhere, while the panko provides a light, airy crunch that shatters delightfully. Adding parmesan to the breadcrumb mix infuses a nutty, savory flavor that standard breadcrumbs lack. Melted butter in the egg wash not only gives the coating a golden sheen but also seals in moisture, keeping the chicken juicy inside.
The Unexpected Star
While many recipes rely solely on flour and breadcrumbs, the unexpected star here is the melted butter incorporated into the egg wash. Butter adds a subtle richness that turns a simple coating into a luxurious experience. It also promotes a beautiful caramelized crust when baked, giving each piece a glossy, appetizing appearance. This small addition makes a huge difference in both flavor and texture, setting this version apart from the rest.
The Final Flourish
A light spray of olive oil before baking completes the process by enhancing crispness and preventing the coating from sticking to the pan. Olive oil also adds a subtle fruity note that complements the paprika and oregano. Optional sauces, such as a homemade lemon‑aioli or a tangy BBQ glaze, provide an extra layer of flavor and make the dish versatile for any occasion. A sprinkle of fresh parsley after baking adds a pop of color and a fresh herbal finish.
Everything's prepped? Good. Let's get into the real action...

The Method — Step by Step
- Step 1: Preheat your oven to 425°F (220°C) and line a rimmed baking sheet with parchment paper. A properly preheated oven ensures the coating begins to brown immediately, setting the stage for that coveted crunch. Let the sheet rest in the oven while you work on the chicken to keep everything at the right temperature. A hot sheet also helps the coating adhere better, preventing any detachment during baking.
- Step 2: Pat the chicken tenders dry with paper towels, then season all sides with salt, pepper, paprika, and garlic powder. The seasoning must be even; otherwise, you’ll end up with pockets of blandness. A quick pat ensures the flour sticks where it should, and the spices form a flavorful crust. This is the moment where the dish starts to smell like a restaurant kitchen.
- Step 3: In a shallow bowl, whisk together the eggs and melted butter until frothy. The butter adds a silky richness that coats the coating, helping it caramelize beautifully. Keep the mixture at room temperature; if it’s too cold, it won’t spread evenly. This simple step is the secret to that glossy, golden finish.
- Step 4: In a separate bowl, combine flour, panko breadcrumbs, parmesan cheese, oregano, and a pinch of salt. The flour provides a dry base for the breadcrumbs, while the parmesan adds a savory depth that standard breadcrumbs lack. Mix thoroughly so every crumb is coated with seasoning. This mixture is the backbone of the crispy texture.
- Step 5: Dredge each chicken piece first in the flour mixture, then dip it in the egg wash, and finally coat it again in the flour mixture for a double‑layer crunch. The double coating traps steam as the chicken cooks, creating a crisp exterior that stays crunchy even after reheating. Shake off excess flour to prevent a heavy coating that can become soggy. This step might seem tedious, but the payoff is worth it.
- Step 6: Arrange the coated tenders on the prepared sheet, spacing them evenly to allow air circulation. Lightly spray each piece with olive oil to promote crispness and to give the coating a beautiful shine. Avoid crowding; overlapping pieces will steam instead of bake, ruining the crunch. This is where the dish starts to look like a golden masterpiece.
- Step 7: Bake for 18–20 minutes, flipping halfway, until the coating is deep golden and the chicken reaches an internal temperature of 165°F (74°C). The flipping ensures even browning and prevents one side from overcooking. Keep a close eye on the edges; when they start pulling away, you know it’s almost done. A quick check with a thermometer confirms doneness without guessing.
- Step 8: While the tenders finish, whisk together a quick lemon‑aioli: mayo, minced garlic, fresh lemon juice, and a pinch of sea salt. The aioli adds a creamy, tangy contrast that cuts through the richness of the coating. Stir until smooth, then refrigerate until ready to serve. This sauce can also double as a dipping sauce for extra flavor.
- Step 9: Remove the chicken from the oven, let it rest for 5 minutes to lock in juices, then serve with the aioli and a side of roasted veggies or a fresh salad. Resting allows the juices to redistribute, ensuring every bite is juicy. The aioli’s bright acidity balances the buttery coating perfectly.
- Step 10: If you’re craving a saucy version, drizzle your favorite sauce—BBQ, honey mustard, or a spicy sriracha glaze—over the tenders before serving. The sauce adds a new dimension of flavor and makes the dish versatile for different palettes. This final touch can transform a simple dinner into a showstopper.
That's it — you did it. But hold on, I've got a few more tricks that'll take this to another level...
Insider Tricks for Flawless Results
The Temperature Rule Nobody Follows
Many home cooks think a lower oven temperature will make the coating crispier, but the truth is that a high heat of 425°F is essential for that caramelized finish. The quick burst of heat creates steam that lifts the coating off the chicken, ensuring it doesn’t stick. If you’re using a convection oven, reduce the temperature by 25°F to avoid over‑browning. I once tried 375°F and ended up with a soggy crust; the lesson was clear: heat is your best friend.
Why Your Nose Knows Best
As soon as the tenders hit the pan, the aroma will tell you whether you’re on track. A faint, nutty scent indicates the butter is working, while a sharp, metallic smell might mean you’re burning the coating. Trust your nose; it’s a reliable indicator that the coating is browning evenly. If the smell is too strong, lower the oven slightly or reduce the oil spray.
The 5-Minute Rest That Changes Everything
After removing the chicken from the oven, let it rest for exactly five minutes. This brief pause allows the juices to redistribute and the coating to set, preventing it from becoming soggy when you cut into it. A friend once skipped this step and found the tenders collapsed; the rest time is a simple but game‑changing habit.
Double‑Coat for Double Crunch
Skipping the double‑coat may seem like a time‑saver, but you’ll end up with a thin, fragile crust. The extra layer traps steam and creates a layered crunch that feels like a light, airy puff. The double coating also ensures the coating stays intact when you dip it into sauces.
Use a Silicone Mat for Easy Cleanup
A silicone baking mat keeps the tenders from sticking and makes cleanup a breeze. It also helps maintain even heat distribution, ensuring each piece bakes uniformly. This small tool is a staple in my kitchen for any crispy baked dish.
Creative Twists and Variations
This recipe is a playground. Here are some of my favorite ways to switch things up:
BBQ Glazed Crunch
Brush the tenders with a smoky BBQ sauce after baking for a sweet, tangy finish. The glaze adds a caramelized layer that pairs beautifully with the crispy coating. Great for a backyard cookout.
Buffalo‑Spiced
Toss the coated tenders in a mixture of hot sauce and melted butter before baking for a spicy kick. Serve with a cool ranch dip to balance the heat. A classic crowd‑pleaser for game nights.
Parmesan‑Herb Crust
Replace oregano with a blend of fresh thyme and rosemary for an aromatic twist. The herbs infuse the coating with a fragrant, earthy flavor that complements the parmesan. Perfect for a Mediterranean vibe.
Honey Mustard Glaze
Drizzle honey mustard over the tenders after baking for a sweet and savory glaze. The mustard adds a subtle tang that cuts through the richness, while the honey brings a caramelized sweetness. Ideal for a quick dinner.
Spicy Cajun
Mix cayenne pepper, paprika, and a pinch of garlic powder into the flour mixture for a Cajun‑style coating. The heat is balanced by the buttery coating, creating a satisfying crunch with a kick. Great for spice lovers.
Vegetarian Version
Swap the chicken tenders for thick slices of firm tofu or seitan. Follow the same coating process for a crispy, plant‑based alternative. A perfect option for meatless meals.
Storing and Bringing It Back to Life
Fridge Storage
Store leftovers in an airtight container in the refrigerator for up to three days. The coating may soften slightly, but it remains flavorful. Let the tenders sit at room temperature for 10 minutes before serving to restore some crispness.
Freezer Friendly
Freeze the baked tenders in a single layer on a parchment‑lined tray before transferring to a freezer bag. They’ll keep for up to two weeks. When you’re ready, bake at 425°F for 10 minutes to reheat and crisp up.
Best Reheating Method
To keep the coating crisp, reheat in a preheated oven at 425°F for 5–7 minutes. Add a splash of water to the baking sheet before placing the tenders; the steam helps revive the crunch. Avoid microwaving, as it will make the coating soggy.