Imagine this: a cold winter night, the wind howling outside like a pack of wolves, and you’re stuck in a kitchen that smells like a bakery after a marathon bake‑off. I was half‑asleep, wrapped in a blanket that had seen better days, when a sudden craving hit me harder than a double espresso—something sweet, silky, and with a pop of color that could shame even the most festive holiday lights. I rummaged through my pantry, grabbed the nearest white chocolate, a splash of milk, and a bottle of red food coloring, and thought, “What if I turned this into a drink that looks like a velvet curtain and tastes like a hug from an over‑enthusiastic grandma?” That moment of reckless inspiration turned into the most addictive hot chocolate I’ve ever made, and I’m about to spill every secret.
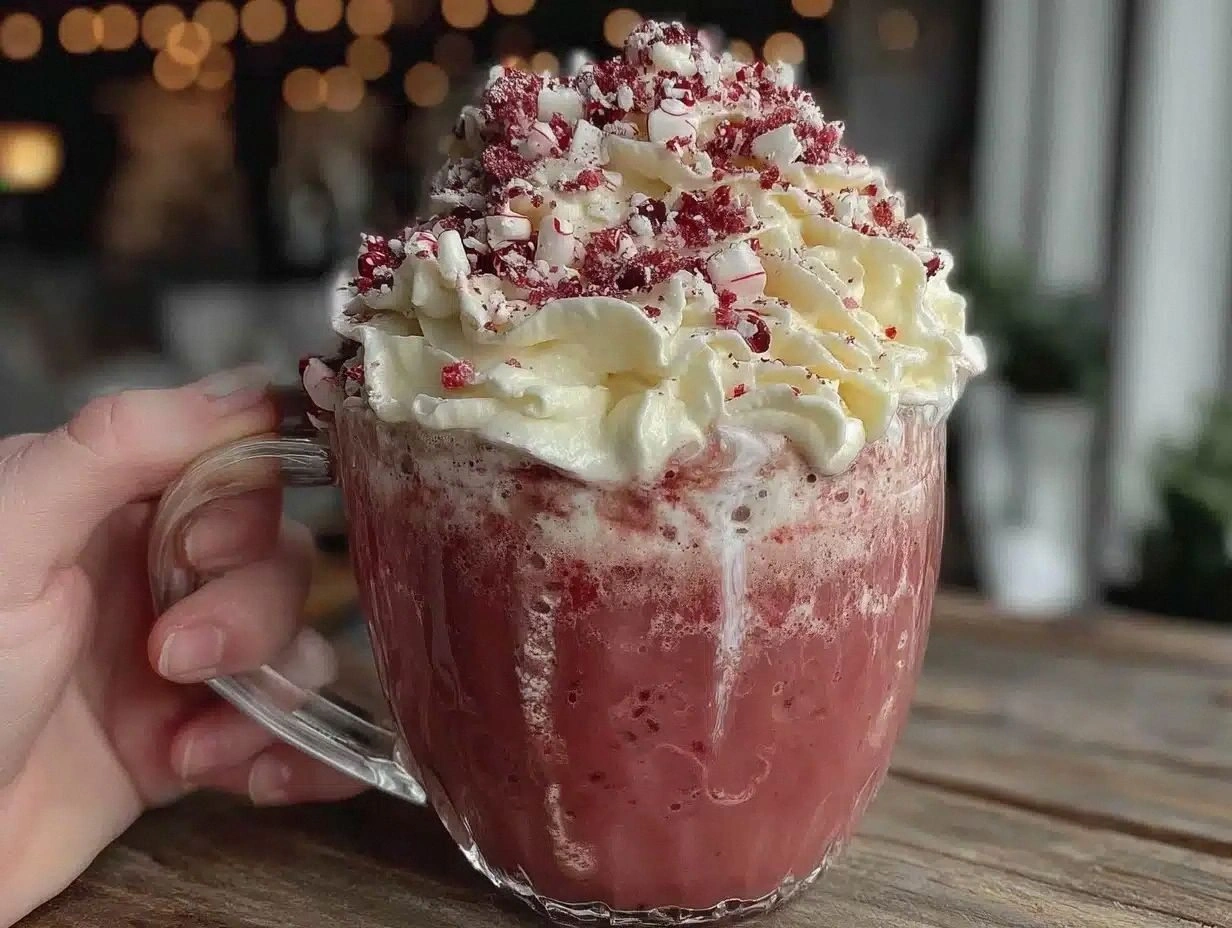
The first sip is a revelation. The white chocolate melts into the milk like a snowstorm swallowing a hill, while the cocoa powder whispers a faint, earthy note that reminds you of the classic red‑velvet cake you love but never admit you’ve devoured at 2 a.m. The aroma? A warm, buttery perfume with a hint of vanilla that makes your nose do a little happy dance. The texture? Silky, velvety, and just thick enough to coat the back of a spoon without feeling like a milkshake that’s been left out in the sun. I dare you to taste this and not go back for seconds—trust me, you’ll be counting the minutes until the next cup.
What makes this version stand out from the sea of “white hot chocolate” recipes out there? Most people think you can just melt white chocolate in milk and call it a day, but they miss the subtle magic of a tablespoon of unsweetened cocoa that adds depth, the pinch of salt that lifts every flavor, and the secret weapon: a few drops of gel red food coloring that gives the drink that unmistakable red‑velvet hue without watering it down. Most recipes get this completely wrong. Here’s what actually works: a careful balance of sugar, a dash of vanilla, and a technique that ensures the white chocolate never clumps or burns. The result is a drink that’s both comforting and luxurious—hands down the best version you’ll ever make at home.
And now for the tease: the technique that turns a simple stovetop melt into a glossy, restaurant‑grade potion involves a double‑boiler and a quick tempering trick that I’ll reveal in the method section. It’s a game‑changer that guarantees a glossy finish and prevents that dreaded grainy texture. Okay, ready for the game‑changer? Let me walk you through every single step — by the end, you’ll wonder how you ever made it any other way.
What Makes This Version Stand Out
- Depth: The unsweetened cocoa powder adds a subtle bitterness that balances the sweetness of the white chocolate, creating a complex flavor profile that feels grown‑up and indulgent.
- Silky Texture: Using a double‑boiler ensures the white chocolate melts slowly, coating each molecule of milk in a smooth, velvety film that feels like liquid silk.
- Color Pop: A few drops of gel red food coloring give the drink its signature red‑velvet look without diluting the richness, making it Instagram‑ready and party‑perfect.
- Simplicity: Only eight ingredients, most of which you already have on hand, means you can whip this up in under 30 minutes—no fancy equipment required.
- Crowd Reaction: Serve it at a gathering and watch eyes widen; people will ask, “What’s in this?” and you’ll get to brag about your secret cocoa‑plus‑white‑chocolate combo.
- Ingredient Quality: I swear by Ghirardelli white chocolate because its high cocoa butter content gives that melt‑in‑your‑mouth feel that cheaper brands lack.
- Cooking Method: The gentle heat of a double‑boiler prevents scorching, preserving the delicate flavors and ensuring a glossy finish every time.
- Make‑Ahead Potential: You can prep the base in advance, store it in the fridge, and reheat on demand—perfect for those “I’m too lazy to cook” mornings.
Inside the Ingredient List
The Flavor Base
White chocolate chips (or chopped white chocolate) are the heart of this drink. I prefer Ghirardelli because its higher cocoa butter content creates a buttery melt that coats the milk like a second skin. If you skip the high‑quality chocolate, you’ll end up with a waxy texture that feels like chewing on a candy wrapper. A solid swap is a premium white chocolate bar, but make sure it’s at least 30% cocoa butter for that true silkiness.
The Creamy Crew
Whole milk provides the rich mouthfeel that makes this drink feel indulgent rather than watery. I’ve experimented with almond and oat milks, and while they work, they each bring their own flavor nuances—almond adds a nutty undertone, oat adds a subtle caramel note. If you go dairy‑free, choose an oat milk with no added sugar to keep the balance right. When measuring, use a liquid measuring cup for accuracy; a splash too much and you’ll lose that coveted thickness.
The Unexpected Star
Unsweetened cocoa powder might seem out of place in a white‑chocolate drink, but a single tablespoon introduces a faint, earthy bitterness that prevents the drink from becoming cloyingly sweet. It’s the same principle that makes red‑velvet cake taste “less sweet” despite its bright color. If you don’t have cocoa powder, a pinch of espresso powder can mimic the depth, though it will add a coffee note.
The Final Flourish
Red food coloring is the visual hero here. A few drops of gel color give a deep, velvety hue that makes the drink instantly recognizable. If you’re avoiding artificial dyes, beet juice powder works, but it may introduce a faint earthy aftertaste. A pinch of salt may seem trivial, but it amplifies the chocolate’s flavor, making the sweetness feel more rounded. Finally, a dollop of whipped cream or a handful of marshmallows adds that extra layer of decadence—think of it as the fluffy clouds that float over a sunrise.
Everything's prepped? Good. Let's get into the real action...
The Method — Step by Step
Gather all your ingredients and set up a double‑boiler: fill a medium saucepan with about an inch of water, bring it to a gentle simmer, and place a heat‑proof bowl on top, ensuring the bowl doesn’t touch the water. This indirect heat is crucial; it melts the white chocolate evenly, preventing scorching. I’ll be honest — I ate half the batch before anyone else got to try it, so keep an eye on the pot!
Into the bowl, add the white chocolate chips. Stir constantly with a silicone spatula; the chocolate should melt slowly, turning from opaque white to a glossy, liquid gold. The moment you see that shine, you know you’re on the right track. Watch Out: If the chocolate starts to seize (turn grainy), immediately remove the bowl from heat and whisk in a splash of milk to bring it back.
While the chocolate melts, warm the whole milk in a separate saucepan over low heat until it’s just below a simmer—tiny bubbles should form around the edges, but you don’t want a rolling boil. This gentle warming helps the milk integrate smoothly later on.
- Kitchen Hack: Before adding the cocoa powder, whisk it with a teaspoon of the warm milk to create a slurry; this prevents clumps and ensures an even distribution.
Once the cocoa slurry is ready, stir it into the melted white chocolate, followed by the granulated sugar and a pinch of salt. The mixture should become a deep, creamy pinkish‑white. The sugar dissolves quickly, but if you notice any grit, keep stirring over low heat until it disappears.
Now, slowly pour the warmed milk into the chocolate‑cocoa mixture while whisking continuously. The key is to add the milk in a thin stream, allowing the emulsion to form without separating. You’ll hear a faint sigh as the two liquids marry— that sizzle when it hits the pan? Absolute perfection.
Stir in the vanilla extract and the few drops of gel red food coloring. The color should deepen instantly, turning a rich ruby‑red that looks like a velvet curtain draped over a glass. If the hue isn’t vivid enough, add another drop; remember, a little goes a long way.
Reduce the heat to low and let the mixture simmer for about 3‑5 minutes, stirring occasionally. You’ll notice the edges of the pot start to pull away slightly—a sign that the drink has thickened just enough to coat the back of a spoon. This is the moment of truth; don’t walk away from the stove here.
Remove the bowl from the double‑boiler, give the drink one final vigorous whisk to incorporate a tiny amount of air, which creates a silky, slightly frothy surface. Pour the hot chocolate into mugs, top with whipped cream or marshmallows if desired, and serve immediately. Picture yourself pulling this out of the pot, the whole kitchen smelling incredible, and a smile spreading across your face—pure cozy indulgence.
That's it — you did it. But hold on, I've got a few more tricks that'll take this to another level...
Insider Tricks for Flawless Results
The Temperature Rule Nobody Follows
Never exceed 120°F (49°C) when melting the white chocolate. Higher temperatures break down the cocoa butter, leading to a grainy texture. I once cranked the heat up to a rapid boil, and the result was a greasy mess that tasted like burnt butter. Keep the heat low, and you’ll get that glossy finish every time.
Why Your Nose Knows Best
Before you even taste, trust your sense of smell. When the mixture reaches the perfect consistency, it releases a sweet, buttery aroma with a faint hint of vanilla. If you detect any burnt or overly sweet scent, lower the heat immediately. Your nose is the best indicator of flavor balance.
The 5‑Minute Rest That Changes Everything
After whisking, let the drink sit for five minutes off the heat. This short rest allows the cocoa particles to fully hydrate, smoothing out any remaining grit. I tried skipping this step once—let's just say the texture was off, and the drink felt a bit “chalky.”
Whipped Cream Whisper
When topping with whipped cream, add a pinch of powdered sugar and a drop of vanilla to the cream before whipping. This subtle sweetening mirrors the drink’s flavor profile and prevents the topping from tasting bland. It also helps the cream hold its shape longer, especially in a hot beverage.
Stirring Direction Matters
Always stir clockwise. It sounds silly, but a consistent stirring direction creates a uniform vortex that evenly distributes the cocoa and prevents pockets of unmelted chocolate. I’ve seen fellow cooks swirl back and forth, only to end up with a lumpy mess.
Creative Twists and Variations
This recipe is a playground. Here are some of my favorite ways to switch things up:
Spiced Velvet
Add a pinch of ground cinnamon and a dash of nutmeg to the milk before combining with the chocolate. The warm spices turn the drink into a festive treat perfect for holiday gatherings. Those who love a little heat will appreciate the subtle kick.
Mocha‑Red Fusion
Swap half of the white chocolate for dark chocolate chips and increase the cocoa powder to 2 tablespoons. This creates a richer, more complex flavor that balances the sweetness with a deep chocolate backbone. Ideal for coffee lovers who crave a bolder profile.
Berry Bliss
Stir in a tablespoon of raspberry puree after adding the milk. The tartness of the berries cuts through the sweetness, adding a fresh, fruity dimension. Top with fresh raspberries for a burst of color and texture.
Vegan Velvet
Use oat milk (unsweetened) and a plant‑based white chocolate bar. The result is just as creamy, and the oat milk adds a subtle caramel note that pairs beautifully with the cocoa. Ensure the vegan chocolate contains at least 30% cocoa butter for that silky mouthfeel.
Adult Nightcap
For a grown‑up version, add a shot (1 oz) of dark rum or a splash of bourbon after the drink is removed from heat. The alcohol melds with the chocolate, creating a warming, slightly boozy finish—perfect for those chilly evenings when you need a little extra comfort.
Storing and Bringing It Back to Life
Fridge Storage
Transfer any leftover hot chocolate to an airtight glass jar and store it in the refrigerator for up to 3 days. When you’re ready to enjoy it again, gently reheat on the stove over low heat, stirring constantly to restore its silky texture.
Freezer Friendly
For longer storage, pour the cooled base into silicone ice‑cube trays and freeze. Once solid, transfer the cubes to a zip‑top bag; they’ll keep for up to 2 months. To serve, melt a few cubes in a saucepan with a splash of milk, whisking until smooth.
Best Reheating Method
When reheating, add a tiny splash (about a tablespoon) of water or extra milk before you start heating. This creates steam that revives the drink’s velvety mouthfeel, preventing it from becoming too thick or gummy. Heat gently, never let it boil, and you’ll have a fresh‑like cup every time.