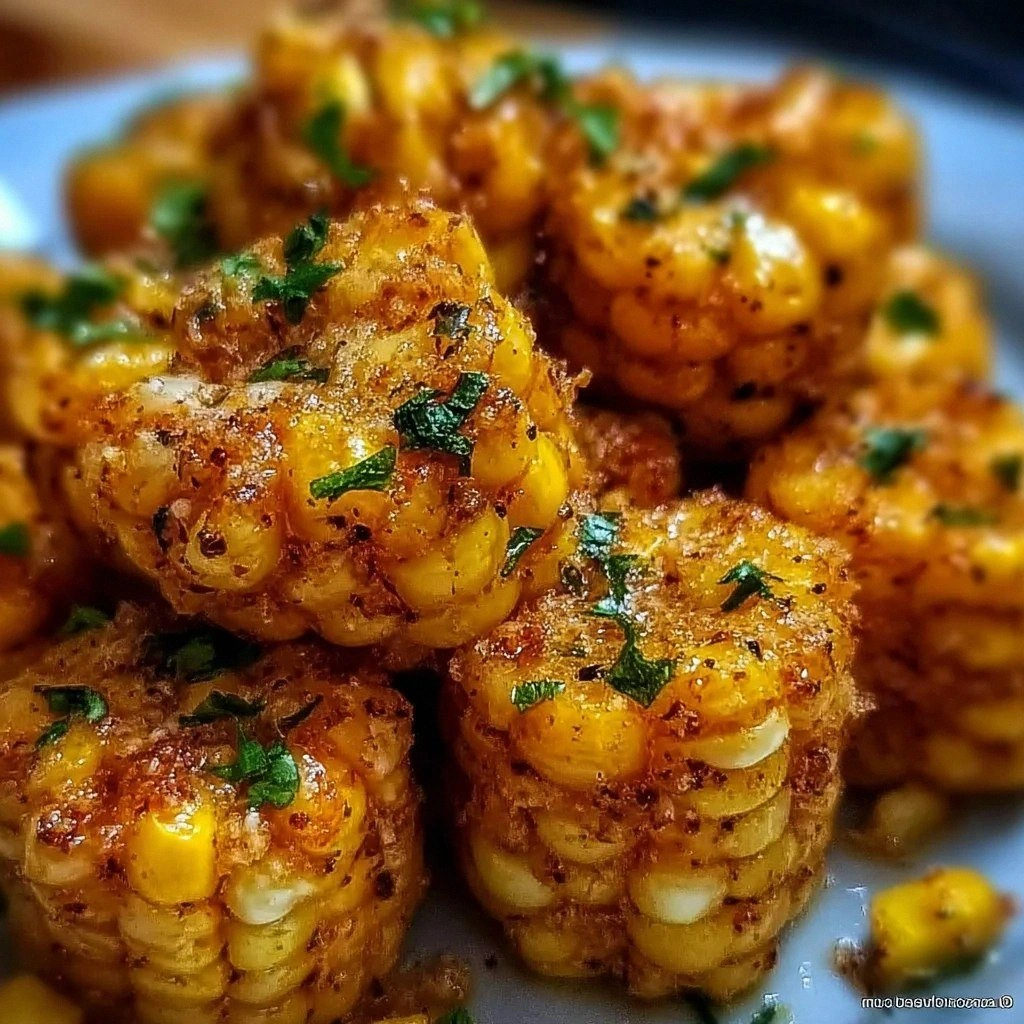
I’ll be honest — I ate half the batch before anyone else got a chance to try it. It all started on a lazy Saturday when my roommate dared me to turn a boring bowl of frozen corn into something that would make us both forget about the pizza we were supposed to order. I tossed the kernels into a pan, added a splash of oil, and the kitchen filled with a scent that reminded me of a bustling Mexican street market. The moment the first bite hit my tongue, I felt a fireworks display of sweet, smoky, and spicy flavors that made me swear I’d never settle for plain corn again. This is hands down the best version you’ll ever make at home, and I’m about to spill every secret.
Picture yourself pulling a tray of golden‑brown bites out of the skillet, the whole kitchen smelling like a fiesta in a skillet. The edges are crisp enough to crack like thin ice, while the interior stays buttery soft, cradling melted cheddar that stretches with each bite. You’ll hear the satisfying sizzle as they hit the oil, a sound that says “we’re about to get delicious.” I dare you to taste this and not go back for seconds, because the combination of sweet corn and a punch of jalapeño will have you reaching for the serving bowl again and again. The secret? A simple coating technique that locks in moisture and creates a crunchy shell you’ll want to brag about at every gathering.
Most recipes get this completely wrong. They either drown the corn in batter, turning it into a soggy mess, or they skip the cheese, missing that creamy heart that ties everything together. I’ve tried them all— from deep‑fried corn fritters that fell apart, to baked versions that never achieved that satisfying crunch. After countless trial‑and‑error sessions, I discovered that a quick flash‑fry followed by a brief rest in the oven gives you that perfect texture contrast. This next part? Pure magic. It’s a technique that sounds fancy but is actually just a smart use of temperature and timing.
Okay, ready for the game‑changer? We’re going to blend fresh corn with a whisper of cumin, a dash of chili powder, and a generous handful of shredded cheddar, then roll the mixture in a flour‑egg‑breadcrumb combo that creates a coating so crisp it sings. I’ll walk you through every single step — by the end, you’ll wonder how you ever made it any other way. Stay with me here — this is worth it.
What Makes This Version Stand Out
- Flavor Explosion: The blend of sweet corn, sharp cheddar, and jalapeño creates a layered taste that hits sweet, salty, and spicy all at once, keeping your palate entertained from the first bite to the last.
- Crispy Coat: By using a double‑dip method (flour‑egg‑breadcrumbs) you get a shell that crunches like fresh tortilla chips while the inside stays tender and juicy.
- Simple Ingredients: Every component is pantry‑friendly; you don’t need exotic spices or hard‑to‑find cheeses, just good quality corn and a handful of basics.
- Quick Turnaround: From prep to plate it’s under an hour, making it perfect for last‑minute parties or a spontaneous snack craving.
- Versatile Crowd‑Pleaser: Whether you’re feeding kids who love cheese or adults who crave heat, you can dial the jalapeño up or down without breaking the recipe.
- Make‑Ahead Friendly: You can prep the mixture and shape the bites ahead of time, then fry them when guests arrive, keeping the kitchen stress low.
- Customizable Crunch: Swap regular breadcrumbs for panko for extra lightness, or add a pinch of smoked paprika for a deeper smoky note.
- Low‑Mess Cleanup: Because we shallow‑fry in a single skillet and finish in the oven, there’s less oil splatter and fewer dishes than a deep‑fried batch.
Inside the Ingredient List
The Flavor Base
Sweet Corn Kernels are the star of the show. Fresh, frozen, or canned—if you choose canned, make sure to drain them well, because excess liquid will make the mixture soggy. The natural sugars in the corn caramelize during the quick fry, delivering that unmistakable golden sweetness. If you skip the corn, you lose the core identity of this snack, turning it into a generic cheese ball.
Diced Jalapeño brings the heat that makes this snack unforgettable. Seed and mince them first for a controlled burn; remember, the seeds carry most of the capsaicin, so adjust to your tolerance. Adding jalapeño at the mixing stage distributes the spice evenly, ensuring each bite has a subtle kick. If you’re feeling adventurous, try serrano or habanero for a different heat profile.
Shredded Cheddar Cheese adds creaminess and a sharp, tangy flavor that balances the corn’s sweetness. Use a good melting cheddar; pre‑shredded varieties often contain anti‑caking agents that can affect texture. The cheese melts into the interior, creating a gooey core that pulls away like a cheesy ribbon when you bite. For a twist, swap half the cheddar with pepper jack for an extra layer of spice.
The Texture Crew
All-Purpose Flour is the silent binder that holds everything together without making the mixture gummy. It creates a light, cohesive dough that can be shaped into bite‑size nuggets. If you’re looking for a gluten‑free version, opt for a gluten‑free flour blend; just be aware that some blends can add a slightly grainy texture.
Eggs act as a binding agent, ensuring your bites hold their shape during frying. Large eggs work best because they provide enough liquid and protein to coat the corn and cheese mixture evenly. Be careful not to over‑beat; a gentle whisk is enough to incorporate air without making the mixture too fluffy.
Breadcrumbs deliver the crunch that shatters like thin ice when you bite into the snack. Traditional breadcrumbs give a denser crust, while panko creates a lighter, airier crunch. Toast the breadcrumbs lightly in a dry pan for extra flavor before using them in the coating.
The Unexpected Star
Chopped Red Onion adds a sweet‑sharp bite that cuts through the richness of the cheese and oil. Its mild pungency deepens the overall flavor profile without overwhelming the corn’s natural sweetness. If you’re not a fan of raw onion, you can lightly sauté the chopped pieces before mixing them in.
Chopped Cilantro brings a fresh, aromatic lift that brightens the entire dish. The herb’s citrusy notes balance the earthiness of cumin and the heat of jalapeño. If cilantro isn’t your thing, parsley works as a good substitute, though you’ll lose some of that characteristic Mexican flair.
The Final Flourish
Ground Cumin adds an earthy warmth that perfectly complements the sweet corn, creating a subtle depth that you’ll notice after the first bite. A little goes a long way; too much can dominate the flavor, so stick to a single teaspoon for four servings.
Chili Powder brings a rich color and a hint of smokiness that elevates the snack from ordinary to extraordinary. It also adds a gentle heat that works hand‑in‑hand with the jalapeño. If you prefer a milder flavor, use half the amount and boost the cumin instead.
Garlic Powder offers a savory backbone that ties all the spices together. Fresh garlic can be used for a more pronounced bite, but be cautious—raw garlic can become bitter if overcooked. A teaspoon of garlic powder is enough to round out the flavor without stealing the spotlight.
Salt and Black Pepper are essential for sharpening every other flavor. Season to taste, but a baseline of one teaspoon salt and half a teaspoon freshly cracked black pepper works well for the default batch. Remember, you can always add more later, but you can’t take it out.
Vegetable Oil is the frying medium that carries the heat and creates that coveted golden crust. Canola, peanut, or even light olive oil work, but choose an oil with a high smoke point to avoid bitterness. For a healthier twist, try air‑frying at 400°F for 12‑15 minutes, turning halfway through.
Everything's prepped? Good. Let's get into the real action…
The Method — Step by Step
- Gather all your ingredients and set up a mise en place station. Measure 2 cups of sweet corn kernels, 1 cup of all‑purpose flour, 2 large eggs, 1 cup breadcrumbs, 1 cup shredded cheddar, 2 tbsp diced jalapeño, ¼ cup chopped red onion, 2 tbsp chopped cilantro, 1 tsp ground cumin, 1 tsp chili powder, 1 tsp garlic powder, and a pinch of salt and black pepper. Having everything within arm’s reach saves you from frantic pantry dives later on. Kitchen Hack: Use a large zip‑top bag for the mixing step; you can shake everything together and then easily scoop out the mixture for shaping.
- In a large mixing bowl, combine the corn kernels, shredded cheddar, diced jalapeño, chopped red onion, cilantro, cumin, chili powder, garlic powder, and the pinch of salt and pepper. Toss everything gently until the cheese is evenly distributed and the spices coat the corn. The mixture should look vibrant, with flecks of red onion and green cilantro peeking through the yellow corn. Pro tip: If the mixture feels too dry, add a splash of milk or water—just enough to bring it together without making it soggy.
- Create a flour‑egg‑breadcrumb station. In a shallow dish, place 1 cup of flour. In a second dish, beat the 2 eggs with a pinch of salt. In a third dish, spread out the breadcrumbs. This three‑step coating is the secret to that perfect crunch. Watch Out: Do not over‑coat the bites; a thin dusting of flour, followed by a full egg wash, and a light breadcrumb layer is all you need. Too much breadcrumb can create a gummy interior.
- Take about a tablespoon of the corn mixture and roll it between your palms to form a compact ball. Press gently to flatten it into a disc about ½ inch thick. This size ensures a crispy exterior while keeping the interior moist. Place the formed disc onto a plate lined with parchment paper. Repeat until the mixture is exhausted; you should have roughly 20‑24 bites.
- Coat each bite: first, lightly dust the disc in flour, shaking off any excess. Then dip it into the beaten egg, allowing any surplus to drip back into the bowl. Finally, roll it in the breadcrumbs, pressing lightly so the crumbs adhere. This double‑dip method creates a seal that locks in moisture. Kitchen Hack: Freeze the coated bites on a tray for 10 minutes before frying; this firms them up and reduces splatter.
- Heat 2 cups of vegetable oil in a large skillet over medium‑high heat until it shimmers—about 350°F if you have a thermometer. Carefully place a few bites into the oil, making sure not to overcrowd the pan. The oil should sizzle immediately; that’s the sound of flavor forming. Fry each side for 2‑3 minutes, or until the coating turns a deep golden brown and the edges start pulling away from the pan. Sense check: You’ll notice a fragrant, slightly nutty aroma as the cheese melts and the corn caramelizes.
- Using a slotted spoon, transfer the fried bites onto a paper‑towel‑lined plate to drain excess oil. While the bites rest, preheat your oven to 200°F (or the lowest setting). This gentle warm‑up keeps them crisp without over‑cooking. Pro tip: If you’re cooking a large batch, keep the finished bites in a single layer on a baking sheet in the oven; this maintains the crunch.
- Once all bites are fried, give them a final dusting of a pinch of extra chili powder for a pop of color and a subtle heat boost. Serve them hot, garnished with a drizzle of lime juice and a sprinkle of fresh cilantro if you like. The lime adds a bright acidity that cuts through the richness, making each bite feel fresh and lively. Final note: Pair with a cool avocado crema or a simple sour cream dip for a balanced snack.
- That’s it — you did it. But hold on, I've got a few more tricks that'll take this to another level…
Insider Tricks for Flawless Results
The Temperature Rule Nobody Follows
Never fry at a temperature lower than 350°F. If the oil is too cool, the coating will soak up excess oil and become soggy rather than crisp. Use a kitchen thermometer or test with a breadcrumb—if it browns in 30 seconds, you’re good. I once tried to “save energy” by lowering the heat, and the result was a mushy, greasy disaster that no one wanted to eat. Keep the heat steady, and you’ll get that perfect, golden crunch every time.
Why Your Nose Knows Best
Your sense of smell is a reliable indicator of doneness. When the bites start to emit a toasted, slightly buttery aroma, it means the crust is forming properly. If you notice a faint burnt smell before the color changes, the oil is too hot and you risk a bitter flavor. Trust your nose more than the clock; it’s a built‑in kitchen timer that never lies.
The 5‑Minute Rest That Changes Everything
After frying, let the bites rest for five minutes on a wire rack instead of paper towels alone. This allows steam to escape, preventing the crust from becoming soggy. I once skipped this step in a rush and the bites turned limp within minutes. A short rest ensures the interior stays moist while the exterior remains crisp, giving you that satisfying bite‑to‑crunch ratio.
The Secret of the Ice‑Water Bath
If you’re shaping a large batch, dip the formed discs into an ice‑water bath for 30 seconds before coating. The rapid chill firms the mixture, making it less likely to fall apart during frying. This trick saved me during a summer BBQ when the kitchen was hot and the mixture tended to soften too quickly. The result? Bites that hold together like tiny, golden bricks.
Air‑Fry for a Lighter Twist
For a healthier version, use an air‑fryer set to 400°F and spray the coated bites lightly with oil. Cook for 10‑12 minutes, shaking the basket halfway through. The texture is surprisingly similar to pan‑frying, and you cut the oil usage by more than half. I tried this on a diet‑focused week and still got rave reviews—proof that you don’t have to sacrifice flavor for health.
Creative Twists and Variations
This recipe is a playground. Here are some of my favorite ways to switch things up:
Cheesy Jalapeño Popper Bites
Swap the cheddar for a mix of cream cheese and shredded Monterey Jack, then add a dash of hot sauce to the filling. The result is a creamy, tangy bite that mimics the classic popper but with a corn twist. Perfect for a party platter where guests love indulgent, gooey snacks.
Southwest Black Bean Fusion
Fold in half a cup of rinsed black beans and a teaspoon of smoked paprika. The beans add protein and a hearty texture, while the smoked paprika deepens the smoky profile. This variation turns the snack into a more filling appetizer that can double as a light lunch.
Sweet‑Heat Delight
Add a tablespoon of honey to the corn mixture and increase the jalapeño to three teaspoons. The honey caramelizes during frying, creating a sweet‑heat contrast that’s addictive. It’s an excellent option for those who love a touch of sweetness with their spice.
Herb‑Infused Green
Replace cilantro with finely chopped fresh basil and add a pinch of dried oregano. The herbaceous notes give the bites a Mediterranean flair while keeping the Mexican backbone. Serve with a side of tzatziki for a cross‑cultural bite.
Vegan Crunch
Swap the eggs for a flax‑egg (1 tbsp ground flaxseed mixed with 3 tbsp water) and use dairy‑free cheddar. Use a gluten‑free breadcrumb blend to keep it completely plant‑based. The texture remains satisfying, and the flavor stays true to the original concept.
Spicy Chipotle Blast
Add a teaspoon of chipotle in adobo sauce to the corn mixture and increase the chili powder to 1½ teaspoons. The smoky chipotle heat layers beautifully with the jalapeño, delivering a deep, lingering heat. Pair with a cool cilantro‑lime crema to balance the intensity.
Storing and Bringing It Back to Life
Fridge Storage
Place the cooled bites in an airtight container lined with a paper towel to absorb excess moisture. They’ll stay fresh for up to three days. When you’re ready to eat, reheat them in a 375°F oven for 8‑10 minutes to restore crispness.
Freezer Friendly
Arrange the uncooked, coated bites on a parchment‑lined tray and freeze for 2 hours. Transfer the frozen bites to a zip‑top bag; they’ll keep for up to two months. To cook from frozen, add an extra minute to the frying time or bake at 400°F for 12‑15 minutes, turning halfway.
Best Reheating Method
For leftover bites, the oven is your best friend. Preheat to 350°F, place the bites on a wire rack, and sprinkle a tiny splash of water (about a teaspoon) over the tray. The steam generated revives the interior moisture while the dry heat re‑crispes the coating. In just 5‑7 minutes, you’ll have snacks that taste almost as fresh as the day they were made.