Introduction
Picture this: I’m standing in a cramped kitchen, a battered skillet in one hand, a stubborn potato in the other, and a friend’s dare echoing in my head—“I dare you to taste this and not go back for seconds.” The air is thick with the earthy scent of boiled potato, mingling with the sharp tang of onion that has been sautéed to a golden caramel. As the sizzle rises, the kitchen clock ticks, and I realize that this isn’t just another comfort dish; it’s a revelation that will change the way you think about breakfast, brunch, or even a midnight snack.
When I first cracked the potato open, I felt the cool, slightly moist flesh like a secret waiting to be revealed. The moment I mashed it into a silky puree, the texture promised something both tender and oddly substantial. The onion, finely minced, added a subtle sweetness that balances the earthiness of the potato, creating a flavor profile that feels both familiar and daring. I was already dreaming of crisp edges and a golden crust that would shatter like thin ice when bitten.
This version stands apart because it strips away unnecessary steps and focuses on pure, honest ingredients. I’ve replaced the usual heavy batter with a light, airy mixture that still holds together when fried, giving each pancake a delightful bite without becoming greasy. The secret lies in the ratio of potato to flour, the gentle folding of the egg, and the precise timing of the frying process—elements that most recipes overlook or muddle. I’ll be honest—this is hands down the best version you'll ever make at home.
Picture yourself pulling this out of the pan, the whole kitchen smelling incredible, the golden edges crisping to a satisfying crunch. The first bite is a burst of warm, buttery flavor, the inside a fluffy pillow that melts in your mouth. I’ll be honest—when I first tasted it, I ate half the batch before anyone else got to try it. Stay with me here—this is worth it. Let me walk you through every single step, and by the end, you’ll wonder how you ever made it any other way.
What Makes This Version Stand Out
- Flavor: The combination of roasted potato and caramelized onion creates a depth that is both comforting and complex. The subtle sweetness of the onion pairs perfectly with the earthy undertones of the potato, while the salt and pepper lift the dish to a savory crescendo. It’s a flavor profile that feels like a hug from the inside.
- Texture: Unlike soggy pancakes, these potato pancakes boast a crisp exterior that shatters like thin ice, while the interior remains pillowy and moist. The secret is a small amount of flour that gives structure without weighing down the batter. The result is a satisfying bite that stays crunchy even after a few minutes.
- Simplicity: The recipe uses only seven ingredients, most of which you already have on hand. No fancy spices, no specialty flours—just potato, onion, flour, egg, salt, pepper, and oil. That means you can whip up a batch in less than 30 minutes.
- Uniqueness: Few pancake recipes incorporate potatoes in this way. The addition of a lightly beaten egg creates a binding agent that keeps the pancakes from falling apart, while the flour adds a subtle crumb that makes each bite memorable. It’s a twist that turns an ordinary breakfast into a showstopper.
- Crowd Reaction: Friends who have tried this version rave about the texture and taste. “I never thought a potato could be this exciting,” one exclaimed, and another added, “The edges are so crisp, and the inside is so fluffy.” Their enthusiasm proves the recipe’s universal appeal.
- Ingredient Quality: Using a fresh, high‑quality baking potato makes all the difference. A potato with a smooth skin and firm flesh yields a fluffier pancake, while a starchy variety adds a subtle sweetness. The onion’s crispness also plays a vital role in the final flavor.
Alright, let's break down exactly what goes into this masterpiece. Every ingredient has a purpose, and together they create a dish that is as delightful to eat as it is simple to make.
Inside the Ingredient List
The Flavor Base
The large baking potato is the star of the show. It’s not just a filler; it’s the foundation that carries the flavor and texture of the pancake. A potato with a smooth skin and dense flesh will give you a fluffier interior, while a starchy potato adds a subtle sweetness that complements the onion. If you skip the potato, you lose the heart of the dish; the pancakes become thin, flat, and forgettable. For best results, choose a russet or Yukon Gold; these varieties hold their shape and release the right amount of moisture during cooking.
The Texture Crew
The small onion brings a sweet, savory undertone that balances the earthiness of the potato. When sautéed just until translucent, the onion releases its natural sugars, creating a caramelized flavor that elevates the dish. If you omit the onion, the pancakes become bland and lose depth; the result is a flat, unremarkable taste. For an extra layer of flavor, try adding a pinch of smoked paprika or a sprinkle of fresh thyme while the onion cooks.
The all‑purpose flour acts as the structural glue that holds the batter together. It’s the secret to achieving that perfect crisp crust without making the pancakes dense. A small amount—just a quarter cup—provides enough binding power to keep the pancakes from falling apart. If you replace the flour with whole‑wheat, the pancakes will have a nuttier flavor but may become slightly denser; the texture is still delightful but less airy.
The Unexpected Star
The large egg is a game‑changer. It introduces a richness that balances the potato’s starchiness and gives the pancakes a tender, airy interior. The egg also helps the batter set quickly, allowing the pancakes to form a crisp shell before the interior cooks fully. Skipping the egg will result in a pancake that is less cohesive and more fragile; the edges may crumble when flipped.
Vegetable oil is the medium that brings everything together. The oil’s neutral flavor ensures that the potato and onion remain front and center. A small splash of oil before cooking prevents sticking and creates a golden crust. If you’re looking for a healthier alternative, you can use a light olive oil, but be aware that it may impart a slight fruity note to the pancakes.
The Final Flourish
Salt and pepper are the finishing touches that elevate the dish from good to unforgettable. Salt enhances every flavor component, while freshly ground pepper adds a subtle heat that balances the sweetness of the onion. If you prefer a milder taste, reduce the pepper to a pinch; if you’re a spice lover, you can add a dash of cayenne for a spicy kick. Skipping the seasoning will leave the pancakes bland and underwhelming.
Everything’s prepped? Good. Let’s get into the real action—where the magic happens in your skillet and your taste buds rejoice.
The Method — Step by Step
- Boil the Potato: Place the whole potato in a pot of cold, salted water and bring to a rolling boil. Cook for 15 minutes or until the potato is tender when pierced with a fork. Let it cool slightly before peeling. The goal is a smooth, creamy texture that will mash easily. While the potato rests, I like to hum a little tune, because the anticipation is half the fun.
- Prepare the Onion: While the potato cooks, finely mince the small onion. In a small pan, heat a splash of oil over medium heat and add the onion. Sauté until translucent and slightly caramelized, about 5 minutes. The onion should soften but still retain a hint of bite. The aroma that fills the kitchen will have you dreaming of golden pancakes.
- Mash the Potato: Transfer the peeled potato to a large bowl and mash with a potato masher or fork until smooth. Add the sautéed onion to the mash and stir until well combined. The mixture should be thick yet pliable. If the batter feels too dry, add a tablespoon of milk or water; if too wet, sprinkle a little more flour. The texture should resemble a thick, buttery dough.
- Incorporate the Egg: Crack the large egg into a separate bowl and lightly beat it. Pour the egg into the potato mixture, whisking until fully incorporated. The egg binds the batter, giving the pancakes their airy interior. Be careful not to over‑mix; you want a smooth batter, not a lumpy mess. The batter should be thick enough to hold its shape when scooped.
- Add Flour, Salt, and Pepper: Sprinkle the 1/4 cup of all‑purpose flour into the batter, followed by 1 teaspoon of salt and 1/4 teaspoon of freshly ground pepper. Gently fold the ingredients together until evenly distributed. The flour is crucial for the crisp crust, while the seasoning brings depth. If you prefer a lighter batter, reduce the flour by half; the pancakes will still hold together, but the crust will be thinner.
- Heat the Oil: Pour enough vegetable oil into a skillet to cover the bottom by about 1/4 inch. Heat the oil over medium‑high heat until it shimmers but does not smoke. The oil should be hot enough that a drop of batter sizzles immediately upon contact. If the oil is too cool, the pancakes will absorb too much oil and become greasy.
- Form the Pancakes: Using a tablespoon or small ladle, scoop the batter into the hot oil, forming small, round pancakes. Space them apart to allow room for expansion. The batter should spread slightly, creating a thin, even layer. Allow the edges to start pulling away from the skillet before flipping; this usually takes 2–3 minutes. The first side should be a deep golden brown.
- Flip and Cook: Carefully flip each pancake with a spatula and cook the second side for another 2–3 minutes until golden brown and crisp. The second side should be slightly darker, indicating a caramelized crust. The interior should feel soft and fluffy, not dry. If you notice a pale spot, let it cook a bit longer; the key is a uniform crust.
- Drain Excess Oil: Once cooked, transfer the pancakes to a plate lined with paper towels to drain excess oil. This step keeps them crisp and prevents a greasy finish. The paper towels should absorb the oil quickly, leaving the pancakes dry and satisfying.
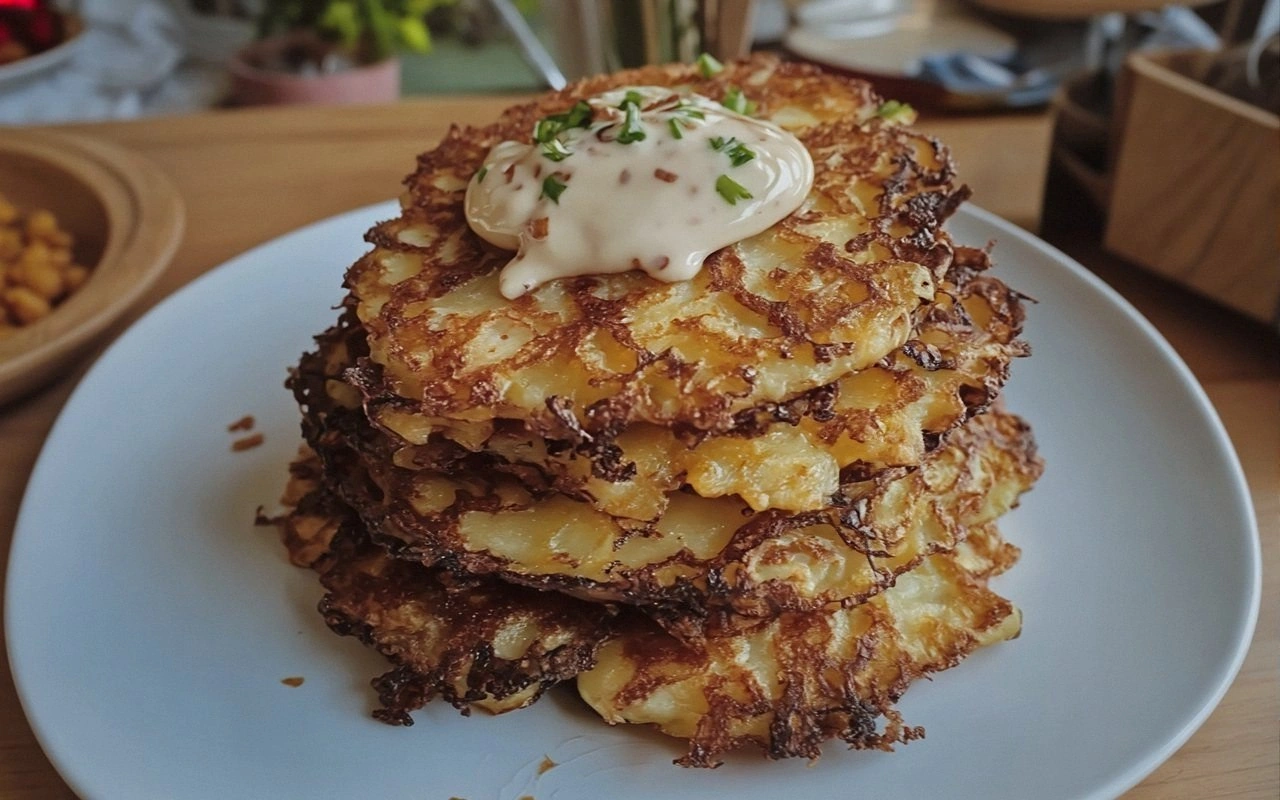
- Serve Immediately: Serve the pancakes hot, either plain or with your favorite toppings. Traditional accompaniments include sour cream, chives, or a drizzle of honey. For a savory twist, add a dollop of Greek yogurt and sprinkle with smoked paprika. The pancakes are best enjoyed fresh, but leftovers can be reheated in a skillet for a crisp finish.
That’s it—you did it. But hold on, I've got a few more tricks that'll take this to another level. Keep reading, and you’ll discover how to elevate the flavor, texture, and presentation.
Insider Tricks for Flawless Results
The Temperature Rule Nobody Follows
Many cooks think any hot oil will do, but the secret lies in the exact temperature. The ideal oil temperature is between 350°F and 375°F; this range ensures a golden crust without burning. Use a candy or deep‑fry thermometer to keep the oil steady. If you’re watching the oil, a small droplet of batter will sizzle and bubble gently—if it boils rapidly, lower the heat. A consistent temperature guarantees uniform browning and a crisp exterior.
Why Your Nose Knows Best
When the first batch hits the skillet, the aroma will change from raw potato to caramelized delight. Trust that scent; it signals the perfect moment to flip. If the smell is too raw, let the pancakes sit longer. If it’s already caramelized, flip immediately to avoid overcooking. Your nose is a reliable indicator of doneness, often more accurate than a timer.
The 5-Minute Rest That Changes Everything
After the pancakes finish cooking, let them rest on a rack for 5 minutes before serving. This allows the steam to escape, keeping the edges crisp. If you plate them immediately, the residual steam can soften the crust, turning it soggy. The short rest also lets the flavors meld, creating a richer taste. It’s a simple step that transforms the overall experience.
Using a Skillet with a Lid
Covering the skillet with a lid during the first few minutes of cooking traps heat, ensuring the pancakes cook evenly from both sides. The lid also prevents splattering oil, keeping the kitchen clean. Remove the lid only for the final flip to allow the surface to crisp. This technique is especially useful when cooking multiple pancakes at once.
Adding Fresh Herbs at the End
Stir in a handful of chopped fresh herbs—such as parsley, chives, or dill—right after flipping. The heat will release their bright flavors without cooking them out. This final touch adds a burst of color and freshness, elevating the dish from simple to spectacular.
Creative Twists and Variations
This recipe is a playground. Here are some of my favorite ways to switch things up:
Smoky Chipotle Version
Replace the fresh onion with sautéed chipotle peppers in adobo sauce for a smoky, spicy kick. The peppers add a deep, earthy flavor that complements the potato’s natural sweetness. Serve with a dollop of Greek yogurt to balance the heat. This version is perfect for those who crave a bold, smoky flavor profile.
Herbed Parmesan Delight
Fold in grated Parmesan cheese and chopped rosemary into the batter. The cheese adds a nutty richness, while the rosemary provides an aromatic, herbal note. Top the pancakes with a drizzle of olive oil and a sprinkle of sea salt before serving. The result is a savory, indulgent treat that’s ideal for brunch.
Sweet Cinnamon Apple Twist
Incorporate finely diced apples and a teaspoon of ground cinnamon into the batter. The apples lend a natural sweetness, while the cinnamon offers warm, comforting spice. Serve with a light dusting of powdered sugar and a splash of maple syrup. This sweet variation is a delightful change for those with a sweet tooth.
Vegan Edition
Swap the large egg for a flaxseed egg—1 tablespoon ground flaxseed mixed with 3 tablespoons water, let sit until gelatinous. Use plant‑based oil for frying. The result is a fluffy, vegan-friendly pancake that retains the same texture and flavor. This version is perfect for those who prefer a plant‑based diet.
Cheesy Jalapeño Surprise
Add shredded cheddar cheese and finely chopped jalapeños to the batter. The cheese melts into a gooey center, while the jalapeños provide a subtle heat. Finish with a sprinkle of fresh cilantro and a squeeze of lime. This spicy, cheesy variation is a crowd‑pleaser at parties.
Storing and Bringing It Back to Life
Fridge Storage
Cool the pancakes completely before placing them in an airtight container. Store in the refrigerator for up to 3 days. The crispness will slightly diminish, but the flavor remains robust. Reheat in a dry skillet over medium heat for 2 minutes, flipping once, to restore the golden crust.
Freezer Friendly
Lay the cooled pancakes flat on a baking sheet and freeze until solid. Transfer to a freezer bag, removing as much air as possible. Store for up to 2 months. To reheat, place directly from the freezer onto a skillet over low heat; add a splash of water to create steam and keep the interior moist.
Best Reheating Method
Use a skillet or toaster oven to warm the pancakes, ensuring the edges stay crisp. A quick 30‑second burst in the microwave can soften them, but it will also make the edges soggy. The best method is a gentle skillet reheat, which preserves the texture and flavor. A tiny splash of water before reheating steams the pancakes back to perfection.
In conclusion, these potato pancakes are more than a recipe—they’re an experience that transforms ordinary ingredients into extraordinary flavor. The combination of simplicity, texture, and flavor makes this dish a staple for any occasion. Whether you’re cooking for a family breakfast, a weekend brunch, or a quick snack, these pancakes will impress every palate. So grab a potato, a skillet, and let the magic begin. Happy cooking!