I still remember the day these donuts were born like it was yesterday. My kitchen looked like a crime scene — flour dusted every surface, sticky strawberry fingerprints on the cabinets, and a rogue blob of cream cheese that somehow made it onto the ceiling. I had promised my coworkers something special for the Monday meeting, but what started as a simple donut experiment turned into an obsession that had me frying batch after batch until 3 AM. The first bite of that warm, pillowy donut with its molten strawberry cheesecake center was so transcendent that I actually dropped the rest on the floor in shock. My dog got lucky that night, but I wasn't giving up. By sunrise, I had perfected what might be the most dangerously delicious thing to ever come out of my kitchen. These aren't just donuts — they're edible happiness bombs that will ruin you for all other breakfast pastries forever.
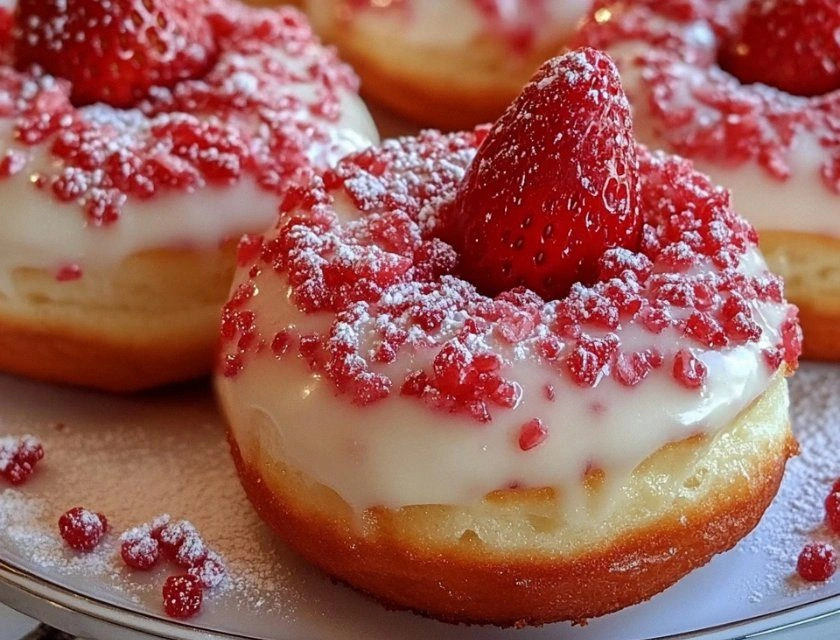
Picture this: a perfectly golden donut that's somehow both airy and substantial, giving way to a creamy cheesecake filling studded with bright strawberry jewels. The contrast between the slightly crisp exterior and the cool, tangy center creates a textural symphony that makes regular filled donuts seem like sad, dry imposters. I dare you to taste this and not go back for seconds — actually, I dare you to stop at three. The magic happens when the warm donut meets the chilled filling, creating temperature contrast that makes every bite feel like the first one. Most recipes get this completely wrong by trying to pipe in room-temperature filling that just melts into a sad puddle. Here's what actually works.
What started as a kitchen disaster became my signature recipe, the one friends request for birthdays, weddings, and "please help me get through this breakup" care packages. I'll be honest — I ate half the batch before anyone else got to try it, standing over my kitchen sink at 6 AM like some kind of pastry-addicted gremlin. The strawberry flavor isn't just a hint or a whisper — it's a full-on flavor explosion that tastes like summer sunshine concentrated into pure form. Stay with me here — this is worth every single step because we're about to create something that bakery chains would sell their souls to replicate.
Let me walk you through every single step — by the end, you'll wonder how you ever made it any other way. Trust me, I've tested every shortcut, every hack, every "but what if I just..." variation you can imagine. The result is a recipe that's bulletproof, foolproof, and guaranteed to make you the most popular person at any gathering. Okay, ready for the game-changer?
What Makes This Version Stand Out
Before we dive into the flour and sugar, let me tell you why this recipe will become your new obsession. I've eaten my way through bakeries across three continents, and nothing comes close to what we're about to create together.
- Revolutionary Filling Technique: Instead of the usual "poke and pray" method, we create a cavity that holds twice as much filling without any leaks. The secret involves freezing dollops of cheesecake filling so they stay perfectly centered during frying, resulting in that Instagram-worthy cross-section every single time.
- Triple-Threat Strawberry Flavor: We're not just talking about strawberries in the filling — oh no. We infuse the dough with strawberry powder, add fresh strawberry bits to the filling, and finish with a strawberry sugar coating that creates layers of berry goodness in every bite.
- Temperature Perfection: Most home fryers get this wrong, leading to greasy nightmares. We use a two-stage frying method that creates a moisture barrier, keeping the inside tender while the outside develops that perfect golden shell that stays crisp even after cooling.
- Make-Ahead Magic: These donuts actually get BETTER after an overnight rest in the fridge. The flavors meld together like they're at a flavor marriage counseling session, and you can fry them fresh in the morning without any 5 AM prep work.
- Texture That Dreams Are Made Of: The dough uses a hybrid technique combining Japanese milk bread methods with classic American donut recipes. The result is an impossibly light, fluffy texture that compresses under your teeth then springs back with a satisfying chew.
- Cheesecake Filling That Doesn't Melt: Through some kitchen wizardry involving cream cheese ratios and a touch of white chocolate, the filling maintains its shape and tang even when the donut is warm. No more sad, runny centers that leak out everywhere.
- Scale-Proof Recipe: Whether you're making a dozen for Sunday brunch or scaling up for a bake sale, this recipe multiplies perfectly. I've made 200 of these for a wedding and they came out identical to my test batch.
Alright, let's break down exactly what goes into this masterpiece...
Inside the Ingredient List
Every ingredient in this recipe pulls its weight and then some. I've tested substitutions that would make a food scientist weep, and the original lineup wins every single time for reasons that will become deliciously clear.
The Flavor Foundation
All-purpose flour might seem boring, but here it's the canvas for our masterpiece. We're using bread flour's protein content to create that perfect chew, while cake flour keeps things tender. The combination creates a texture that's both substantial and cloud-like — like biting into a strawberry-scented pillow. Don't even think about using whole wheat unless you want dense, sad donuts that taste like health food punishment. The sugar does more than sweeten — it helps create that gorgeous golden color through caramelization and feeds the yeast for maximum puff.
Speaking of yeast, this isn't the time for the ancient packet that's been hiding in your pantry since 2019. Fresh yeast makes the difference between donuts that rise like they're on steroids versus ones that sit there like doughy hockey pucks. The milk needs to be exactly 110°F — too hot and you'll murder your yeast, too cold and they'll refuse to wake up. I use a instant-read thermometer because guessing has led to too many tragic baking failures at 2 AM when I was too tired to think straight.
The Texture Crew
Eggs are the unsung heroes here, providing structure, richness, and that beautiful golden hue. Room temperature eggs incorporate better, creating a smoother dough that fries up with fewer air bubbles. The butter needs to be soft enough to leave an indent when pressed but not melted into an oily puddle. This creates tiny pockets of fat that translate to flakiness in the final product. Trust me, I've tried the microwave-softening trick and ended up with partially melted butter that created a greasy mess.
The cream cheese is where things get interesting. Full-fat is non-negotiable — low-fat versions have stabilizers that break down when heated, creating a grainy, watery filling. Let it soften on the counter for at least an hour; impatient microwaving creates hot spots that will cook your filling before you even start. The strawberries need to be at peak ripeness — underripe berries taste like disappointment and water, while overripe ones turn your filling into baby food.
The Unexpected Star
Here's where most recipes go wrong: they use strawberry extract or artificial flavoring that tastes like cough syrup had a baby with bubblegum. We're using real strawberries three ways for depth that extract could never achieve. The powdered sugar in the filling isn't just for sweetness — it contains cornstarch that helps stabilize the mixture and prevent weeping. Vanilla extract might seem basic, but it bridges the gap between the tangy cream cheese and bright strawberries, creating harmony in every bite.
The frying oil is crucial — use a neutral oil like vegetable or canola, and for the love of all that's holy, don't reuse oil that's fried fish or onions. The temperature needs to stay consistent at 350°F, which means using a heavy pot that holds heat well and a thermometer that you actually trust. I once tried to eyeball the temperature and ended up with donuts that were raw in the middle and burnt on the outside, proving that confidence can't replace actual knowledge.
The Final Flourish
The strawberry sugar coating isn't just pretty — it adds a delicate crunch that shatters like thin ice when you bite in. We're making this by blending freeze-dried strawberries with granulated sugar, creating a coating that melts on your tongue while adding intense berry flavor. The powdered sugar dusting at the end isn't just for looks — it helps absorb any excess oil and adds a final touch of sweetness that makes these absolutely irresistible.
Everything's prepped? Good. Let's get into the real action...

The Method — Step by Step
- Start by making the cheesecake filling because it needs time to firm up in the freezer. Beat the cream cheese until it's light and fluffy — this should take about 3 minutes on medium speed. Add the powdered sugar gradually, beating until completely smooth and no lumps remain. Stir in the vanilla extract and strawberry purée, mixing just until combined. The mixture should be thick but pipeable, like slightly softened ice cream. Using a small cookie scoop or two spoons, portion out 24 small balls onto a parchment-lined baking sheet. Freeze these for at least 2 hours or until rock solid — this is the key to filling that stays put during frying instead of melting into the oil.
- While the filling freezes, bloom your yeast by combining warm milk with a teaspoon of sugar and the yeast in a small bowl. Let this sit for about 10 minutes until it's foamy and smells like a brewery — that's how you know your yeast is alive and ready to party. If nothing happens after 15 minutes, your yeast is dead and you need to start over. Don't try to power through with dead yeast unless you want dense, sad donuts that could double as paperweights. The mixture should double in volume and create a thick foam on top.
- In the bowl of a stand mixer fitted with the dough hook, combine the flour, sugar, and salt. Make a well in the center and add the yeast mixture, eggs, and softened butter. Mix on low speed until a shaggy dough forms, then increase to medium and knead for 8-10 minutes. The dough should be soft, smooth, and slightly sticky — it will stick to the bottom of the bowl but pull away from the sides. If it's too dry, add milk a tablespoon at a time. If it's too wet, add flour a tablespoon at a time. This is the moment of truth — proper kneading develops the gluten that gives donuts their characteristic chew.
- Transfer the dough to a lightly oiled bowl, cover with plastic wrap, and let rise in a warm spot for 1-2 hours until doubled in size. I like to turn my oven on for 2 minutes, then turn it off and place the dough inside — the gentle warmth creates perfect rising conditions. Don't let the temperature exceed 80°F or you'll kill the yeast. The dough is ready when you can poke it with your finger and the indentation stays — if it springs back, it needs more time. This is not the time to rush off to run errands; over-proofed dough becomes slack and refuses to hold its shape.
- Once risen, punch down the dough and turn it out onto a lightly floured surface. Roll it to about ½-inch thickness — too thin and your donuts will be all crust, too thick and they won't cook through. Use a 3-inch round cutter to cut out circles, then use a 1-inch cutter to remove the centers. Save these for donut holes, which make excellent quality control testers. Reroll the scraps gently, but know that rerolled donuts will be slightly tougher than the first batch. Place the cut donuts on parchment-lined baking sheets, cover with a clean kitchen towel, and let rise for another 30-45 minutes until puffy.
- Now comes the fun part — stuffing these beauties with our frozen cheesecake centers. Use the back of a wooden spoon or your finger to create a cavity in each donut, going about halfway through but not piercing the bottom. Work quickly because the warmth of your hands will start melting the frozen filling. Insert a frozen cheesecake ball into each cavity, then pinch the dough closed around it. The key is making sure the seam is completely sealed — any gaps and your filling will leak out during frying, creating a mess and ruining your oil.
- Heat your oil in a heavy-bottomed pot to exactly 350°F — use a thermometer and don't guess. The oil should be at least 3 inches deep to allow the donuts to float freely. Gently lower 2-3 donuts into the oil using a slotted spoon, being careful not to splash. Don't walk away from the stove here — they brown quickly. Fry for 1-2 minutes per side until golden brown, flipping once. The donuts should puff up dramatically and sound hollow when tapped. Remove to a wire rack set over paper towels to drain.
- While the donuts are still warm, toss them in the strawberry sugar coating. This creates a delicate crust that adds texture and intensifies the berry flavor. For the final touch, dust with powdered sugar just before serving — this adds visual appeal and absorbs any remaining surface oil. The contrast between the warm donut and the cool, creamy center is what makes these absolutely magical. That first bite when the filling is still slightly chilled but the donut is warm? Pure perfection.
- Let the donuts cool for at least 10 minutes before serving — I know it's torture, but the filling needs time to warm slightly and the exterior needs to set. These are best served the day they're made, but they reheat beautifully in a 300°F oven for 5-7 minutes. The filling will be melty and luscious, the exterior crisp, and the whole experience will make you wonder why you ever settled for regular filled donuts.
That's it — you did it. But hold on, I've got a few more tricks that'll take this to another level...
Insider Tricks for Flawless Results
After making these donuts more times than I care to admit (my scale and I aren't speaking), I've discovered some game-changing techniques that separate amateur results from bakery-quality perfection. These aren't just suggestions — they're the difference between good donuts and life-changing ones.
The Temperature Rule Nobody Follows
Here's the thing about temperature — it's not just about the oil being hot enough. Your ingredients need to be at specific temperatures too. The eggs and butter should be room temperature, but the milk for the yeast needs to be exactly 110°F. I use a candy thermometer because I'm obsessive, but you can test it by touching a drop to your wrist — it should feel warm but not hot. When everything is at the right temperature, the dough comes together like silk and rises like it's on a mission from the donut gods.
The room temperature rule applies to your kitchen too. If it's colder than 68°F, your dough will rise at a glacial pace. Hotter than 75°F and the yeast goes into overdrive, creating off-flavors. I once tried to make these in a friend's freezing apartment and ended up with dense, sad donuts that could've been hockey pucks. Now I plan ahead — if it's cold, I create a proofing box with my oven's proofing setting or a bowl of warm water in the microwave.
Why Your Nose Knows Best
Forget timers — your nose is the most reliable tool in your kitchen. When the donuts are perfectly fried, they'll smell like butter and vanilla with a hint of caramel. If you smell anything even slightly burnt, you've gone too far. The human nose can detect acrolein, the compound that makes burnt oil smell awful, at incredibly low concentrations. Trust your instincts — when they smell like heaven, they're done. That moment when the scent hits you is when you know you've achieved donut nirvana.
The same principle applies to the filling. When the cream cheese mixture smells tangy and fresh, with bright strawberry notes, it's ready. If it smells flat or dull, you need more acid or your berries aren't ripe enough. I once used strawberries that looked perfect but tasted like cardboard, and the resulting filling was so bland it could've been library paste. Now I taste every component before mixing — if the strawberries don't make my mouth water, they don't go in the donuts.
The 5-Minute Rest That Changes Everything
After frying, resist the urge to immediately coat your donuts. Let them rest on the wire rack for exactly 5 minutes — set a timer because patience isn't natural when hot donuts are calling your name. This brief rest allows the surface moisture to evaporate, creating the perfect texture for the sugar coating to adhere. Skip this step and your sugar will dissolve into a sticky mess that slides off in sheets. I learned this the hard way when I was running late for a party and ended up with donuts that looked like they'd been through a sugar sandstorm.
But here's the real secret — during those 5 minutes, something magical happens. The residual heat continues cooking the interior gently, while the exterior sets to that perfect texture. The filling warms slightly but stays distinct from the dough. It's like the difference between a good donut and a great donut happens in those quiet 5 minutes when nobody's watching. Use this time to make your coffee or set up your serving platter — trust me, it's worth the wait.
Creative Twists and Variations
This recipe is a playground. Here are some of my favorite ways to switch things up when I'm feeling adventurous or when strawberry season has passed but I still need my filled donut fix.
Raspberry Lemon Cheesecake Explosion
Swap the strawberries for raspberries and add a teaspoon of lemon zest to both the filling and the sugar coating. The tartness of raspberries pairs beautifully with the tangy cream cheese, while the lemon adds brightness that makes these taste like summer in donut form. The sugar coating gets a boost from lemon zest that's been dried for an hour — it adds intense citrus flavor without the moisture that would make it clump. These are like eating sunshine if sunshine were filled with creamy, tangy deliciousness.
Chocolate Hazelnut Dream
Replace the strawberry purée with chocolate hazelnut spread and add chopped toasted hazelnuts to the filling. The sugar coating becomes a mixture of cocoa powder and sugar, creating a sophisticated version that tastes like Nutella had a baby with a donut. The key is using good-quality chocolate hazelnut spread — the cheap stuff separates and creates an oily mess. These are dangerous because they taste like breakfast but feel like dessert, making it socially acceptable to eat them at 8 AM on a Tuesday.
Pumpkin Spice Cheesecake (For Basic Season)
When fall hits and everything becomes pumpkin-spiced, embrace it. Replace the strawberry purée with pumpkin purée and add a teaspoon each of cinnamon, nutmeg, and ginger to the filling. The sugar coating gets a mixture of brown sugar and pumpkin pie spice, creating the ultimate autumn breakfast. These taste like pumpkin pie but with the added joy of being fried and filled, which let's be honest, makes everything better. Even pumpkin spice haters convert after one bite of these.
Salted Caramel Apple Pie
Dice tart apples and cook them down with brown sugar and cinnamon until they become a thick compote. Mix this into the cream cheese filling and add a drizzle of salted caramel to each center before sealing. The sugar coating gets a sprinkle of flaky sea salt, creating that perfect sweet-salty balance. These taste like someone took the best parts of apple pie and stuffed them into a donut, which frankly should be illegal but thankfully isn't.
Blueberry Muffin Top Donuts
Use blueberry jam instead of fresh strawberries and add lemon zest and a touch of cinnamon to the filling. The sugar coating becomes a mixture of sugar and crushed cornflakes, creating that signature muffin top crunch. These are like the best part of a blueberry muffin — the crispy, buttery top — but in donut form with a creamy center. The cornflakes add texture that makes every bite interesting, not just sweet.
Tropical Coconut Pineapple Paradise
Replace the strawberries with crushed pineapple that's been drained and patted dry. Add toasted coconut to the filling and use coconut milk instead of regular milk in the dough. The sugar coating gets mixed with toasted coconut flakes, transporting you to a tropical beach with every bite. These taste like vacation and are particularly dangerous because they make you forget you're eating something fried for breakfast. Close your eyes while eating and you can almost hear waves crashing.
Storing and Bringing It Back to Life
Let's be real — these donuts are best fresh, but life happens and sometimes you need to make them ahead or save leftovers (though I've never personally experienced this phenomenon of "leftover donuts"). Here's how to keep them at their peak.
Fridge Storage
Store completely cooled donuts in an airtight container in the refrigerator for up to 3 days. Place a sheet of parchment paper between layers to prevent them from sticking together. The cold temperature will firm up the filling, but that's actually perfect because it creates that delightful contrast when you reheat them. Don't store them at room temperature — the filling contains dairy and will spoil faster than you can say "food poisoning." I've made this mistake and ended up with a container of science experiments that smelled like regret.
Freezer Friendly
These freeze beautifully for up to 2 months. Freeze them on a baking sheet first, then transfer to freezer bags once solid. This prevents them from freezing into a single donut blob that's impossible to separate. When you're ready to eat, let them thaw in the refrigerator overnight, then reheat in a 300°F oven for 5-7 minutes. The filling will be just as creamy and the exterior will crisp up like they're fresh from the fryer. Pro tip: freeze them uncoated and add the sugar coating after reheating for maximum freshness.
Best Reheating Method
The microwave is your enemy here — it turns the sugar coating into a sticky mess and makes the dough rubbery. Instead, reheat in a 300°F oven for 5-7 minutes or in an air fryer at 325°F for 3-4 minutes. Add a tiny splash of water to the container before reheating — it creates steam that brings back the original texture. The donuts will emerge warm and crisp, with a molten center that makes them taste almost as good as fresh. Actually, some people prefer them this way because the flavors have had time to meld together.