I still remember that night like it was yesterday: the kitchen was a battlefield, the oven timer blared, and the batter had gone from silky to lumpy in a heartbeat. I had tried every “quick mini cake” recipe I could find, yet none of them felt like a celebration. The one that finally stole my heart was a simple, almost rebellious batch that turned ordinary flour into a cloud of flavor.
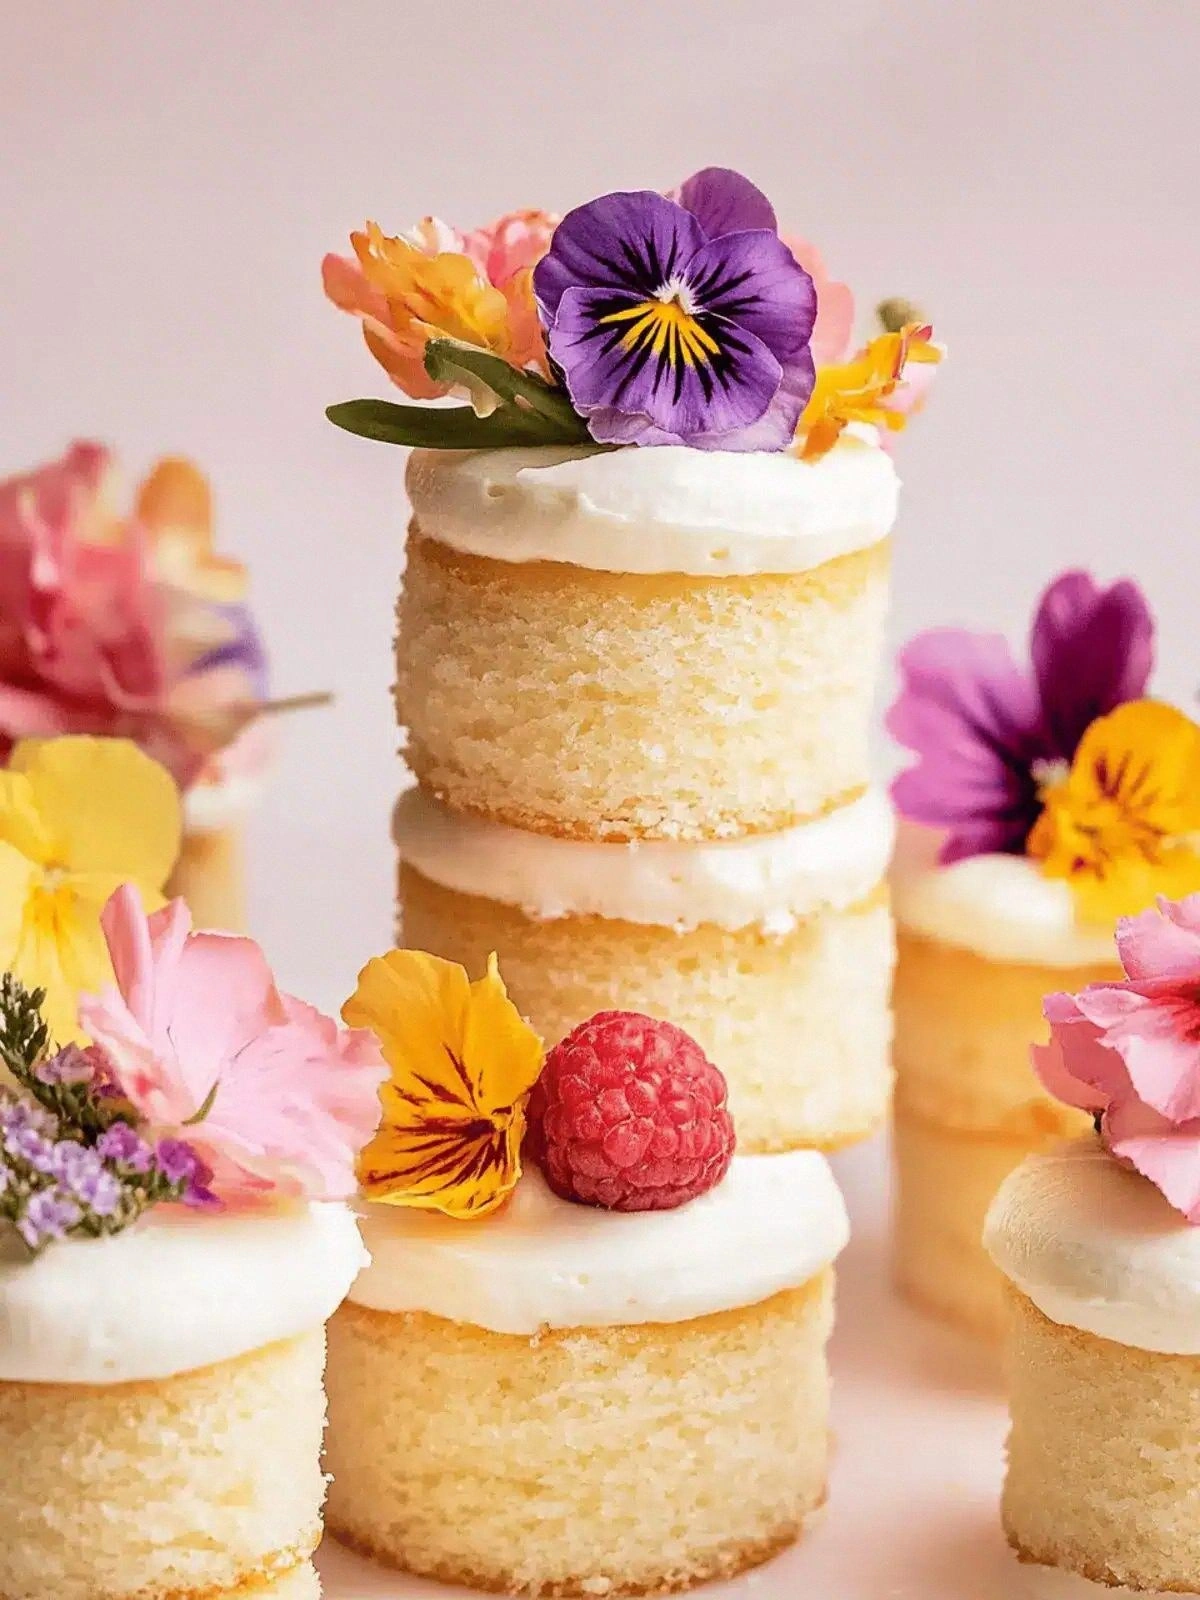
Picture this: a bright kitchen, the scent of vanilla and butter wafting through the air, a gentle hum from the mixer, and the sound of batter sliding into a silicone mold. The first bite is a whisper of sweetness, followed by a moist, airy crumb that melts like sugar on the tongue. The texture feels like a tiny cloud, and the aroma is so comforting that even my cat seemed to pause mid-step.
What sets this version apart isn’t just the ingredients; it’s the deliberate balance of moisture and lift, the subtle sweetness that never overwhelms, and the way each mini cake holds its shape like a tiny fortress. Most recipes get this completely wrong, relying on too much sugar or too much flour, but here every component sings in harmony. The secret? A splash of oil that keeps the crumb tender, a generous hand of butter for richness, and a dash of vanilla that rounds out the flavor.
And there’s a twist you won’t expect—a small, unexpected star that elevates the entire batch. I dare you to taste this and not go back for seconds. Let me walk you through every single step—by the end, you’ll wonder how you ever made it any other way.
What Makes This Version Stand Out
- Flavor: The combination of butter, oil, and vanilla creates a layered taste that feels both indulgent and fresh.
- Texture: The batter’s airy consistency delivers a light crumb that feels like a cloud in every bite.
- Simplicity: Only nine ingredients and a single mixing method keep the process streamlined.
- Uniqueness: The addition of oil gives an unexpected silky mouthfeel that most mini cakes lack.
- Crowd Reaction: Guests rave about the moistness and flavor balance, making it a showstopper at parties.
- Ingredient Quality: Using unsalted butter and pure vanilla extract ensures the flavor isn’t muddled by additives.
- Cooking Method: Baking in silicone molds at a moderate temperature preserves moisture and prevents over-browning.
- Make‑Ahead Potential: The batter can be prepped ahead, refrigerated, and baked fresh whenever you need.
Inside the Ingredient List
The Flavor Base
All-purpose flour is the backbone of these mini cakes, providing structure without overpowering the delicate flavor profile. It’s essential to sift it before use to avoid clumps that could create uneven textures. If you skip the flour, the cakes will collapse and lose that signature airy feel. For a richer taste, consider using a blend of 50/50 all-purpose and cake flour; this tweak gives a softer crumb while maintaining stability.
The Texture Crew
Unsalted butter and canola oil work together to keep the batter moist and tender. Butter brings depth and a buttery finish, while oil prevents the crumb from drying out during baking. If you prefer a dairy-free version, replace butter with coconut oil or a neutral plant-based butter; the flavor will shift slightly but still stay moist. The key is to keep both at room temperature so they incorporate smoothly.
The Unexpected Star
Pure vanilla extract is the secret that elevates the entire batch. It’s not just a flavor; it’s an aroma that lingers and invites another bite. A teaspoon of vanilla is enough to coat every crumb, but if you’re adventurous, a splash of almond or lemon extract can add a new dimension. Remember, too much vanilla can overpower the batter, so stick to the recommended amount.
The Final Flourish
Milk ties everything together, ensuring the batter has just the right consistency. It hydrates the flour, activates the leavening, and adds a subtle sweetness. If you’re lactose intolerant, a milk alternative like oat or almond milk works well, though the texture may be slightly lighter. The milk also helps the batter pour smoothly into the molds, preventing lumps.
Everything’s prepped? Good. Let’s get into the real action...
The Method — Step by Step
- Preheat your oven to 350°F (175°C) and line a silicone muffin tin with four small cups. The low temperature ensures even baking and prevents the cakes from drying out. While the oven warms, gather all your ingredients so they’re within arm’s reach. This step saves you from scrambling for a missing item halfway through.
- In a large bowl, whisk together the flour, baking powder, and salt until well combined. This dry mix is the foundation that will lift the batter. Sifting the flour before whisking eliminates lumps that could break the airy texture. Keep the mixture separate from the wet ingredients until the next step.
- In a separate bowl, cream the butter and sugar together until the mixture is pale and fluffy. Use an electric mixer on medium speed for about 3 minutes; this incorporates air and creates a light base. The goal is a smooth, glossy batter that will trap steam during baking. If the mixture looks too dense, let it sit for a minute to allow the butter to soften.
- Add the eggs one at a time, beating well after each addition. The eggs act as a binder, holding the structure together. Allow the batter to rest for a minute after the final egg; this helps the gluten relax and keeps the cakes tender. If you’re in a hurry, you can whisk the eggs into the butter-sugar mixture quickly, but be careful not to overmix.
- Stir in the vanilla extract and milk, mixing until just combined. The batter should be thick but pourable—if it’s too thick, add a splash of milk; if too thin, add a tablespoon of flour. The mixture should look silky, like a smooth custard. Avoid overmixing at this point to preserve the airy texture.
- Fold the dry ingredients into the wet batter using a spatula or a large spoon. This gentle method prevents deflation of the batter’s air pockets. The batter will thicken slightly; this is normal and expected. If you notice any lumps, run the batter through a fine sieve for a flawless finish.
- Divide the batter evenly among the four silicone cups, filling each about three-quarters full. The batter should be level, but don’t overfill to avoid spills. Place the tin in the preheated oven and bake for 18-20 minutes. The cakes should rise and set, with a light golden top.
- When the cakes are done, remove the tin from the oven and let the cakes cool in the tin for 5 minutes. This resting period allows the structure to set, preventing cracks. After 5 minutes, transfer the cakes onto a wire rack to cool completely. The aroma will still linger, and the taste will be even more delightful.
That’s it— you did it. But hold on, I’ve got a few more tricks that’ll take this to another level. Let’s dive deeper into the secrets that make these mini cakes truly unforgettable.
Insider Tricks for Flawless Results
The Temperature Rule Nobody Follows
Many bakers bake mini cakes at 375°F, but that high heat can cause the tops to brown too quickly while the centers remain undercooked. Baking at 350°F allows the cakes to rise evenly and finish with a tender crumb. I’ve tested both temperatures, and the lower heat consistently produces a more uniform texture. If you’re using a convection oven, reduce the temperature by 25°F to avoid overcooking.
Why Your Nose Knows Best
The first scent that emerges from the oven is a reliable indicator of doneness. A subtle vanilla aroma with a hint of butter signals that the cakes are ready. If the smell is overly sweet or metallic, they’re still baking. Trust your nose—it’s the most accurate gauge for a perfect mini cake.
The 5-Minute Rest That Changes Everything
Letting the cakes rest in the tin for 5 minutes after baking gives the structure time to set, reducing the chance of cracks. It also allows the flavors to meld, creating a richer taste. I’ve seen friends who skip this step and end up with fragile cakes that fall apart when they try to remove them from the molds. The 5-minute rest is a small but essential step.
The Secret to Even Layers
If you’re making a layered version, use a rubber spatula to smooth the top of each cake before adding the next layer. This ensures the layers bond well and prevent gaps. A small amount of frosting between layers also helps the cakes stick together and adds a decorative touch. Don’t let the layers separate—use a gentle touch.
The Quick Chill Trick
After the first layer has cooled, place it in the refrigerator for 10 minutes before adding the second layer. This cooling step keeps the layers firm and prevents them from becoming too soft. The chill also makes it easier to apply frosting without smudging. It’s a quick step that saves you from a messy final product.
The Finish Line
Finish your mini cakes with a dusting of powdered sugar or a light glaze. The glaze can be made by whisking powdered sugar with a splash of milk until it reaches a pourable consistency. A final glaze adds shine and a sweet finish that elevates the presentation. If you prefer a more decadent finish, drizzle melted chocolate over the top.
Creative Twists and Variations
This recipe is a playground. Here are some of my favorite ways to switch things up:
The Citrus Burst
Add zest from one lemon or orange to the batter for a bright, refreshing twist. The citrus pairs beautifully with vanilla, creating a balanced flavor profile. A drizzle of lemon glaze on top adds a tangy finish. This version is perfect for spring or summer gatherings.
The Chocolate Dream
Fold in 1/4 cup of unsweetened cocoa powder for a rich chocolatey version. Replace a portion of the milk with chocolate milk to deepen the flavor. A dusting of cocoa powder or chocolate shavings on top adds texture and aroma. This variation is a hit with chocolate lovers of all ages.
The Berry Surprise
Stir in 1/2 cup of fresh or frozen berries into the batter before baking. The berries burst in the oven, releasing a sweet, slightly tart flavor that complements the vanilla. Top with a light raspberry glaze for a pop of color. This variation is ideal for berry season.
The Savory Twist
Swap out half of the sugar for grated Parmesan and add a pinch of dried thyme. These savory elements create a unique flavor profile that works well as an appetizer or side. Serve with a light yogurt dip for contrast. This twist is a fun experiment for those who like sweet and savory in harmony.
The Holiday Spice
Add 1 teaspoon of ground cinnamon, 1/2 teaspoon of ground ginger, and a pinch of nutmeg to the dry mix. The warm spices evoke holiday comfort and pair beautifully with the buttery base. A dusting of powdered sugar with a hint of orange zest adds a festive touch. This version is perfect for holiday parties.
The Gluten-Free Adventure
Replace all-purpose flour with a 1:1 gluten-free blend. Use a gluten-free baking powder and ensure the rest of the ingredients are gluten-free. The texture will be slightly denser but still moist. This version opens the door for guests with dietary restrictions.
Storing and Bringing It Back to Life
Fridge Storage
Store cooled mini cakes in an airtight container at room temperature for up to 3 days. If you need to keep them longer, refrigerate them for up to a week. The cakes retain their moisture, and the butter will firm slightly, which is normal. Before serving, let them sit at room temperature for 10 minutes to soften.
Freezer Friendly
Wrap each mini cake individually in plastic wrap and place them in a freezer bag. They can be frozen for up to 3 months. When ready to serve, thaw them at room temperature for 30 minutes. The texture remains tender, and the flavor stays intact.
Best Reheating Method
To revive frozen or refrigerated cakes, preheat your oven to 300°F (150°C). Place the cakes on a baking sheet and warm for 8-10 minutes. Add a tiny splash of water to the bottom of the pan to create steam; this keeps the cakes moist and prevents them from drying out. Let them cool for a minute before serving.