Picture this: it’s a frosty December evening, the wind is howling outside, and you’re stuck in the kitchen trying to salvage a batch of sad, flat meringues that collapsed like a deflated balloon. I was in that exact situation, staring at a tray of lifeless white discs that looked more like soggy clouds than festive treats. The smell of burnt sugar lingered in the air, and I felt the crushing weight of disappointment—until a mischievous friend dared me to turn those failures into something spectacular. I accepted the challenge, grabbed a bottle of green food‑colour gel, and promised myself I’d create the most jaw‑dropping Christmas tree meringues anyone had ever tasted.
The kitchen transformed into a sensory playground. The crackle of the oven door opening was like a drumroll, the sweet perfume of caramelizing sugar wrapped around me like a cozy blanket, and the glossy green sheen of the batter glimmered under the fluorescent lights. My fingertips tingled as I whisked the egg whites into glossy peaks, each fold feeling like I was coaxing a shy animal out of its den. The moment the batter hit the parchment, it sang a soft hiss, promising crisp edges that would shatter like thin ice and a soft, melt‑in‑your‑mouth centre that would melt away in seconds.
What makes this version the ultimate holiday meringue? Most recipes get the ratio of sugar to egg whites wrong, resulting in either gritty sweetness or a rubbery texture that clings to your teeth. I cracked the code by using a precise balance of caster sugar and a pinch of cream of tartar, which stabilizes the foam and gives the meringues that ethereal lightness. The secret weapon? A dash of vanilla extract that adds depth, and a whisper of green gel that turns each tree into a miniature forest wonderland. And let’s not forget the festive sprinkles—red, green, and white—added at the very end for that perfect pop of holiday sparkle.
Okay, ready for the game‑changer? I’m about to walk you through every single step—mixing, piping, baking, and decorating—so you’ll end up with meringues that literally melt in your mouth and look so pretty you’ll hesitate to eat them. By the time we’re done, you’ll be daring anyone to taste these without going back for seconds, because honestly, I’ll be honest — I ate half the batch before anyone else got to try it. Let me walk you through every single step — by the end, you’ll wonder how you ever made it any other way.
What Makes This Version Stand Out
- Texture: The outer shell cracks with a whispering snap while the inside stays soft, airy, and melt‑in‑your‑mouth, a contrast that most meringue recipes simply can’t achieve.
- Flavor: A subtle vanilla undertone balances the sweet sugar, and the green gel adds a fresh, almost minty note that lifts the whole bite.
- Simplicity: Only six ingredients, no exotic equipment—just a mixer, a piping bag, and a sprinkle of holiday spirit.
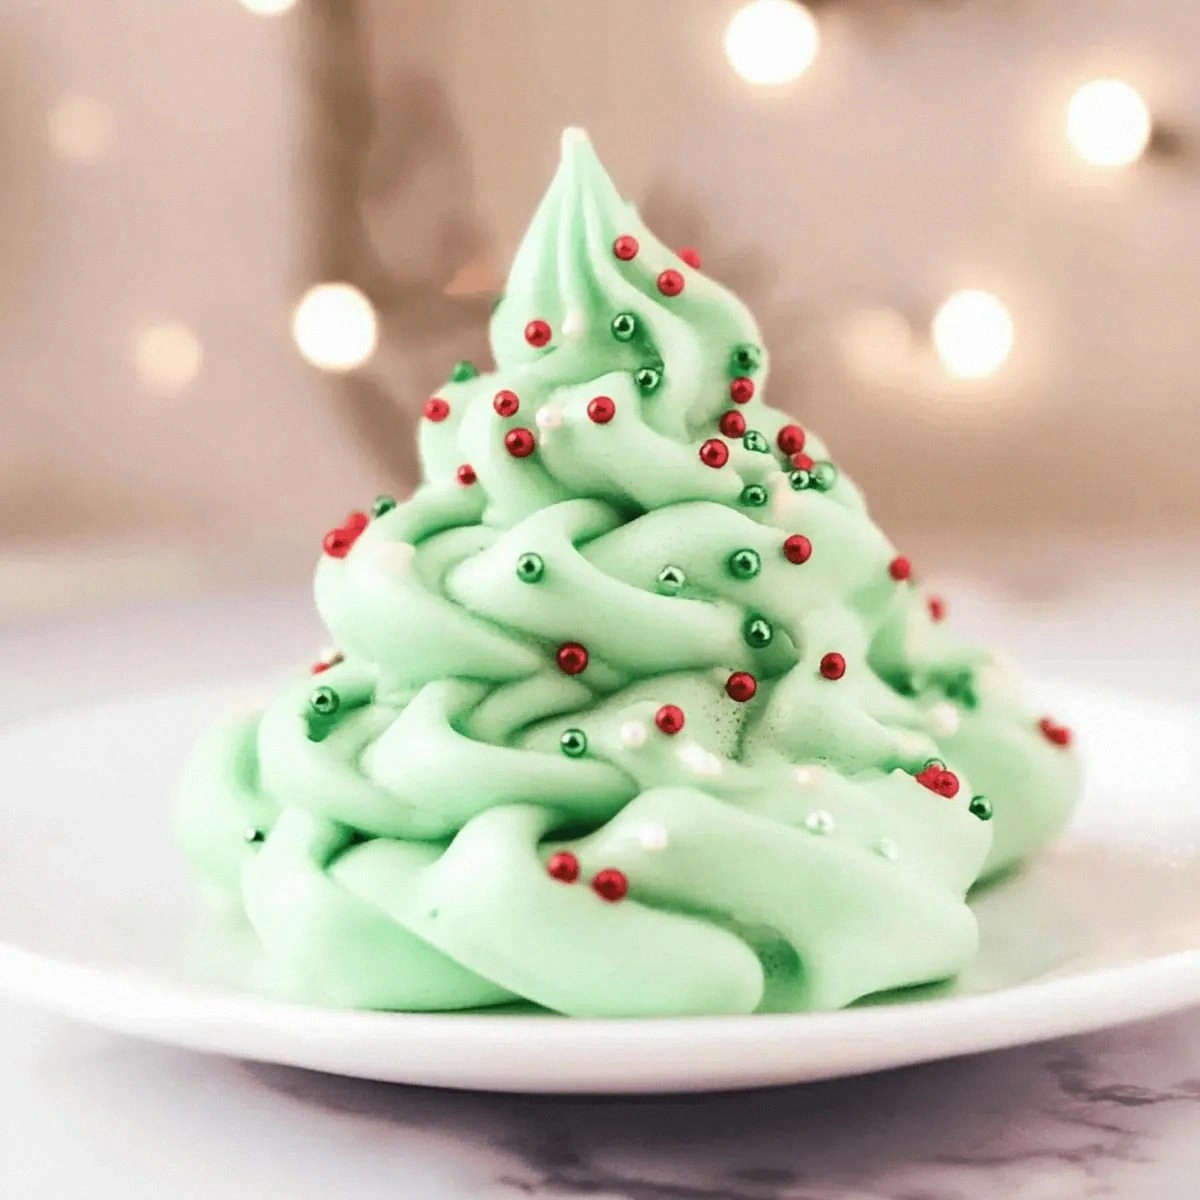
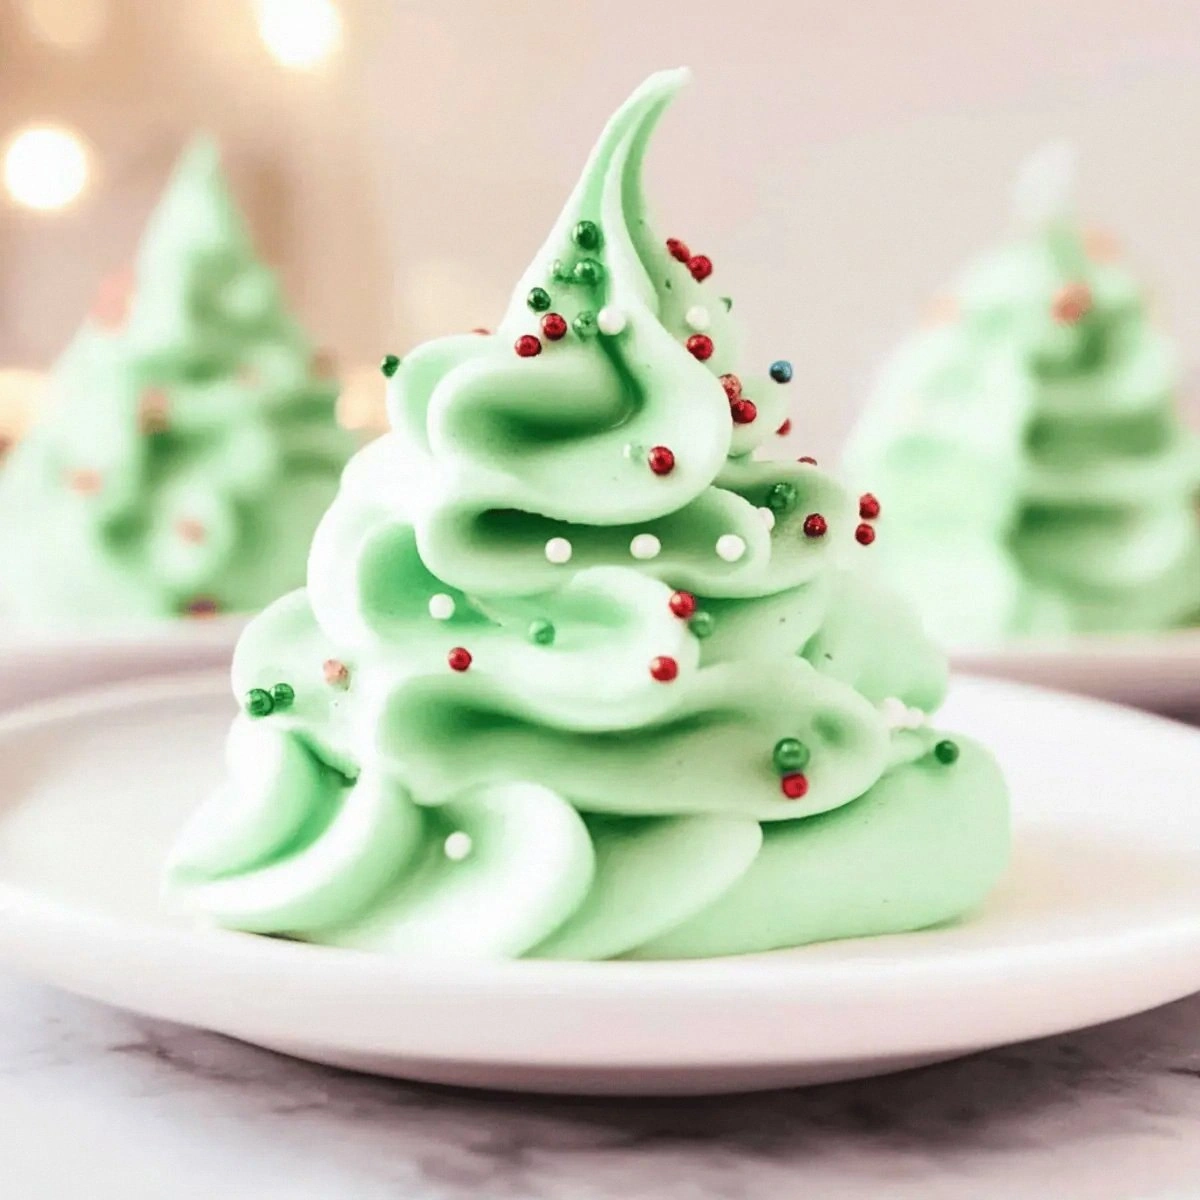
- Visual Impact: Shaped like tiny Christmas trees, they become instant centrepieces that sparkle with festive sprinkles.
- Crowd Reaction: Guests often gasp at the first bite, then immediately ask for the recipe—this is hands down the best version you’ll ever make at home.
- Ingredient Quality: Using fine caster sugar and fresh egg whites guarantees a smooth, glossy finish without grainy grit.
- Cooking Method: Low‑and‑slow baking at 225°F creates that perfect, dry‑to‑the‑touch exterior without burning.
- Make‑Ahead Potential: Store them in an airtight tin for up to two weeks; they stay crisp and ready for any holiday gathering.
Alright, let's break down exactly what goes into this masterpiece...
Inside the Ingredient List
The Flavor Base
First up, the vanilla extract. Just one teaspoon, but it does more than add sweetness—it rounds out the sugar’s sharp edge and creates a buttery undertone that lingers on the palate. If you skip it, the meringues taste like plain sugar clouds, which can be a bit one‑dimensional for a holiday treat. A good quality vanilla bean paste works just as well, and it adds a speckled visual cue that’s surprisingly elegant.
The Texture Crew
Egg whites are the heart of any meringue. Using three large, room‑temperature egg whites ensures maximum volume; cold whites won’t whip properly, and overly fresh whites can be too watery. The cream of tartar is the unsung hero—it stabilizes the foam, preventing collapse during baking, and gives you those glossy peaks that look like polished snowflakes. If you don’t have cream of tartar, a pinch of lemon juice works in a pinch, but expect a slightly different texture.
The Unexpected Star
Caster sugar, not powdered, is crucial. Its fine crystals dissolve quickly, creating a smooth, glassy sheen without the gritty feel that regular granulated sugar can leave. The one‑cup amount is calibrated to the three egg whites; too much sugar makes the meringue dense, too little leaves it sweet but unstable. A quick tip: sift the sugar before adding it to the whites; this aerates it and prevents clumps.
The Final Flourish
The green food‑colour gel is where the magic happens. Just a teaspoon is enough to tint the entire batch a festive evergreen without turning it bitter. Gel colour is preferred over liquid because it doesn’t add extra water, which could jeopardize the delicate structure. If you’re feeling adventurous, you can split the batch and add a drop of red gel to create a gradient effect that looks like a sunrise over a snowy forest.
Everything's prepped? Good. Let's get into the real action...
The Method — Step by Step
Start by preheating your oven to a gentle 225°F (107°C). While the oven warms, line two large baking sheets with parchment paper and set a cooling rack on top of each. This low temperature is the secret to achieving that delicate, dry exterior without any burnt edges. Picture yourself sliding the trays in, the kitchen filling with a faint, sweet aroma that hints at the magic to come.
Separate the egg whites from the yolks, making sure no trace of yolk contaminates the whites. Any fat will sabotage the foam, so take a moment to wipe the bowl with a damp cloth. I dare you to taste this and not go back for seconds—once you get the perfect peaks, you’ll be hooked.
Using a clean, metal whisk or a stand mixer, begin beating the egg whites on medium speed. When they become frothy, add the teaspoon of cream of tartar. This acid not only stabilises the foam but also helps the sugar dissolve more evenly. Keep whisking until soft peaks form—when you lift the whisk, the peaks should just barely hold their shape.
Now the fun part: gradually sprinkle in the caster sugar, one tablespoon at a time, allowing each addition to fully incorporate before adding the next. This slow incorporation is pure magic; it creates a glossy, thick batter that looks like liquid glass. As the sugar dissolves, the mixture will become glossy and stiff, forming glossy peaks that stand tall.
At the very end, drizzle in the vanilla extract and the green food‑colour gel. Fold gently with a rubber spatula, turning the batter over just enough to colour it uniformly without deflating the peaks. The colour should be a deep evergreen, reminiscent of a pine forest under moonlight. If you notice any streaks, keep folding until the hue is consistent.
Transfer the batter into a piping bag fitted with a large star tip. Pipe tiny conical shapes onto the parchment, spacing them about two inches apart. Then, using the tip’s back, gently press a small indentation at the base of each cone to create a “tree trunk” shape. This step is where your artistic side shines; I like to imagine each cone as a miniature fir ready for decoration.
Sprinkle the red, green, and white sprinkles over the piped meringues while they are still wet. The sprinkles will adhere instantly, creating a festive sparkle that catches the light. If you’re feeling extra festive, add a pinch of edible gold dust for a luxe touch.
Slide the trays into the preheated oven and bake for 30‑35 minutes. You’ll know they’re done when the edges turn a pale golden‑brown and the tops feel dry to the touch. The centre should still be slightly soft—this is the sweet spot that guarantees a melt‑in‑your‑mouth experience.
Turn off the oven, crack the door open just a crack, and let the meringues cool completely inside the oven for another 15 minutes. This gradual cooling prevents sudden temperature changes that could cause cracks or collapse. Once cooled, carefully lift them off the parchment using a thin spatula; they should lift cleanly, like snowflakes drifting off a window.
That's it — you did it. But hold on, I've got a few more tricks that'll take this to another level. Stay with me here — this is worth it.
Insider Tricks for Flawless Results
The Temperature Rule Nobody Follows
Never, ever rush the oven preheat. A fully heated oven ensures the meringues set instantly, locking in that airy interior. I once tried a “quick‑heat” method and ended up with soggy bases that never crisped. Trust the thermostat; the extra five minutes of waiting pays off in texture.
Why Your Nose Knows Best
When the meringues are halfway through baking, the kitchen will fill with a faint, caramel‑sweet scent. That aroma is your cue that the sugar is caramelising just enough to give a subtle crunch without turning bitter. If you smell a burnt note, pull them out early; you can always finish them under a broiler for a quick crisp.
The 5‑Minute Rest That Changes Everything
After the oven’s door is cracked for cooling, let the meringues sit for exactly five minutes before moving them. This short rest lets the interior set, preventing cracks when you transfer them. A friend tried skipping this step once — let’s just say the trees shattered like glass when she tried to lift them.
Sprinkle Strategy
Apply sprinkles while the meringues are still tacky; otherwise, they’ll slide off. If you want a more even distribution, use a small sieve to dust the sprinkles, creating a gentle rain effect. This technique also prevents clumping, keeping each tree looking pristine.
Humidity Is Your Enemy
On humid days, the meringues can absorb moisture and become sticky. To combat this, place a small dish of uncooked rice in the storage container—it acts like a desiccant. I’ve used this trick at holiday parties and the meringues stayed crisp for days.
Creative Twists and Variations
This recipe is a playground. Here are some of my favorite ways to switch things up:
Chocolate‑Dipped Forest
After the meringues have cooled, dip the base of each tree into melted dark chocolate and let it set. The contrast of bitter chocolate with sweet meringue creates a sophisticated flavor that adults love.
Berry Burst
Fold a tablespoon of freeze‑dried raspberry powder into the batter for a pink‑hued twist, then sprinkle with pink and white sprinkles. The tart berry notes cut through the sweetness, making it a perfect palate cleanser.
Spiced Holiday
Add a pinch of ground cinnamon and nutmeg to the batter for a warm, spicy undertone. This version pairs beautifully with mulled wine and brings a nostalgic holiday feeling.
Miniature Snowballs
Pipe the batter into small round mounds instead of trees, then dust with powdered sugar for a snowball effect. These are perfect for cocktail garnishes or as a whimsical addition to a cheese board.
Vegan Version
Replace the egg whites with aquafaba (the liquid from canned chickpeas) — three tablespoons of aquafaba mimics three egg whites. Add a pinch of cream of tartar and follow the same steps; the texture is surprisingly similar.
Glittering Glam
Swap the traditional sprinkles for edible glitter and gold leaf. The result is a dazzling centerpiece that looks like a winter wonderland under fairy lights.
Storing and Bringing It Back to Life
Fridge Storage
Place the cooled meringues in an airtight tin lined with parchment. They’ll stay crisp for up to five days in the refrigerator. Avoid plastic wrap directly on the meringues; the moisture will make them soggy.
Freezer Friendly
For longer storage, layer the meringues between sheets of wax paper and seal them in a zip‑lock freezer bag. They freeze beautifully for up to three months. When you’re ready to serve, let them thaw at room temperature for 30 minutes.
Best Reheating Method
To revive that fresh‑out‑the‑oven crunch, preheat the oven to 250°F (120°C) and warm the meringues for five minutes. Add a tiny splash of water to the oven tray before reheating; the steam helps the outer shell regain its snap without drying out the interior.