I was standing in my kitchen, half‑asleep, when my roommate dared me to create “the most insane breakfast‑dessert hybrid ever.” I laughed, grabbed a bag of apples, and stared at my battered waffle iron like it was a secret portal to flavor heaven. The smell of cinnamon drifting from the pantry made my nostrils do a little dance, and the clatter of my old cast‑iron skillet reminded me of the countless fried dough disasters I’d survived. I thought, “What if I could marry the airy lightness of a waffle with the indulgent crunch of a fried donut, then hide a sweet apple‑fritter core inside?” That thought turned into a full‑blown obsession, and after a few trial runs (including one that left my smoke alarm screaming), I finally nailed a version that makes the ordinary feel like a distant memory.
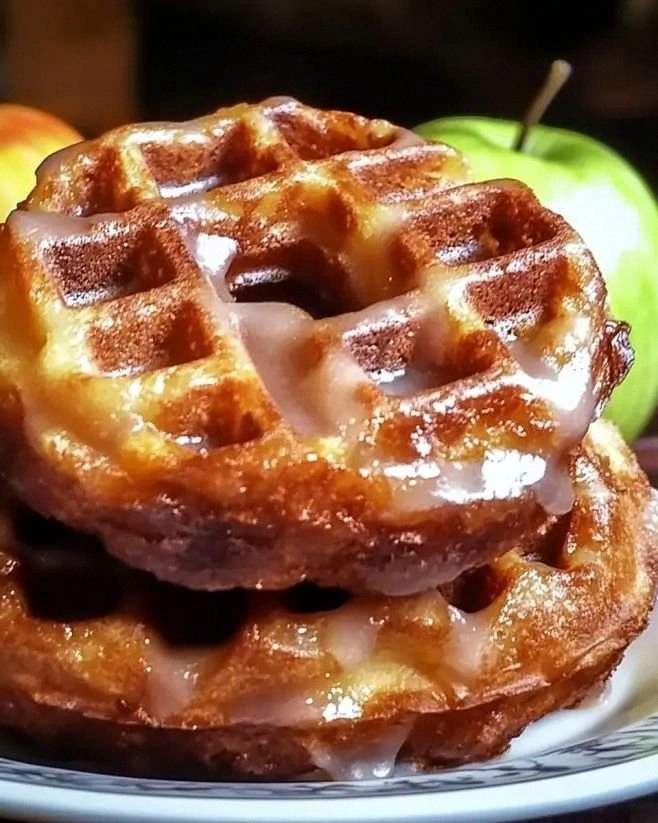
Picture this: a golden‑brown donut that’s been kissed by a waffle iron, its surface patterned with those iconic gridlines, then finished with a quick dip in hot oil that gives it a whisper‑thin crisp. The first bite releases a burst of caramelized apple pieces, buttery walnuts, and a hint of cinnamon that swirls around your tongue like a warm autumn breeze. The glaze? It slides over the top like a glossy veil, catching the light and promising a sweet finish that’s both delicate and decadently sticky. Every sense is engaged – the sizzle of batter hitting the iron, the sweet perfume of apples caramelizing, the tactile pleasure of a soft interior meeting a crunchy edge.
Most recipes for apple fritters either fry everything in a deep pan or bake a plain waffle. Both are good, but they miss the magic that happens when you combine the two techniques. This version stands out because it gives you the best of both worlds: the airy lift of a waffle and the indulgent crunch of a fried donut, all while packing in fruit and nut goodness. I’ll be honest — I ate half the batch before anyone else got to try it, and that’s a confession that proves how addictive this treat really is. I dare you to taste this and not go back for seconds; your taste buds will file a formal complaint to the flavor police.
There’s a secret technique hidden in the batter that you won’t find in any generic recipe: a brief rest period that lets the gluten relax and the baking powder fully activate, creating a texture that’s airy yet sturdy enough to hold the glaze without sagging. I also sprinkle a pinch of sea salt into the glaze, a tiny twist that makes the sweetness sing like a choir. Okay, ready for the game‑changer? Let me walk you through every single step — by the end, you’ll wonder how you ever made it any other way.
What Makes This Version Stand Out
- Taste: The combination of caramelized apples, toasted walnuts, and a buttery vanilla glaze creates a flavor symphony that’s both comforting and sophisticated.
- Texture: You get a fluffy interior that pulls apart like a cloud, contrasted with a crisp, golden‑brown exterior that shatters like thin ice when you bite.
- Simplicity: Despite the impressive result, the ingredient list is short, and the steps use tools most home cooks already own.
- Uniqueness: Marrying waffle iron cooking with a quick oil finish is a technique most recipes overlook, giving you that coveted “restaurant‑level” finish.
- Crowd Reaction: Guests invariably ask for the recipe, and the first bite often earns a delighted gasp — perfect for brunch parties or a cozy weekend treat.
- Ingredient Quality: Fresh apples and real butter elevate the dish from “just okay” to “wow, I could eat this every day.”
- Cooking Method: The two‑stage cooking (waffle iron then oil) ensures even cooking without the sogginess you sometimes get from deep‑frying alone.
- Make‑Ahead Potential: You can prep the batter and glaze a day ahead, then pop the donuts in the iron when you’re ready to serve.
Inside the Ingredient List
The Flavor Base
All‑purpose flour is the backbone of any batter, providing structure while still allowing the leavening agents to create lift. I always reach for a flour that’s been sifted at least once; it guarantees a lighter crumb and prevents clumps that could ruin the waffle pattern. If you skip the flour or use a low‑protein alternative, the donuts will turn dense and gummy, losing that airy quality we crave. Swap tip: For a gluten‑free version, use a 1‑to‑1 gluten‑free flour blend, but add a tablespoon of xanthan gum to mimic the elasticity of wheat.
Baking powder is the silent hero that makes the batter rise dramatically once it hits the hot iron. A tablespoon is just enough to give each donut a lofty interior without turning it into a bread‑like texture. Using baking soda alone would require an acidic component, which we don’t have in abundance, so the powder is the perfect match. Pro tip: Shake the powder in a sealed jar before measuring to ensure even distribution of the leavening salts.
Ground cinnamon brings that warm, spicy note that pairs beautifully with apples. It’s the spice that makes you think of cozy fall evenings, even in the middle of summer. If you love a bolder spice profile, add a pinch of nutmeg or allspice; just don’t overdo it, or the flavor will dominate the delicate vanilla glaze.
Fun Fact: Cinnamon was once so valuable that it was used as currency in ancient trade routes, and it was believed to have medicinal properties that could ward off the plague.
The Texture Crew
A half‑teaspoon of salt might seem trivial, but it amplifies every other flavor, ensuring the sweetness isn’t cloying. Salt also tightens the gluten network just enough to give the donuts a pleasant bite without becoming tough. If you’re on a low‑sodium diet, you can reduce it to a quarter teaspoon, but expect a slightly flatter flavor profile.
Granulated sugar adds sweetness and contributes to the caramelization that forms the golden crust. The half‑cup amount is balanced to keep the glaze from becoming overly sweet. If you prefer a deeper caramel flavor, swap half of the granulated sugar for brown sugar, which also adds a hint of molasses.
Brown sugar, with its molasses undertone, adds depth and a subtle moisture that keeps the interior tender. It works in harmony with the apples, reinforcing that warm, autumnal vibe. For a richer flavor, you can use dark brown sugar, but watch the batter’s color—it will turn a richer amber.
The Unexpected Star
Whole milk provides the liquid needed to bring the dry ingredients together, and its fat content helps create a tender crumb. If you’re dairy‑free, substitute with oat milk or almond milk; just make sure it’s unsweetened to keep the flavor balanced.
Unsalted butter, melted and cooled slightly, adds richness and a buttery aroma that’s impossible to replicate with oil alone. The butter also helps the glaze adhere later on. If you’re looking to cut calories, you can replace half of the butter with a neutral‑flavored apple sauce, but expect a slightly different texture.
Large eggs act as a binding agent, trapping air bubbles created by the baking powder and giving the donuts structure. Using smaller eggs would require an extra egg to maintain the same moisture level. If you’re vegan, a flax‑egg (1 tbsp ground flaxseed + 3 tbsp water) works as a decent substitute, though the texture will be a touch denser.
Vanilla extract adds a fragrant backbone that ties the spices, apples, and glaze together. A teaspoon is enough to perfume the batter without overwhelming the other flavors. For a twist, try a splash of maple syrup in place of vanilla for a deeper, caramel‑like note.
The Final Flourish
Fresh apples, peeled and diced, are the heart of the “fritter” component. Their natural sugars caramelize quickly, creating pockets of juicy sweetness throughout each bite. Choose a firm variety like Granny Smith or Honeycrisp; they hold their shape better during cooking. If you use a softer apple, the batter may become soggy.
Chopped walnuts or pecans add a crunchy contrast and a nutty richness that complements the apples. Toast them lightly before folding them in to enhance their flavor. If you have a nut allergy, replace with toasted pumpkin seeds for a similar crunch.
Oil for frying is essential for that final crisp. I recommend a neutral oil with a high smoke point—canola or grapeseed works best. Using olive oil would add a bitter aftertaste and could smoke at the high temperatures needed.
The glaze, made from powdered sugar, milk, and vanilla, is the finishing touch that gives the donuts their glossy allure. It sets quickly, forming a thin, sweet shell that doesn’t overwhelm the interior flavors. If you like a thicker glaze, double the powdered sugar and add a touch more milk.
Everything's prepped? Good. Let's get into the real action...

The Method — Step by Step
In a large mixing bowl, whisk together the flour, baking powder, ground cinnamon, salt, granulated sugar, and brown sugar. The dry mixture should look uniformly speckled, with no clumps of sugar or flour. I like to sift the flour and spices together; it aerates the mixture and prevents any gritty texture later on. Pro tip: Let this dry blend rest for 5 minutes; it gives the baking powder a chance to hydrate, which will boost lift later.
In a separate saucepan, melt the unsalted butter over low heat, then remove from the stove and let it cool just until it’s warm to the touch. While it’s cooling, whisk in the whole milk, eggs, and vanilla extract until the mixture is smooth and slightly frothy. This wet mixture should have a glossy sheen, indicating the butter is fully incorporated. Watch Out: If the butter is too hot, it will scramble the eggs, creating a grainy batter.
Create a well in the center of the dry ingredients and pour the wet mixture in. Using a rubber spatula, gently fold the two together until just combined; a few streaks of flour are okay. Over‑mixing will develop gluten, resulting in a dense donut instead of a light, airy one.
Kitchen Hack: Add a splash of sparkling water (about 2 tbsp) to the batter at this stage; the bubbles help keep the interior fluffy.Fold in the diced apples and chopped nuts, distributing them evenly throughout the batter. The apples should be coated lightly with the batter, preventing them from sinking to the bottom during cooking. If the batter looks too thick, drizzle a teaspoon of milk and stir gently. This step is where the magic begins – the fruit and nut pockets will become caramelized gems in each bite.
Preheat your waffle iron to a medium‑high setting (around 190‑200°C / 375‑400°F). While it heats, lightly brush the plates with a thin layer of oil to prevent sticking. Once the iron signals it’s ready, spoon a generous ladle (about ¼ cup) of batter onto the center, spreading it just enough to fill the grid without overflowing. Close the lid and let it cook for 3‑4 minutes. You’ll know it’s done when the edges pull away slightly and the surface turns a deep golden‑brown.
While the first donut is cooking, heat a shallow pan with about ½‑inch of oil to 350°F (175°C). Use a thermometer; the oil should shimmer but not smoke. Once the first waffle‑donut pops out, carefully slide it into the hot oil for a quick 15‑20 second dip. This brief fry creates that coveted crispy exterior while preserving the fluffy interior. Watch Out: Do not overcrowd the pan – crowding drops the oil temperature and yields soggy donuts.
Using a slotted spoon, lift the fried donut and place it on a paper‑towel‑lined cooling rack. While it’s still hot, brush or drizzle the glaze over the top, allowing it to cascade into the waffle pockets. The glaze will set in about a minute, forming a glossy coat that adds a sweet finish without soaking the donut.
Repeat the process with the remaining batter, adjusting the heat of the waffle iron and oil as needed. Keep a watchful eye on the oil temperature; if it drops below 325°F, the donuts will absorb too much oil. If it climbs above 375°F, the glaze may burn before the interior cooks through. Consistency is key, and a little patience goes a long way.
Once all donuts are cooked and glazed, let them rest on the rack for a few minutes to allow the glaze to set fully. This is the perfect moment to admire your handiwork – the grid pattern, the glossy sheen, the caramelized apple bits peeking through. Serve warm, or let them cool to room temperature for a firmer bite. And now the fun part: digging in, of course.
Insider Tricks for Flawless Results
The Temperature Rule Nobody Follows
Most home cooks set their waffle iron on “high” and assume more heat equals faster cooking. In reality, a moderate temperature (190‑200°C) gives the batter time to rise without scorching the outside. I’ve seen donuts that look perfect on the outside but are doughy inside because the iron was too hot. Keep an eye on the steam – a gentle hiss means the interior is cooking evenly. If you hear a loud crackle, lower the heat immediately.
Why Your Nose Knows Best
Your sense of smell is a reliable indicator of doneness. When the batter hits the iron, you’ll hear a faint sizzle, followed by a sweet, buttery aroma. As the donut nears completion, the scent shifts to a deeper caramel note. If you catch that change, it’s time to start checking the edges. Trusting your nose can save you from over‑cooking and losing that delicate interior.
The 5‑Minute Rest That Changes Everything
After mixing wet and dry ingredients, let the batter sit for exactly five minutes. This pause allows the baking powder to fully activate and the flour to hydrate, resulting in a batter that spreads just enough to fill the waffle grid without overflowing. Skipping this rest often yields a dense, uneven texture. I set a timer, sip coffee, and watch the batter thicken slightly – a small ritual that makes a huge difference.
Oil Temperature Mastery
A common mistake is using a thermometer that reads the oil’s surface temperature, which can be misleading. Instead, drop a tiny piece of batter into the oil; if it sizzles immediately and rises to the surface within two seconds, the oil is perfect. If it sinks or browns too quickly, adjust the heat accordingly. This simple test ensures every donut gets that crisp, golden crust.
Glaze Timing Trick
Applying the glaze while the donut is still steaming hot creates a thin, glass‑like coating that adheres flawlessly. If you wait until the donut cools, the glaze will pool and slide off, leaving a sticky mess. For an extra glossy finish, dip the glazed donut in a second, thinner glaze just before serving.
Creative Twists and Variations
This recipe is a playground. Here are some of my favorite ways to switch things up:
Maple‑Bacon Bliss
Swap the vanilla extract for pure maple syrup in both batter and glaze, and fold in crisp‑fried bacon bits. The sweet‑savory combo turns these donuts into a brunch centerpiece that will have everyone reaching for seconds.
Cranberry‑Orange Zing
Replace half the apples with dried cranberries and add a teaspoon of orange zest to the batter. The tartness of cranberries paired with citrus brightens the flavor profile, perfect for a holiday twist.
Chocolate‑Hazelnut Dream
Add 2 tablespoons of cocoa powder to the dry mix and fold in chopped toasted hazelnuts. Finish with a chocolate glaze (powdered sugar, cocoa, milk) instead of the vanilla glaze for a decadent dessert.
Pumpkin Spice Autumn
Incorporate ½ cup of pumpkin puree into the wet ingredients and swap cinnamon for pumpkin spice blend. Garnish with a drizzle of caramel sauce for an instant fall favorite.
Vegan Coconut Crunch
Use coconut oil for frying, replace butter with coconut oil, and swap the eggs for flax‑eggs. Top with a coconut‑infused glaze (powdered sugar, coconut milk, vanilla) and sprinkle toasted coconut flakes.
Storing and Bringing It Back to Life
Fridge Storage
Place cooled donuts in an airtight container lined with parchment paper. They stay fresh for up to three days. To revive, reheat in a toaster oven at 350°F for 5 minutes, or pop them in a skillet with a splash of butter for a quick crisp.
Freezer Friendly
Wrap each donut individually in plastic wrap, then seal them in a zip‑top freezer bag. They freeze beautifully for up to two months. When ready to enjoy, let them thaw at room temperature, then give them a quick 2‑minute blast in a preheated oven (375°F) to restore the glaze’s shine.
Best Reheating Method
Add a tiny splash of water (about a teaspoon) to the donut before microwaving for 20‑30 seconds; the steam revives the interior while keeping the glaze intact. For a crispier finish, follow the microwave step with a 1‑minute pass in a hot skillet, pressing gently with a spatula.