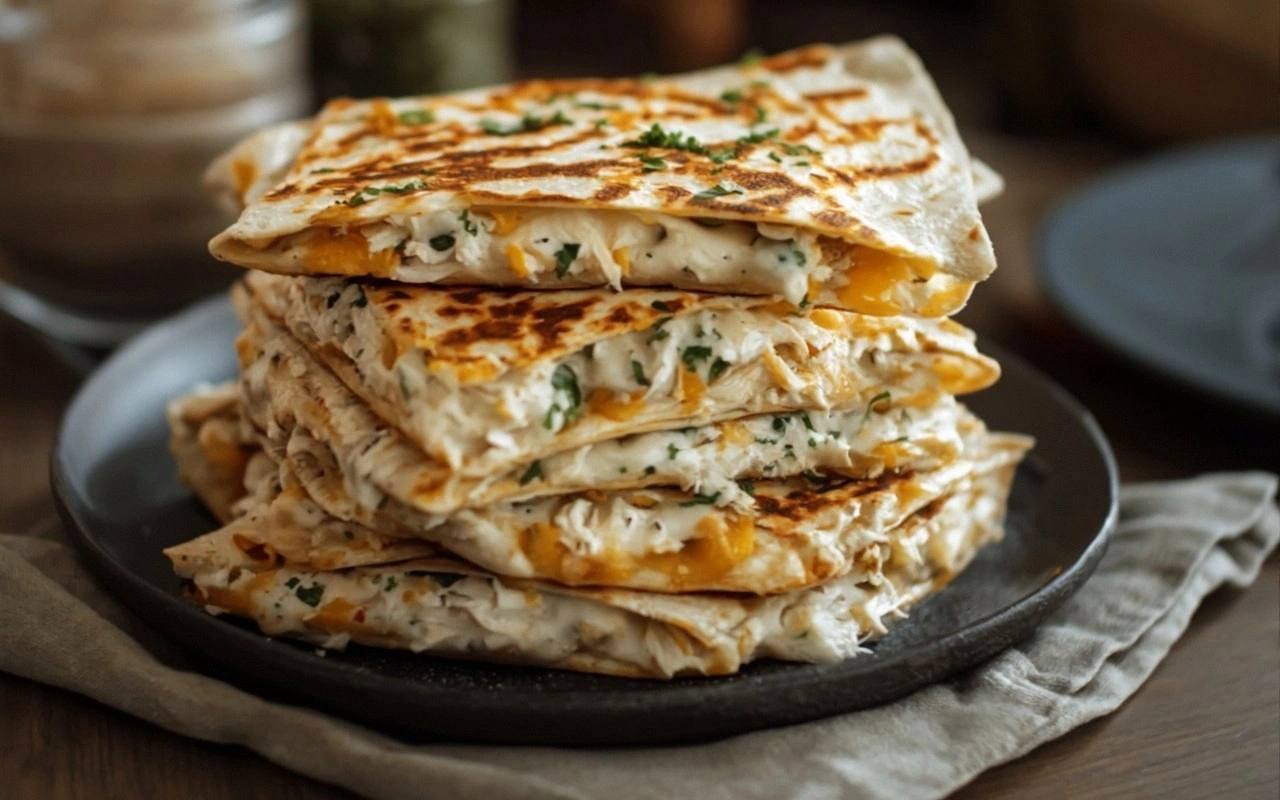
Picture this: it’s 6 p.m., the fridge is a sad, empty shell, and your stomach is growling louder than a freight train. You flip through a cookbook, stare at a page of bland chicken tacos, and suddenly a wild idea sparks—why not turn a simple chicken quesadilla into a protein-packed powerhouse that’s ready in minutes? The kitchen lights flicker, the air smells like sizzling oil, and you’re ready to dive headfirst into a culinary experiment that will change how you think about quick meals.
We’re not talking about a run-of-the-mill, microwavable “quick fix.” This recipe is a symphony of textures: the tortilla’s buttery crunch, the cheese’s molten melt, the ranch’s silky drizzle, and the fresh peppers’ crisp snap. The aroma is a heady mix of toasted corn, peppery green onions, and the subtle tang of ranch that makes your nose do a double-take. Every bite feels like a burst of flavor that refuses to let you settle for anything else.
What sets this version apart isn’t just the ingredients—it’s the method that locks in moisture, balances heat, and keeps the protein high while the flavor stays bold. I’ve spent countless evenings scrambling to make a decent dinner, and this is the hands‑down best version you’ll ever make at home. Trust me, I ate half the batch before anyone else got to taste it. The secret is in the quick, high‑heat pan technique that locks in juices and creates a golden, slightly charred edge that shatters like thin ice.
Let me walk you through every single step—by the end, you’ll wonder how you ever made it any other way. I dare you to taste this and not go back for seconds. The moment you pull the finished quesadilla out of the pan, the whole kitchen smells incredible, and you’ll know you’re about to experience a flavor explosion that’s both comforting and adventurous. Stay with me here—this is worth it.
What Makes This Version Stand Out
- Taste: The blend of ranch, sharp cheddar, and fresh veggies creates a creamy, savory profile that feels indulgent yet balanced. The pepper’s bite adds a subtle heat that wakes the palate.
- Texture: The tortilla’s crisp edge contrasts with the gooey cheese, while the chicken stays moist and tender thanks to the quick sear.
- Speed: From prep to plate, you’re in and out in under fifteen minutes, making this a perfect weeknight winner.
- Simplicity: No fancy equipment, no complicated sauces—just a few pantry staples and a hot skillet.
- Protein Power: Two cups of cooked chicken breast deliver a hefty protein punch that keeps you full and satisfied.
- Crowd Appeal: Even picky eaters love the familiar quesadilla shape, while the added veggies bring a healthy twist.
- Make‑Ahead Potential: Assemble the filling in advance; just grill the tortillas when you’re ready to eat.
- Ingredient Quality: Fresh, high‑quality chicken and fresh veggies make all the difference in flavor.
Inside the Ingredient List
The Protein Core
Cooked chicken breast is the star of this dish, providing a lean source of protein that keeps the meal balanced. Use leftover rotisserie chicken or grill fresh breasts for a burst of flavor. If you’re short on time, pre‑cooked rotisserie chicken works perfectly—just shred or cube it before mixing. A good quality chicken will make the difference between a bland and a memorable quesadilla.
The Creamy Companion
Ranch dressing isn’t just a side; it’s the creamy glue that binds the filling together. The subtle herbs and buttermilk tang elevate the dish, giving it a velvety coating that melts into every bite. If you’re watching sodium, look for a low‑sodium or homemade version—just blend Greek yogurt with herbs to keep it fresh and light.
The Cheesy Element
Shredded cheddar adds a sharp, melty texture that creates the signature gooey interior. For a milder option, try Monterey Jack or a blend of cheeses. The cheese also helps bind the tortilla, giving the quesadilla a satisfying snap when you bite into it. Remember, the cheese is the final touch that brings everything together.
The Fresh Finish
Green onions and bell pepper give the dish a bright, crisp finish that cuts through the richness of cheese and ranch. They add a pop of color and a subtle crunch that keeps the texture varied. If you can’t find bell pepper, red onion or even a handful of diced tomatoes will work in a pinch.
Everything’s prepped? Good. Let’s get into the real action and turn those ingredients into a mouth‑watering masterpiece.
The Method — Step by Step
- Step 1: Prep the Filling. In a large bowl, combine the shredded chicken, ranch dressing, shredded cheese, green onions, and bell pepper. Stir until every morsel is coated in creamy ranch. This step is crucial because a well‑mixed filling ensures even distribution of flavors. Let the mixture sit for a minute; the ranch will thicken slightly, making it easier to handle.
- Step 2: Heat the Pan. Place a cast‑iron skillet over medium‑high heat and add the tablespoon of olive oil. Wait until the oil shimmers—this indicates the pan is hot enough to seal the tortilla edges. A properly heated pan is the secret to crisp, golden tortillas that don’t stick. The oil also prevents the cheese from burning during the final melt.
- Step 3: Lay the First Tortilla. Place one flour tortilla flat on the skillet, allowing it to sizzle. The tortilla should be warm enough to feel the heat through your fingers. This is the moment the aroma starts to build—an invitation to the rest of the kitchen. Let it cook for about 30 seconds before adding filling.
- Step 4: Spoon the Filling. Spread a generous layer of the chicken mixture over half of the tortilla. Don’t overfill; you want the cheese to melt without spilling out. The filling should be thick enough to hold together but not so heavy that the tortilla tears. This step is where the protein and creaminess meet the crisp tortilla.
- Step 5: Fold and Seal. Carefully fold the tortilla in half, pressing down gently to seal the edges. The fold creates a pocket that holds the gooey cheese and juicy chicken. Pressing a bit helps the tortilla stick together, preventing the filling from escaping. The fold also gives the quesadilla that classic, handheld shape.
- Step 6: Sear the Quesadilla. Allow the folded tortilla to cook for 2–3 minutes on each side. Watch for golden brown spots—this indicates the cheese is melting and the tortilla is crisping up. Flip carefully with a spatula; the cheese may be molten but the tortilla should hold together. The sizzling sound is the soundtrack of flavor.
- Step 7: Repeat the Process. Repeat steps 3–6 for the remaining tortillas, keeping the cooked ones warm in a low‑heat oven if needed. Consistency is key—each quesadilla should have the same balance of crunch, melt, and filling. If you’re making multiple at once, a second skillet will help keep the pace brisk.
- Step 8: Let the Cheese Set. Once all quesadillas are cooked, let them sit for 30 seconds before slicing. This short rest allows the cheese to set slightly, making each bite less runny. The cheese will still be gooey but will hold the tortilla together. This step also lets the flavors meld just a touch more.
- Step 9: Slice and Serve. Use a sharp knife or pizza cutter to slice each quesadilla into wedges. Serve immediately with a side of salsa, guacamole, or a simple green salad. The contrast of hot, creamy filling against cool accompaniments creates a satisfying meal. Enjoy the instant gratification of a protein‑rich dinner that feels indulgent.
- Step 10: Clean as You Go. While the quesadillas are cooking, wipe the skillet with a paper towel to keep it clean. A clean pan means fewer sticky bits and a smoother cooking process. It also saves you a deep‑cleaning session later. Remember, a tidy kitchen is a happy kitchen.
- Step 11: Optional Extra Crispy Edge. For an extra crunch, sprinkle a pinch of parmesan cheese on the tortilla before adding the filling. The cheese will caramelize slightly, giving a nutty flavor that pairs well with ranch. This tweak is simple but elevates the dish to a new level of indulgence. Try it next time you want a gourmet touch.
- Step 12: Taste Test. Take a bite and evaluate the balance of flavors—if the ranch is too mild, add a dash of hot sauce; if the cheese feels heavy, sprinkle a little fresh cilantro. Adjusting seasonings on the fly keeps the dish personalized and perfect. The final taste test is the moment you confirm the recipe’s success.
- Step 13: Plate with Style. Arrange the wedges on a plate, drizzle a thin ribbon of ranch, and sprinkle chopped green onions for a pop of color. Presentation matters; a visually appealing dish enhances the eating experience. A simple garnish can elevate a quick meal into something special.
- Step 14: Enjoy! Sit back, relax, and savor the culmination of quick prep, bold flavors, and protein power. The first bite is a satisfying crunch followed by a creamy, savory explosion. This is the kind of dish that turns a mundane evening into a culinary celebration. Let the flavors linger and plan your next batch—this recipe is addictive.
Insider Tricks for Flawless Results
The Temperature Rule Nobody Follows
Many cooks overcook tortillas, resulting in a dry center. Keep the skillet at medium‑high heat and watch the first side for a quick golden color. A slight wobble in the tortilla indicates it’s ready to flip. This small timing tweak guarantees a crisp edge without sacrificing the tender interior.
Why Your Nose Knows Best
When the cheese starts to melt, the aroma becomes a reliable indicator of readiness. A strong, buttery scent signals that the filling is hot enough to finish cooking. Trust your nose; it’s a seasoned chef’s secret that saves you from overcooking.
The 5-Minute Rest That Changes Everything
After removing the quesadillas from the skillet, let them rest for five minutes. This short pause allows the cheese to set, preventing a runny mess when you cut. The rest also lets the flavors meld, giving each bite a deeper, more cohesive taste.
Keep It Clean, Keep It Quick
Wipe the skillet between each quesadilla to avoid excess oil build‑up. A clean surface ensures even browning and a consistent texture across all servings. It also prevents any leftover bits from sticking and ruining the next batch.
Freshness Is Key
Use fresh, high‑quality chicken and fresh veggies. The fresher the ingredients, the more vibrant the flavors. Avoid pre‑cut or frozen veggies unless you’re in a pinch; they can dilute the taste and texture.
Don’t Overcrowd the Pan
Cooking too many quesadillas at once can lower the skillet’s temperature, leading to uneven cooking. Work in batches if you’re making more than two at a time. A slightly lower heat for a larger batch still produces a golden crust.
Creative Twists and Variations
This recipe is a playground. Here are some of my favorite ways to switch things up:
Spicy Sriracha Kick
Add a tablespoon of sriracha to the filling for a fiery twist. The heat pairs beautifully with ranch, creating a spicy‑creamy combo that excites the palate. This variation is perfect for those who love a little heat in their meals.
Southwestern Fiesta
Swap the ranch for a cilantro lime dressing and sprinkle cumin into the mix. The citrusy tang and earthy spice transform the dish into a southwestern celebration. Serve with a side of black bean salsa for a complete experience.
Veggie‑Loaded Power
Introduce diced zucchini, corn, and spinach to the filling. The extra veggies boost the fiber content and add a pop of color. The texture contrast keeps each bite interesting and satisfying.
Cheese Swap
Use pepper jack or a blend of mozzarella and provolone for a different melt profile. Each cheese brings its own flavor notes—pepper jack adds heat, while mozzarella offers a milder, stretchy texture.
Low‑Carb Edition
Replace flour tortillas with lettuce leaves or a low‑carb tortilla. This change keeps the protein high while cutting down on carbs, making the dish suitable for keto or low‑carb diets.
Breakfast Boost
Serve the quesadilla with a side of scrambled eggs and a drizzle of hot sauce. This combo turns the dish into a hearty breakfast that fuels you for the day. The protein and flavor balance is perfect for morning cravings.
Storing and Bringing It Back to Life
Fridge Storage
Store cooked quesadillas in an airtight container in the fridge for up to 3 days. The cheese may firm up, but the filling stays moist. When ready to eat, reheat in a skillet or microwave for 30 seconds to restore warmth.
Freezer Friendly
Wrap each quesadilla tightly in plastic wrap and place in a freezer bag. They remain fresh for up to 2 months. Thaw overnight in the fridge before reheating. The tortilla’s crispness is preserved with a quick pan sear.
Best Reheating Method
Reheat in a hot skillet over medium heat for 2 minutes on each side. The cheese will melt again, and the tortilla will regain its golden crunch. Add a splash of water to create steam if the tortilla looks dry.
Reheat with a Splash
Before reheating, sprinkle a tiny splash of water over the quesadilla. The steam will keep the filling moist and prevent the cheese from drying out. This simple trick restores the dish’s original texture.
Reheat in the Oven
Preheat the oven to 375°F (190°C). Place the quesadilla on a baking sheet and heat for 10 minutes. The oven evenly distributes heat, giving the tortilla a uniform crispness.
Reheat in the Microwave
Wrap the quesadilla in a damp paper towel and microwave for 45 seconds. The moisture keeps the cheese from drying out, and the tortilla stays pliable.