I was halfway through a week of bland, reheated takeout when my phone buzzed with a message from my roommate: “I’ve been craving something spicy and nutty that feels like a hug.” I stared at my pantry, then at the chicken breast that had been sitting on the counter for days, and the idea hit me like a thunderclap—Thai Peanut Chicken Buddha Bow. The moment I tossed the chicken into a bowl of garlic powder, ground ginger, salt, and pepper, the kitchen filled with a fragrant, almost electric aroma that made my taste buds tingle even before the first bite. The sizzle that followed when the chicken hit the pan was music, a satisfying crack that promised a crisp exterior while keeping the inside juicy and tender.
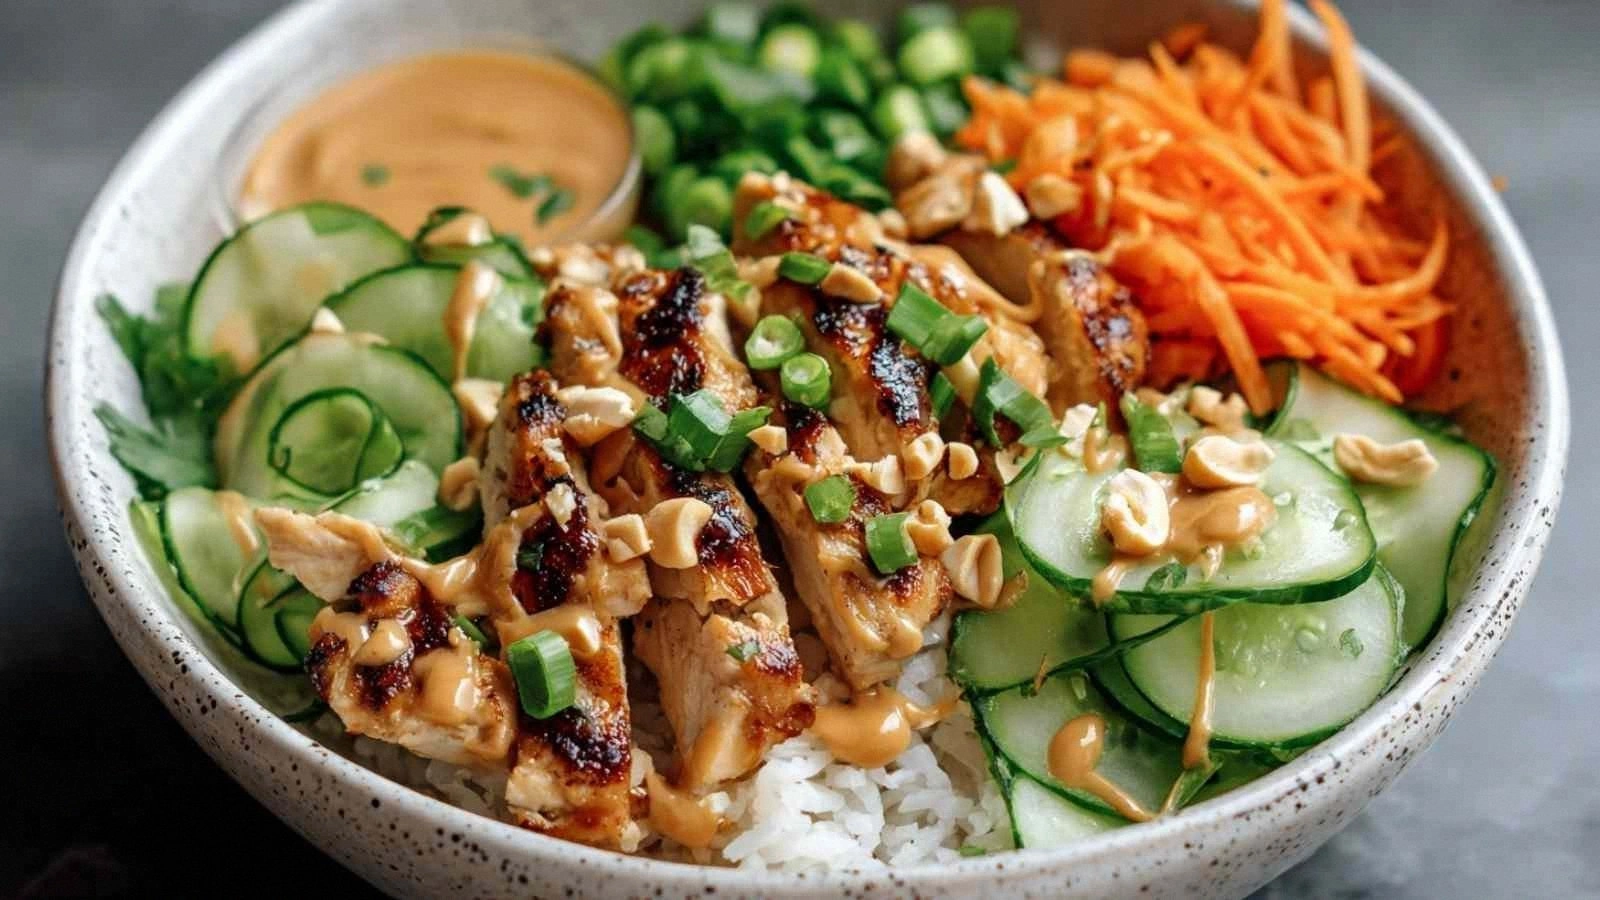
Picture the scene: a golden pan, a bright splash of color from the sliced carrots, cucumber, and bell pepper, and the glossy sheen of the peanut sauce coating the chicken like velvet. The sound of the sauce thickening, the subtle hiss of steam, and the visual dance of sesame seeds falling like tiny confetti create a multisensory experience that turns a simple meal into a performance. I dare you to taste this and not go back for seconds—once you’ve had one spoonful, the rest will feel like a guilty pleasure that you can’t resist. My kitchen, usually a place of routine, became a stage for a dish that was both comforting and adventurous.
What sets this version apart isn’t just the blend of flavors; it’s the way each element works in concert. The sauce is a harmonious marriage of creamy peanut butter, tangy rice vinegar, and a hint of honey that balances the heat of red pepper flakes, while the olive oil gives the chicken a caramelized crust that shatters like thin ice when you bite. The rice or quinoa base is fluffy and slightly nutty, providing a neutral canvas that lets the bright veggies and savory chicken shine. Most recipes get this completely wrong, either by overcooking the chicken or by thinning the sauce with too much water, but I’ve perfected a method that keeps everything moist, flavorful, and visually stunning.
And here’s the twist that makes this bowl truly unforgettable: a splash of warm water in the sauce creates a silky emulsion that clings to every grain of rice and every bite of chicken. This subtle technique transforms a simple peanut butter sauce into a silky, glossy coating that feels like a luxurious blanket over the bowl’s contents. Stay with me here—this is worth it. Let me walk you through every single step, and by the end, you’ll wonder how you ever made it any other way.
What Makes This Version Stand Out
- Flavor Fusion: The sauce marries sweet, salty, and spicy elements, creating a balanced profile that feels both exotic and comforting.
- Texture Contrast: Crisp carrots, crunchy cucumber, and tender chicken give each bite a delightful play of textures.
- Quick Prep: From chopping to searing, the entire prep takes under 15 minutes, making it ideal for busy evenings.
- Healthful Boost: Packed with protein, fiber, and healthy fats, this bowl satisfies without compromising nutrition.
- Make‑Ahead Friendly: The dish can be assembled ahead of time and reheated, preserving flavor and texture.
- Kid‑Approved: The peanut sauce’s sweetness appeals to kids while the veggies add a subtle crunch.
- Versatile Base: Whether you choose brown rice or quinoa, the bowl adapts seamlessly to your dietary preferences.
- Instagram Worthy: The vibrant colors and glossy sauce make for a picture-perfect presentation that will shine on social feeds.
Alright, let's break down exactly what goes into this masterpiece...
Inside the Ingredient List
The Flavor Base
Peanut Butter (1/3 cup): This is the heart of the sauce, providing a rich, nutty undertone that balances the heat from the red pepper flakes. If you skip it, the sauce loses its signature depth and becomes a thin, watery drizzle. For an extra kick, swirl in a teaspoon of sriracha or a pinch of cayenne pepper.
Low‑Sodium Soy Sauce (2 tbsp): It brings umami and a subtle saltiness that grounds the sweetness of the honey. If you’re avoiding soy, try tamari or coconut aminos as a 1:1 substitute.
Rice Vinegar (1 tbsp): This bright acid cuts through the richness of the peanut butter, keeping the sauce from feeling heavy. A splash of lime juice can replace it for a citrusy twist.
Honey (1 tbsp): The natural sweetener balances the salt and spice, giving the sauce a glossy sheen. If you prefer a lower‑calorie option, replace it with a teaspoon of maple syrup.
Warm Water (2 tbsp): This small addition creates a silky emulsion, allowing the sauce to coat each grain of rice and each slice of chicken. Without it, the sauce will separate and feel greasy.
The Protein Crew
Boneless Skinless Chicken Breast (1 lb): Chicken is lean, versatile, and absorbs the sauce’s flavors beautifully. If you’re a fan of a richer protein, swap it for thighs or even shrimp for a different texture.
Olive Oil (2 tbsp): A high‑smoke point oil that helps the chicken sear to a golden crust. For a subtler flavor, use avocado oil or a light sesame oil.
Sesame Oil (1 tsp): Adds a fragrant, nutty aroma that elevates the dish. A small amount is enough; too much can overpower the other flavors.
The Texture Crew
Carrots (1 cup, julienned): Their natural sweetness and crunch provide a satisfying bite. If you’re short on carrots, use sliced zucchini or bell pepper strips.
English Cucumber (1/2 cup, diced): Adds a refreshing crunch and coolness that balances the heat. For a sweeter option, try diced mango or pineapple.
Red Bell Pepper (1/4 cup, diced): Contributes color, sweetness, and a slight peppery note. You can also use a mix of green and yellow peppers for a rainbow effect.
Edamame (1/4 cup, shelled): A protein‑rich, crunchy addition that enhances the bowl’s heartiness. If edamame is unavailable, substitute with corn or peas.
The Final Flourish
Green Onions (2, sliced): They add a bright, oniony finish that cuts through the richness of the sauce. If you’re not a fan of raw onions, lightly sauté them for a milder flavor.
Sesame Seeds (1 tbsp): Sprinkle them on top for a nutty crunch and a polished look. Toasting them slightly before adding will deepen their flavor.
Everything’s prepped? Good. Let’s get into the real action...
The Method — Step by Step
- Prep the Sauce: In a bowl, whisk together creamy peanut butter, low‑sodium soy sauce, rice vinegar, honey, warm water, and a splash of sesame oil until you achieve a smooth, glossy consistency. The mixture should feel silky and coat the back of a spoon without separating. If the sauce is too thick, add a teaspoon of water at a time until it reaches a pourable yet thick texture. This step is crucial; a well‑emulsified sauce will cling to every grain of rice and slice of chicken, delivering flavor in each bite.
- Season the Chicken: Pat the chicken breast dry with paper towels. Toss the chicken with garlic powder, ground ginger, salt, and black pepper until evenly coated. The seasoning should form a thin, aromatic crust that will caramelize when seared. A good tip: let the seasoned chicken rest for 10 minutes at room temperature; this allows the flavors to penetrate and the surface to dry, which helps the sear.
- Heat the Skillet: Place a heavy skillet over medium‑high heat and add olive oil. Once the oil shimmers, slide the chicken into the pan. The pan should hiss loudly—this is the sound of a perfect sear. Cook the chicken for 5–6 minutes on one side until a golden crust forms and the edges pull away. Flip and sear the other side for another 4–5 minutes. The internal temperature should reach 165°F (74°C); use a meat thermometer for precision.
- Glaze the Chicken: Reduce the heat to medium. Pour the prepared sauce over the chicken, swirling to coat each side evenly. Let the sauce simmer for 2 minutes, allowing it to thicken slightly and cling to the chicken. This step is the moment of truth; the sauce should coat the chicken like a glossy, flavorful glaze.
- Rest the Chicken: Once the chicken is fully glazed, remove it from the skillet and let it rest on a cutting board for 5 minutes. Resting allows the juices to redistribute, ensuring the meat stays moist. While the chicken rests, you can prepare the veggies.
- Prepare the Veggies: Toss julienned carrots, diced cucumber, diced bell pepper, and shelled edamame in a bowl. Add a pinch of salt and a drizzle of sesame oil to enhance flavor. If you prefer a slightly sweet note, sprinkle a teaspoon of honey over the veggies. The vegetables should be crisp and bright, offering a contrast to the rich sauce.
- Assemble the Bowl: Spread 3 cups of cooked brown rice or quinoa in the bottom of a bowl. Layer the rested chicken, then the colorful veggie mixture. Drizzle the remaining sauce over the top, or serve it on the side for dipping. Finish with sliced green onions and a sprinkle of sesame seeds for crunch and aroma. The arrangement should look inviting, with each component visible and vibrant.
- Serve Immediately: This bowl is best enjoyed fresh, while the rice is still slightly warm and the sauce is glossy. The contrast of textures—crisp veggies, tender chicken, fluffy rice—makes each spoonful a delight. If you prefer a cooler bowl, let it sit for a few minutes before serving; the sauce will thicken slightly, creating a richer coating.
That’s it — you did it. But hold on, I've got a few more tricks that'll take this to another level...
Insider Tricks for Flawless Results
The Temperature Rule Nobody Follows
Most people cook chicken over medium‑high heat, but the secret is to start at high to get a caramelized crust, then reduce to medium to finish cooking without drying. Keep the skillet hot enough that the chicken sizzles but not so hot that it burns. If you notice the oil smoking, lower the heat slightly. This temperature control ensures juicy, flavorful meat.
Why Your Nose Knows Best
When the sauce starts to thicken, the aroma will shift from sweet to nutty. Trust that scent; it indicates the sauce is ready to coat the chicken. If you’re unsure, gently tilt the pan—if the sauce glides off the spoon and clings, it’s perfect. A nose that senses flavor is a kitchen ally that saves you from over‑seasoning.
The 5‑Minute Rest That Changes Everything
Resting the chicken allows the juices to redistribute, making every bite tender. A friend once skipped this step and ended up with a dry chicken that clung to the sauce. The 5‑minute pause also lets the sauce thicken slightly, creating a glossy coating that feels luxurious on the tongue.
The Veggie Vibe
Stir-frying the veggies for 1 minute before adding them to the bowl adds a subtle char that enhances flavor. If you prefer raw crunch, toss them in cold water and pat dry. Either method works, but the slight stir-fry adds depth to the overall taste profile.
The Quick Sesame Toast
To elevate the sesame seeds, toast them in a dry skillet over medium heat until they’re fragrant and lightly browned. This small step adds a nutty aroma that complements the peanut sauce. Keep a close eye; sesame seeds burn quickly.
Creative Twists and Variations
This recipe is a playground. Here are some of my favorite ways to switch things up:
Spicy Sriracha Splash
Add a tablespoon of sriracha to the sauce for a fiery kick that pairs well with the sweet peanut butter. The heat will balance the richness and leave a lingering warmth.
Coconut Curry Version
Replace the rice vinegar with coconut milk and add a pinch of curry powder. The result is a creamy, fragrant bowl that feels like a tropical escape.
Grilled Shrimp Alternative
Swap the chicken for shrimp, grilling them for 2 minutes per side. The shrimp’s briny flavor complements the peanut sauce, creating a lighter yet equally satisfying dish.
Vegan Take
Use tofu instead of chicken, marinating it in the sauce for 10 minutes before searing. The tofu will absorb the flavors beautifully, making a plant‑based bowl that doesn’t compromise on taste.
Zesty Lime Twist
Add a squeeze of fresh lime juice to the sauce for a bright, citrusy note that cuts through the richness. This variation is especially refreshing on hot days.
Breakfast Bowl
Swap the rice for scrambled eggs and add a handful of spinach. This protein‑packed breakfast bowl will keep you energized until lunch.
Storing and Bringing It Back to Life
Fridge Storage
Store the assembled bowl in an airtight container in the refrigerator for up to 3 days. Keep the sauce separate until ready to eat to prevent the rice from becoming soggy. When reheating, add a splash of water or broth to re‑hydrate the rice.
Freezer Friendly
For longer storage, freeze the bowl in a freezer‑safe container for up to 2 weeks. Thaw overnight in the refrigerator before reheating. The sauce may separate slightly; give it a quick stir before serving.
Best Reheating Method
Reheat the bowl in the microwave on high for 2 minutes, stirring halfway through. If the sauce feels thick, drizzle a teaspoon of water or coconut milk to restore its silky texture. For a crispier finish, finish in a skillet for 1 minute.