Picture this: I’m standing in my kitchen, the oven humming like a contented cat, and the entire pantry is a battlefield of spices, nuts, and that unmistakable scent of butter melting into phyllo. I’d just attempted the classic baklava for the umpteenth time, only to end up with a dry, crumbly mess that tasted more like cardboard than the sweet, buttery heaven I was craving. I swear I could hear the sighs of my guests as they hesitated over the plate, and I thought, “There has to be a better way.” That night, after a frantic Google search and a half‑hour of YouTube tutorials, I decided to blend the airy lightness of a sponge cake with the nutty, honey‑soaked layers of traditional baklava. The result? A dessert that’s as soft as a cloud yet packed with the crunchy, aromatic punch you expect from baklava.
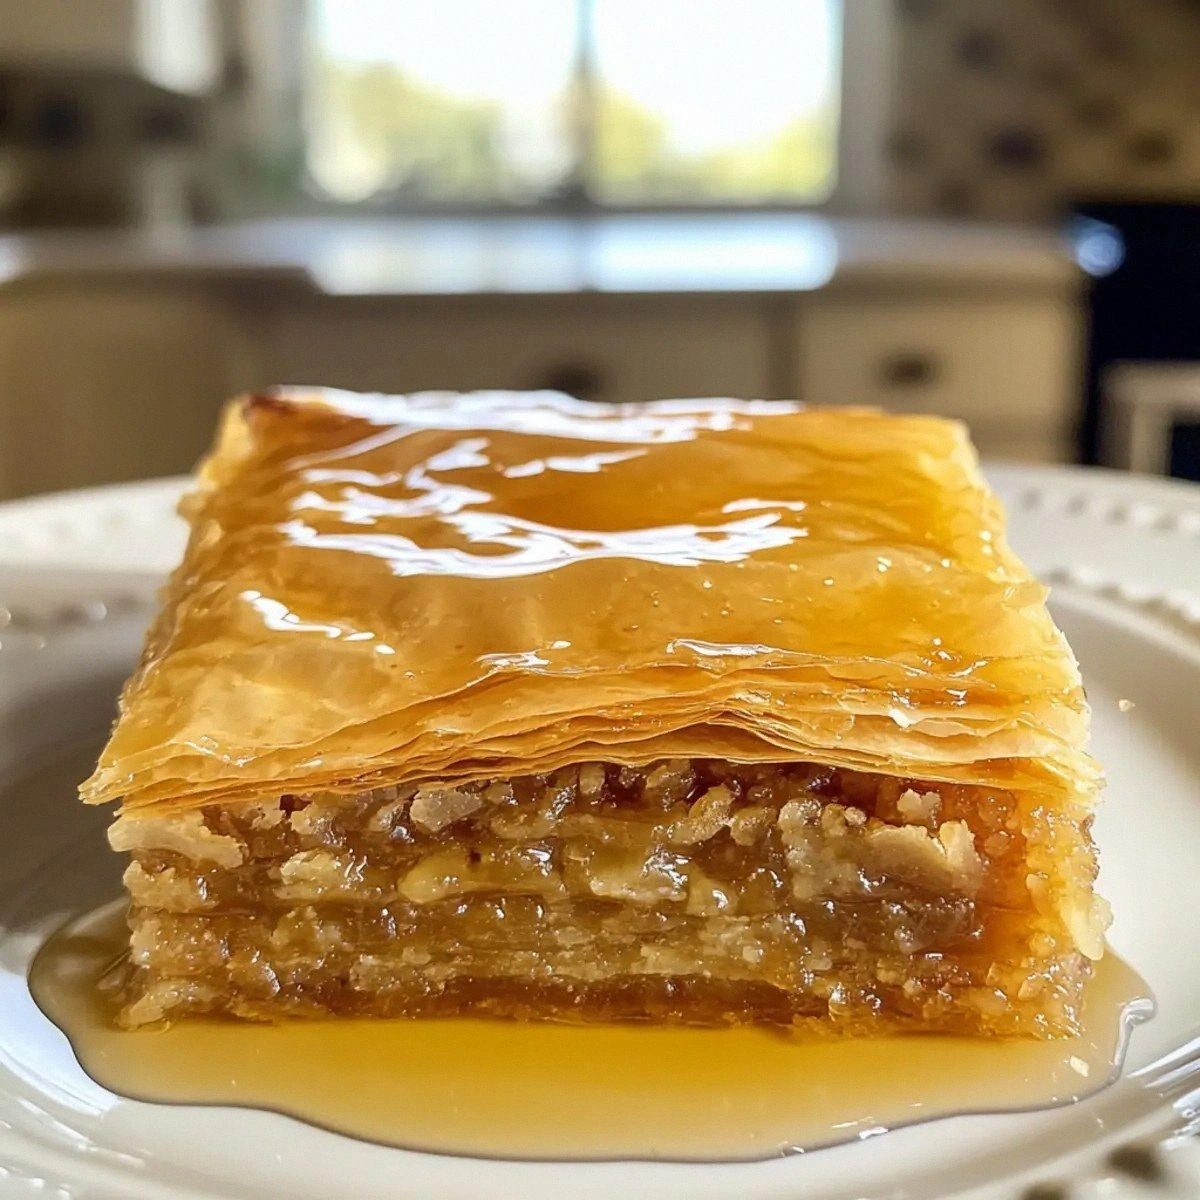
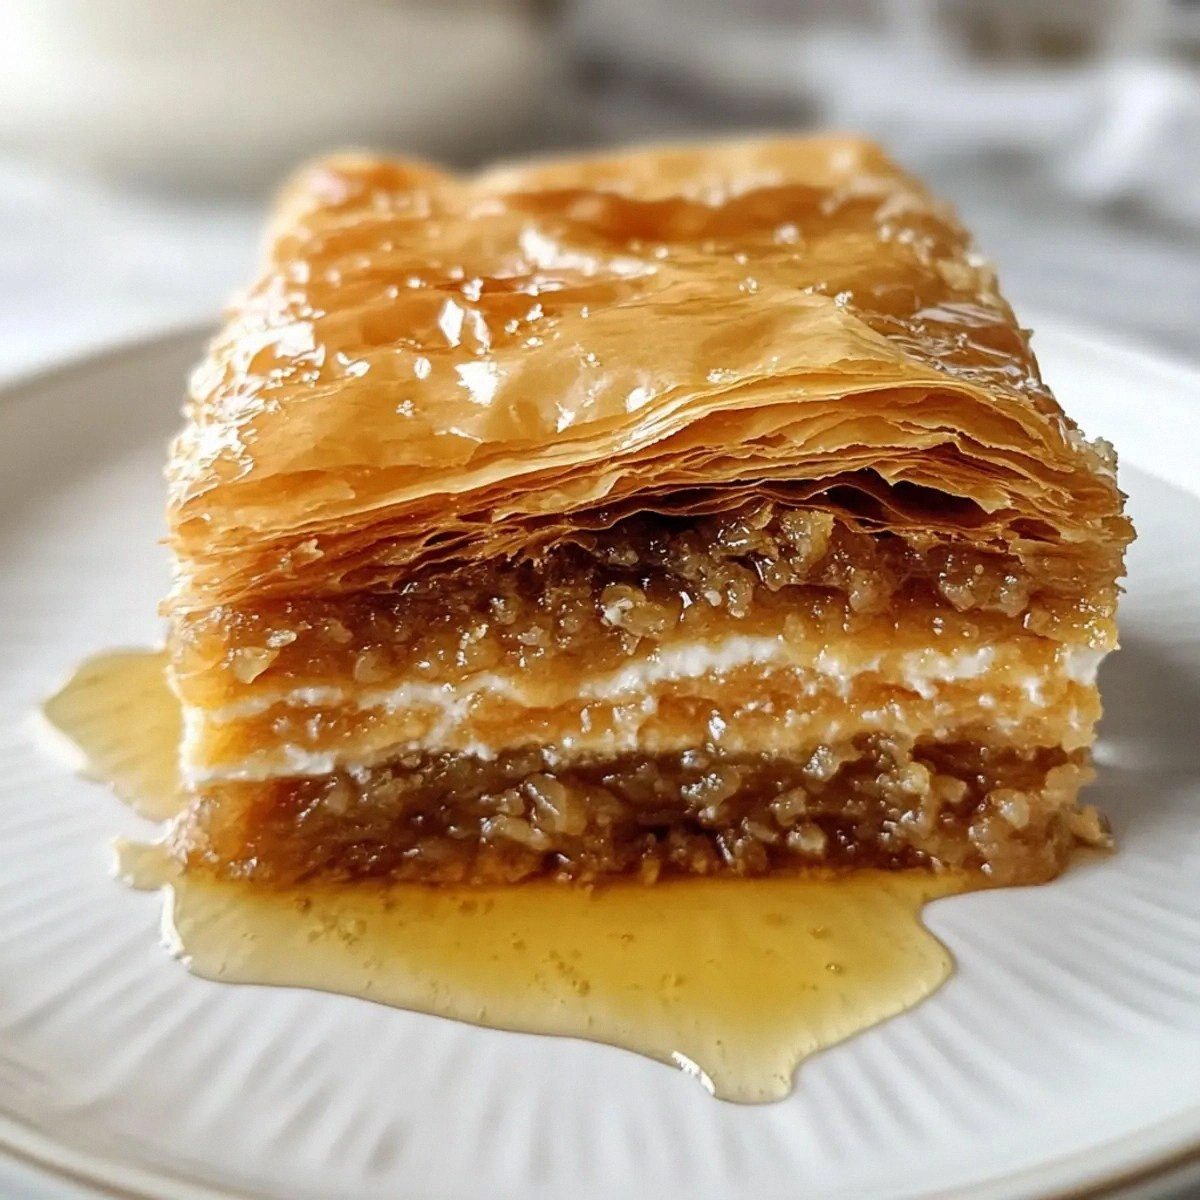
The moment I cut into the first slice, the sponge gave way with a gentle give, like stepping onto a plush carpet, while the phyllo underneath crackled with a satisfying snap. The aroma of cinnamon and clove rose like incense, mingling with the sweet perfume of honey and toasted nuts, making my kitchen feel like a Turkish bazaar on a breezy spring morning. I could hear the faint hiss of the caramelizing syrup as it seeped into every crevice, and the buttery glaze glistened like a polished marble countertop. The texture was a revelation: the sponge was moist and tender, the phyllo buttery and crisp, and the nut filling offered a delightful crunch that kept each bite interesting.
Now, I’m not one to keep such a game‑changing discovery to myself. This version stands out because it fixes the two biggest complaints about traditional baklava – it’s often too dry and too labor‑intensive. By integrating a light sponge base, you get that melt‑in‑your‑mouth softness without sacrificing the iconic flaky layers. Plus, the technique is surprisingly simple: you’re essentially baking a layered cake, not wrestling with endless sheets of phyllo and butter. The secret ingredient? A splash of water in the batter that keeps the sponge airy, and a generous drizzle of honey that seeps into every pocket, ensuring each forkful is drenched in sweet, nutty bliss.
But wait, there’s more. I’m about to reveal a trick that most baklava lovers overlook – the “double‑butter” method, where you melt butter twice: once for brushing the phyllo and once for the syrup, creating a glossy finish that looks as good as it tastes. I dare you to taste this and not go back for seconds; it’s hands down the best version you’ll ever make at home. Let me walk you through every single step — by the end, you’ll wonder how you ever made it any other way.
What Makes This Version Stand Out
- Texture: The sponge layer adds a pillow‑soft cushion beneath the flaky phyllo, creating a contrast that feels like biting into a cloud wrapped in crisp parchment.
- Flavor Depth: Toasted walnuts and pistachios paired with cinnamon, clove, and a honey‑water syrup deliver a multi‑layered taste that deepens as it cools.
- Simplicity: You only need one pan and a single oven, no need for a separate stovetop caramel or a marathon of butter‑brushing sessions.
- Visual Appeal: The golden‑brown top, speckled with nuts, looks stunning on any dessert table, and the cut reveals the gorgeous cross‑section of sponge, nuts, and phyllo.
- Crowd Reaction: Guests constantly ask for the recipe, and even the toughest baklava skeptics are converted on the first bite.
- Ingredient Quality: Using fine semolina in the sponge adds a subtle grainy bite that mimics the traditional texture of baklava dough.
- Make‑Ahead Potential: This dish actually improves after a few hours as the syrup settles, making it perfect for dinner parties.
- Versatility: Swap nuts, add orange zest, or drizzle chocolate for a personalized twist without breaking the core concept.
Inside the Ingredient List
The Flavor Base
Eggs are the backbone of any sponge cake, providing structure and lift. In this recipe, the four large eggs are beaten until they turn a pale, frothy yellow, trapping air that will later expand in the oven, giving the cake its signature fluffiness. If you skip them or use a lower‑fat substitute, you’ll end up with a dense, gummy layer that defeats the purpose of the “soft twist.” For a richer flavor, try using free‑range eggs; the yolk’s depth really shines through when paired with honey.
The Texture Crew
Flour and fine semolina work together like a dynamic duo. The 1.5 cups of all‑purpose flour give the sponge its structure, while the 0.5 cup of semolina introduces a subtle grainy texture that mirrors the traditional baklava dough. If you replace semolina with cornmeal, you’ll get a grittier bite that’s less authentic, but it can be an interesting experiment for a corn‑infused version. Always sift the flour and semolina together to avoid lumps that could create uneven pockets in the final bake.
The Nutty Symphony
Walnuts and pistachios are the heart of baklava. The one cup of walnuts brings an earthy, buttery flavor, while the half cup of pistachios adds a pop of color and a slightly sweet, grassy note. Toast them lightly before mixing; the heat releases their natural oils, intensifying the aroma and preventing the nuts from becoming soggy once the syrup soaks in. If you’re allergic to nuts, try substituting with toasted pumpkin seeds for a similar crunch.
The Final Flourish
Butter, honey, and the spice blend are the finishing touches that turn a simple sponge into an indulgent masterpiece. The whole cup of butter is split: half melts into the sponge batter for moisture, and the other half is brushed onto each phyllo sheet, ensuring every layer is golden and crisp. The honey (¾ cup) combined with a cup of water creates a syrup that’s both sweet and slightly fluid, allowing it to seep into the cake without making it soggy. The cinnamon stick, ground cinnamon, and clove create a warm, aromatic profile that evokes memories of holiday gatherings.
Everything's prepped? Good. Let's get into the real action...
The Method — Step by Step
Preheat your oven to 350°F (175°C). While the oven warms, melt half of the butter (½ cup) in a small saucepan over low heat, then set aside to cool slightly. In a large mixing bowl, whisk the four large eggs with the cup of sugar until the mixture becomes thick, pale, and triples in volume – think of it as a cloud you could almost scoop with a spoon. This is the moment where the sponge gains its airy character, so don’t rush it; the longer you whisk, the lighter the batter will be.
Gently fold the sifted flour, fine semolina, and baking powder into the egg‑sugar mixture using a rubber spatula. The batter should look glossy and slightly thick, not dry. At this point, drizzle the remaining melted butter (½ cup) and the cup of water, stirring just enough to combine – you’re aiming for a smooth, pourable batter that still holds some air bubbles.
Grease a 9×13‑inch baking pan with a tablespoon of butter, then sprinkle the bottom with a thin layer of the chopped walnut‑pistachio mixture (about a quarter of the total). This first nut layer will toast as the sponge bakes, creating a fragrant base that infuses the entire cake.
Lay out three sheets of phyllo on the pan, brushing each sheet generously with melted butter before adding the next. Once you have three layers, pour half of the sponge batter over them, spreading it evenly with a spatula. Sprinkle another third of the nut mixture over the batter, then repeat the phyllo‑butter‑sponge‑nut sequence, finishing with a final three sheets of butter‑brushed phyllo on top.
Using a sharp knife, cut the assembled cake into diamond or square shapes, making sure to cut all the way through the phyllo layers. This pre‑cutting step ensures the syrup will seep evenly later and prevents the top from cracking when you pour the hot syrup over it.
In a saucepan, combine the honey, water, ground cinnamon, ground clove, and the whole cinnamon stick. Bring to a gentle boil, then reduce to a simmer for about 5 minutes, allowing the flavors to meld. The syrup should be slightly thickened but still pourable – think of a light maple glaze.
Place the pan in the preheated oven and bake for 30‑35 minutes, or until the phyllo turns a deep golden‑brown and the sponge is fully set. You’ll know it’s done when the edges start pulling away from the pan and the top gives a faint, caramelized scent.
Allow the baklava to cool completely in the pan – at least an hour – so the syrup fully penetrates every layer. Once cooled, cover with foil and store at room temperature for up to two days, or refrigerate for longer freshness. The longer it sits, the more the flavors meld, and the softer the sponge becomes, making each bite a perfect balance of crisp and melt‑in‑your‑mouth.
That's it — you did it. But hold on, I've got a few more tricks that'll take this to another level...
Insider Tricks for Flawless Results
The Temperature Rule Nobody Follows
Never bake a baklava on a cold oven. Start with a fully preheated oven and, if possible, let the pan sit inside for a minute before adding the batter. This ensures the phyllo begins crisping immediately, preventing soggy spots. I once tried a “room‑temperature” start and ended up with a soggy bottom that ruined the whole dessert. Trust me, the extra minute of heat is worth the perfect snap.
Why Your Nose Knows Best
When the syrup is simmering, keep a close watch on the aroma. The moment you smell a sweet, spicy perfume with a hint of caramel, you’re at the perfect consistency. If the scent turns bitter, you’ve over‑reduced it and the syrup will become too thick, making the cake gummy. A quick nose test is more reliable than a timer.
The 5‑Minute Rest That Changes Everything
After you pour the syrup, let the baklava sit uncovered for exactly five minutes before covering it. This short rest lets the syrup settle into the sponge without creating a soggy surface. Then, cover with foil or a clean kitchen towel to keep it moist. This tiny pause is the secret behind that glossy, non‑wet top.
Butter Brush Mastery
Instead of using a brush that can leave streaks, dip a silicone pastry brush in melted butter and tap off excess on the side of the bowl. This gives you a thin, even coat that won’t weigh down the phyllo. I once used a heavy brush and ended up with greasy pockets that never crisped.
Nut Toasting Precision
Toast the walnuts and pistachios on a dry skillet over medium heat for just 3‑4 minutes, stirring constantly. You’ll hear a gentle crackle, and the nuts will turn a golden amber. Over‑toasting makes them bitter, under‑toasting leaves them bland. The perfect toast adds depth that you can taste in every bite.
Creative Twists and Variations
This recipe is a playground. Here are some of my favorite ways to switch things up:
Citrus‑Infused Delight
Add the zest of one orange to the honey‑water syrup and swap half the pistachios for candied orange peel. The citrus brightens the sweet profile, making it perfect for spring brunches where you want a fresh twist.
Chocolate‑Swirl Baklava
Before pouring the second layer of sponge, drizzle a thin ribbon of melted dark chocolate over the batter, then swirl with a skewer. The chocolate adds a luxurious depth that pairs wonderfully with the nuts and spices.
Nut‑Free Version
Replace walnuts and pistachios with toasted sunflower seeds and shredded coconut. The texture remains crunchy, and the coconut brings a tropical aroma that’s surprisingly complementary to the honey syrup.
Spiced Rum Kick
Stir a tablespoon of dark rum into the syrup just before boiling. The rum’s caramel notes amplify the warmth of cinnamon and clove, turning the dessert into an adult‑only indulgence.
Layered Fruit Surprise
Scatter thin slices of ripe figs or apricots between the sponge and nut layers. The fruit’s natural sweetness melds with the honey, creating pockets of juicy surprise.
Vegan Adaptation
Swap the eggs for a mixture of 1 cup aquafaba (chickpea water) whipped to stiff peaks, and use plant‑based butter. The texture stays airy, and the dish remains cruelty‑free without compromising flavor.
Storing and Bringing It Back to Life
Fridge Storage
Place the cooled baklava in an airtight container and store it in the refrigerator for up to five days. The cool environment keeps the butter from going rancid and the syrup from turning overly thick. Before serving, let it sit at room temperature for 20 minutes so the flavors awaken.
Freezer Friendly
Wrap the entire pan tightly in plastic wrap, then cover with aluminum foil. Freeze for up to two months. When you’re ready to enjoy, thaw in the fridge overnight, then bring to room temperature and give it a quick 5‑minute bake at 300°F to refresh the crust.
Best Reheating Method
To revive that crisp phyllo, preheat your oven to 325°F, place the slice on a parchment‑lined tray, and drizzle a tiny splash (about a teaspoon) of water over the top. Cover loosely with foil and heat for 8‑10 minutes. The steam created by the water will re‑moisturize the sponge while the foil protects the phyllo from burning, delivering that just‑baked feel.