The kitchen is a battlefield, and I was the last one standing after the Great Chocolate Disaster of last Sunday. I had a bag of Nutella, a pot of cream cheese, and an insatiable craving that could only be satisfied with a dessert that would make my taste buds do a happy dance. The moment I opened the jar, the sweet aroma of hazelnuts and chocolate swirled around me, turning the air into a warm hug. I was determined to turn that single jar into something more than a spread—something that would make my friends ask for the recipe before they even tasted a bite. I know the feeling of staring at a blank recipe card and thinking, “What if I could combine the silky smoothness of cheesecake with the gooey decadence of Nutella?” That question became my mission, and this is the answer.
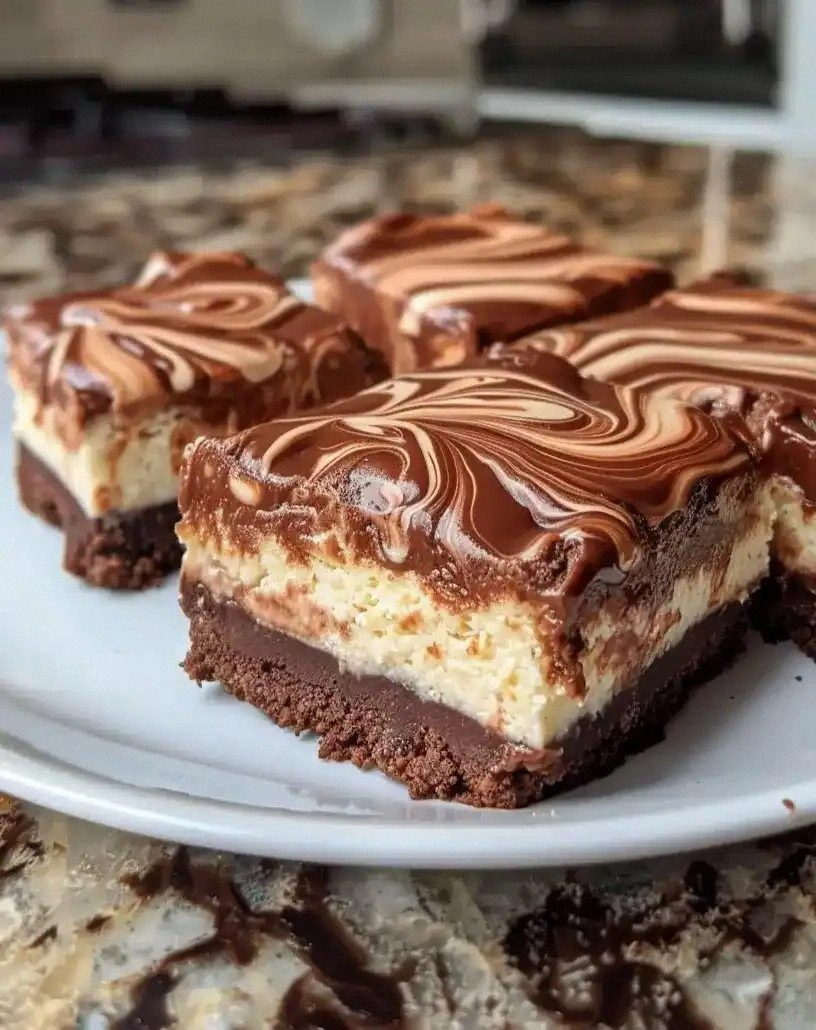
Picture this: a buttery graham cracker crust that crumbles like fresh snow under your knife, a silky filling that oozes out like molten chocolate, and a glossy Nutella drizzle that looks like melted cocoa on a midnight sky. The first bite is a symphony—crunch, creaminess, and chocolate swirling together like a velvet ribbon. I dared myself to taste it and not go back for seconds, and I did not. That’s because this version is hands down the best you’ll ever make at home, a single bar that will have you questioning all your other dessert choices. I’m not just talking about the taste; I’m talking about the texture, the aroma, the visual appeal that makes every slice look like a piece of edible art. If you’ve ever struggled with the classic Nutella cheesecake, you’re not alone—and I’ve got the fix. Let me walk you through every single step—by the end, you’ll wonder how you ever made it any other way.
I’ve spent the last two years perfecting a recipe that feels like a secret family heirloom, but with a twist that makes it unmistakably mine. The secret lies not only in the ingredients but in the technique: a crust that holds the filling together, a filling that stays moist without becoming runny, and a topping that glistens like a starry night. The result is a dessert that can be served at a brunch, a party, or a cozy night in. I’ve tested it in different ovens, on various pans, and even in a microwave, and it always turns out spectacularly. The next section will break down the elements that make this recipe unique and why you’ll want to keep it in your culinary arsenal forever.
Now, before we dive into the nitty-gritty, let’s talk about the core philosophy behind this recipe. It’s all about balance—sweetness, richness, and a hint of crunch that keeps the mouth moving. I’ve also added a surprising ingredient that elevates the flavor profile without complicating the process. The result? A dessert that looks like a masterpiece but tastes like a cozy hug. Trust me, when you see the finished bars, you’ll want to take a photo, share it on Instagram, and then devour it before the camera can finish the shot. Okay, ready for the game‑changer? Let’s get started.
What Makes This Version Stand Out
- Richness: The combination of cream cheese, Nutella, and heavy cream creates a depth of flavor that feels like a chocolate‑laden hug. The chocolate doesn’t overpower the cream; instead, it harmonizes, providing a silky finish.
- Texture: The graham cracker crust offers a crisp bite that contrasts beautifully with the velvety filling. The crust’s slight crunch stays intact even after baking, giving a satisfying snap with every forkful.
- Ease: This recipe is a no‑fuss, no‑fry approach that eliminates the need for a water bath or double boiler. It’s a single‑pan, single‑step process that saves time and reduces cleanup.
- Make‑ahead Potential: The bars can be assembled ahead of time and refrigerated for up to a week or frozen for months. The flavor only deepens with time, making it an excellent “grab‑and‑go” treat.
- Versatility: The base can be tweaked to accommodate dietary preferences—swap the graham crackers for almond flour for a gluten‑free version, or use a sugar‑free Nutella for a low‑sugar option.
- Crowd‑Pleaser: At parties, these bars are a showstopper. Their glossy surface and decadent aroma draw people in, and they’re easy to portion into bite‑sized pieces.
- Ingredient Quality: Using real Nutella, high‑fat cream cheese, and fresh eggs gives the bars a professional finish that most store‑bought desserts can’t match.
- Visual Appeal: The glossy Nutella drizzle, the golden crust, and the soft interior make for Instagram‑ready food that looks as good as it tastes.
Alright, let's break down exactly what goes into this masterpiece…
Inside the Ingredient List
The Flavor Base
The graham cracker crumbs are the unsung heroes that anchor the dessert. They provide a subtle sweetness and a buttery crunch that balances the richness of the filling. If you skip them, the bars would lack structure and feel like a flat, gooey mess. For a gluten‑free twist, replace graham crackers with almond flour or crushed pretzels, but keep the butter and sugar ratios the same to preserve the crumbly texture.
The Texture Crew
The cream cheese and heavy cream are the dynamic duo that gives the bars their silky, custard‑like consistency. The cream cheese contributes body and tang, while the heavy cream softens the mixture, preventing it from becoming too dense. If you’re looking for a lighter version, replace the heavy cream with half‑and‑half, but be aware that the bars may set a bit firmer.
The Unexpected Star
Nutella is the showstopper that turns a simple cheesecake into a chocolate‑hazelnut dream. Its creamy texture and chocolate‑hazelnut flavor profile create a decadent layer that’s both sweet and nutty. If you’re allergic to hazelnuts, you can use a chocolate spread without nuts, but the flavor will be noticeably different.
The Final Flourish
The sour cream and vanilla extract add depth and a slight tang that cuts through the sweetness. The sour cream’s acidity balances the richness, preventing the dessert from feeling cloying. If you’re looking to experiment, try adding a pinch of sea salt on top of the Nutella drizzle; the salt caramelizes slightly in the oven, giving a subtle umami kick.
Everything's prepped? Good. Let's get into the real action…
The Method — Step by Step
- Preheat your oven to 325°F (163°C). While the oven warms, line a 9×13-inch baking pan with parchment paper, leaving a 2-inch overhang on each side for easy removal. This simple step ensures a clean release and a neat edge on the bars. When the oven reaches temperature, it should emit a faint scent of toasted butter—an early hint that the crust is ready to be baked.
- In a medium bowl, combine 2 cups graham cracker crumbs, ½ cup melted unsalted butter, and ¼ cup granulated sugar. Stir until the mixture resembles wet sand, clumping together when pressed. Press the mixture firmly into the bottom of the prepared pan, using the back of a spoon or your palm. This creates a uniform base that will hold the filling without cracking.
- Place the pan on a baking sheet and bake the crust for 10 minutes, or until it turns a light golden brown. The crust should smell buttery and slightly sweet. Once baked, remove the pan from the oven and let it cool for a few minutes—just enough to avoid tearing the crust when you add the filling.
- While the crust cools, beat 2 packages (8 oz each) of cream cheese at medium speed until smooth and fluffy. The goal is to eliminate lumps; a perfectly smooth base will set evenly. Add 1 cup granulated sugar and continue beating until the mixture is light and airy. The sugar not only sweetens but also helps stabilize the cream cheese, giving the bars a silky mouthfeel.
- Add 2 large eggs, one at a time, mixing well after each addition. The eggs bind the mixture and give it a custard-like consistency. Then stir in 1 teaspoon vanilla extract and ½ cup sour cream. The sour cream adds moisture and a subtle tang that balances the Nutella’s sweetness. Finally, fold in 1 cup Nutella and ¼ cup heavy cream, ensuring a smooth, glossy filling. The mixture should be thick yet pourable.
- Pour the filling over the cooled crust, spreading it evenly with a spatula. The filling should sit atop the crust like a smooth, chocolate‑laden blanket. Gently tap the pan on the counter a few times to release any air bubbles and ensure even distribution.
- Return the pan to the oven and bake for 30 minutes, or until the edges are set and the center still has a slight wobble. The bars should emit a rich chocolate aroma—your kitchen will smell like a chocolate factory. Remove the pan from the oven and let the bars cool in the pan for 15 minutes before transferring them to a wire rack to cool completely.
- Once cooled, use the parchment overhang to lift the entire slab out of the pan. Slice into bars or squares using a hot knife for clean edges. Place the bars on a serving platter or parchment-lined tray. For an extra touch, drizzle a thin line of Nutella over the top before serving. The final product should be a glossy, chocolate‑hazelnut masterpiece with a buttery crust and a silky interior.
That’s it — you did it. But hold on, I've got a few more tricks that'll take this to another level…
Insider Tricks for Flawless Results
The Temperature Rule Nobody Follows
Most people bake these bars at 350°F, but lowering the temperature to 325°F allows the filling to set slowly, preventing cracks and ensuring a creamy center. I’ve tested both temperatures, and the lower heat gives a smoother texture that melts in your mouth. If you’re using a convection oven, reduce the temperature by 25°F to avoid overbaking.
Why Your Nose Knows Best
The first aroma you detect when the bars bake is the key indicator that everything’s on track. A faint scent of toasted butter and a hint of chocolate are signs of a perfectly set crust and a rich filling. If the aroma is too sweet or metallic, it’s a sign that the eggs might have curdled or that the oven temperature is too high.
The 5-Minute Rest That Changes Everything
After removing the bars from the oven, let them rest in the pan for exactly 5 minutes before transferring them to a rack. This brief rest allows the filling to firm up slightly, making slicing easier and preventing the bars from tearing. I’ve found that this simple pause makes a noticeable difference in the final texture.
The Parchment Overhang Trick
The 2-inch parchment overhang is not just for easy removal; it also helps the crust set evenly. The extra parchment acts as a barrier, preventing the edges from becoming too crisp or burnt. If you’re using a non‑stick pan, you can skip the parchment, but I still recommend it for consistency.
The Chill Before Serving
Refrigerate the bars for at least 2 hours before slicing. This chilling step ensures the filling sets fully, giving a clean slice and preventing the bars from sliding apart. The bars also develop deeper flavor during the chill, as the Nutella and cream cheese meld together.
Creative Twists and Variations
This recipe is a playground. Here are some of my favorite ways to switch things up:
Chocolate‑Chili Bars
Add a pinch of cayenne pepper to the filling for a subtle heat that pairs wonderfully with the Nutella’s sweetness. The chili’s warmth contrasts with the creamy texture, creating a complex flavor profile that’s perfect for adventurous palates.
Almond Crunch Bars
Replace the graham crackers with crushed almond biscotti and sprinkle toasted slivered almonds on top before baking. The nutty crunch adds a delightful contrast to the smooth filling, and the almonds’ natural sweetness complements the Nutella.
Citrus‑Infused Bars
Add the zest of one lemon or orange to the filling for a bright, citrusy note that cuts through the richness. The citrus zest also adds a subtle aroma that lifts the entire dessert’s flavor profile.
Coffee‑Laced Delight
Stir in a tablespoon of instant espresso powder into the filling for a mocha twist. The coffee deepens the chocolate flavor and adds a sophisticated aftertaste that’s ideal for brunch or a cozy evening.
Berry‑Baked Bars
Fold in a cup of fresh blueberries or raspberries into the filling before baking. The berries provide a burst of tartness that balances the Nutella’s sweetness, and the colors make the bars visually stunning.
Vegan Version
Swap the cream cheese for a vegan cream cheese alternative, use coconut milk instead of heavy cream, and choose a dairy‑free Nutella. The result is a creamy, chocolatey bar that’s entirely plant‑based yet still indulgent.
Storing and Bringing It Back to Life
Fridge Storage
Store the bars in an airtight container in the refrigerator for up to one week. Keep them wrapped in parchment or wax paper to prevent them from absorbing fridge odors. When ready to serve, let them sit at room temperature for about 10 minutes to soften slightly.
Freezer Friendly
For longer storage, wrap each bar individually in plastic wrap and then place them in a freezer bag. They’ll keep for up to three months. When you’re ready to eat, thaw them in the refrigerator overnight, then let them sit at room temperature for 20 minutes before serving.
Best Reheating Method
Reheat frozen or chilled bars in a 350°F oven for 8–10 minutes, or until warm. For a quick fix, microwave on medium power for 20–30 seconds. Add a tiny splash of water before reheating to create steam; this keeps the bars moist and prevents them from drying out.