I was standing in my kitchen, staring at a burnt batch of protein bars that had turned into a sticky, flavorless mess, when a friend dared me to whip up something better. The memory of that disaster still haunts me, but it also sparked a fire in my culinary curiosity. I wanted something that would not only satisfy my protein cravings but also taste like a dessert. I scoured the pantry, pulled out Medjool dates, peanut butter, and oat flour, and decided to give it a go. The result was a revelation that I can’t keep to myself.
From the moment the dates hit the blender, the kitchen filled with the warm, caramelized aroma of natural sweetness. The peanut butter added a creamy, nutty undertone that danced with the earthy scent of oat flour. The honey or maple syrup slipped in like liquid gold, while a splash of vanilla extract whispered vanilla notes. The air felt thick with anticipation, as if the entire room were holding its breath for the first bite. Every sense seemed to amplify the excitement of this culinary experiment.
What makes this recipe a revelation is its balance of flavors and textures. The dates provide natural sweetness that cuts through the richness of peanut butter, creating a harmonious sweetness that feels indulgent yet wholesome. The protein powder bumps up the protein content without adding a chalky aftertaste, thanks to the oat flour’s subtle binder. The coconut oil gives the bars a silky mouthfeel, almost like a soft chocolate truffle. The result is a chewy, satisfying bite that feels like a hug for your muscles.
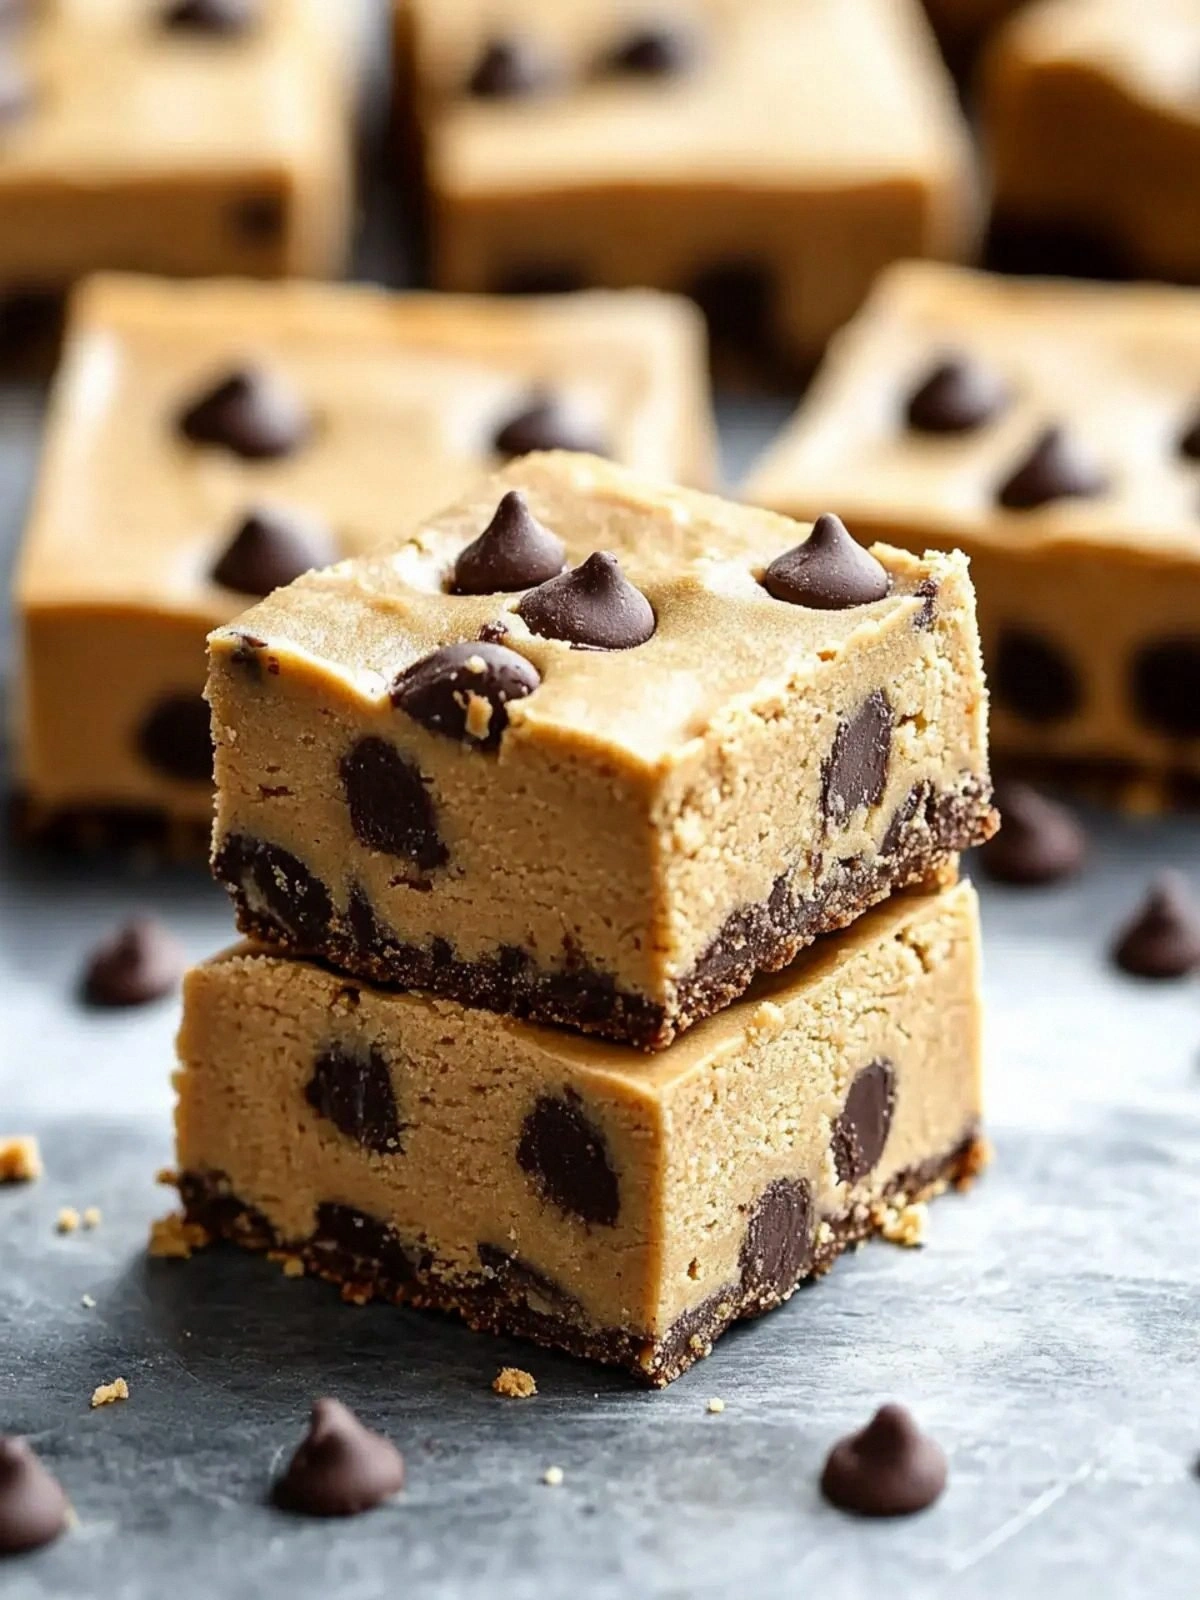
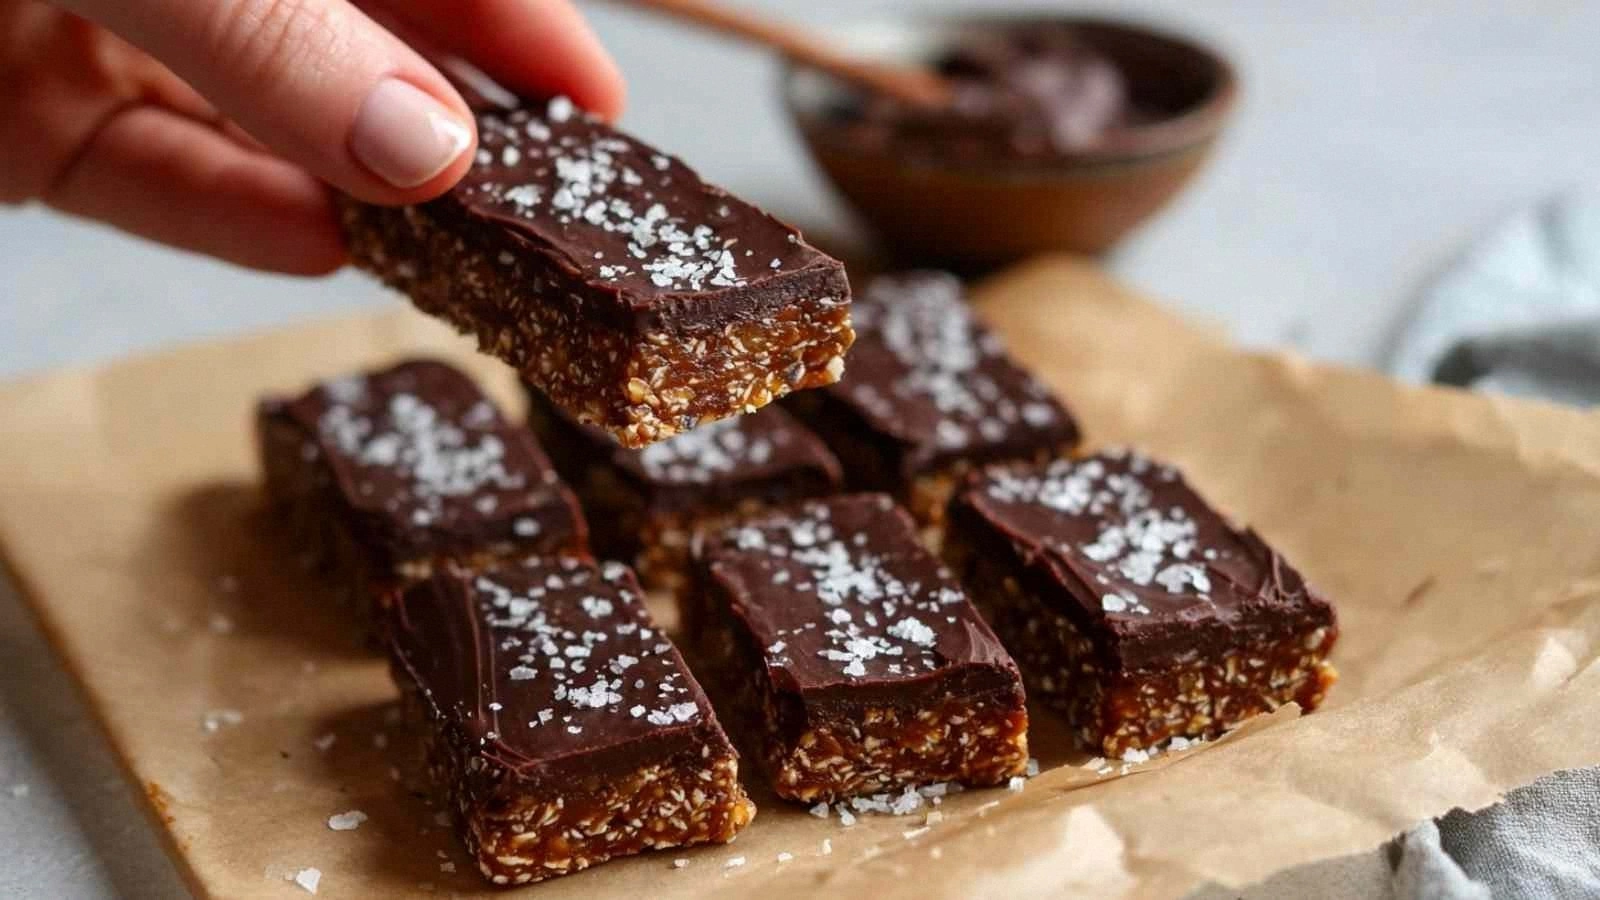
And there’s a twist that will make you question every other protein bar you’ve made: a splash of coconut oil that gives the bars a silky texture and a subtle tropical whisper. The coconut oil also helps the chocolate chips melt into a glossy coating that clings beautifully to each bar. When you bite, the chocolate’s bitterness balances the natural sweetness, and the sea salt adds a final pop of savory contrast. The combination feels like a mini dessert, but it’s packed with protein to power your day. Let me walk you through every single step — by the end, you’ll wonder how you ever made it any other way.
What Makes This Version Stand Out
- Taste: The sweet‑to‑savory harmony that dances on your palate, leaving you craving a second bite. It’s the kind of flavor profile that feels indulgent yet wholesome, striking the perfect balance between dessert and nutrition.
- Texture: Chewy core, chocolate coating, sea salt crunch. Each bite delivers a satisfying contrast that keeps your mouth moving and your taste buds engaged.
- Simplicity: No oven, no mess, just blend, press, and chill. The process is streamlined enough for a busy day yet rewarding enough to feel like a special treat.
- Uniqueness: Coconut oil twist, dark chocolate chips, protein powder. These elements combine to create a bar that stands apart from the generic, store‑bought options.
- Crowd Reaction: Friends can’t resist the first bite, and they keep asking for the recipe. The bars are a conversation starter at any gathering.
- Make‑ahead Potential: These bars stay fresh for a week in the fridge, or longer in the freezer. They’re perfect for meal prep or a quick energy boost on the go.
Inside the Ingredient List
The Flavor Base
Medjool dates are the sweet heart of this recipe, offering natural sugars that caramelize during the blending process. Honey or maple syrup adds a golden sheen and a subtle depth of flavor that complements the dates. A splash of pure vanilla extract lifts the entire mixture, creating a fragrant aroma that makes the bars feel like a sweet treat. Skipping any of these would leave the bars bland and lacking that signature sweetness.
The Texture Crew
All‑natural peanut butter is the creamy binder that keeps everything together; its oils create a smooth mouthfeel that feels indulgent. Ground oat flour is the structural backbone, providing a chewy texture without the heaviness of wheat flour. Coconut oil, added later, infuses a silky sheen and a gentle tropical hint that balances the chocolate’s bitterness. If you omit the coconut oil, the bars will still hold together but will feel drier.
The Unexpected Star
Vanilla protein powder not only boosts protein content but also masks the nutty flavor of the peanut butter, creating a clean, smooth taste. Dark chocolate chips are the showstopper; they melt into a glossy coating that clings to each bar, adding a bittersweet finish. The combination of chocolate and sea salt is a classic pairing that elevates the entire flavor profile. Without the chocolate, the bars would feel flat and one‑dimensional.
The Final Flourish
Water is a subtle ingredient that brings the dough together without diluting the flavors. A pinch of salt enhances the sweetness and balances the chocolate’s bitterness, making each bite more complex. Coarse sea salt is the finishing touch; it adds a crunchy contrast that awakens the palate. Skipping the salt would leave the bars too sweet and unbalanced.
Everything's prepped? Good. Let's get into the real action.
The Method — Step by Step
- Start by washing the Medjool dates, removing the pits, and chopping them into bite‑sized pieces. Place them in a high‑speed blender or food processor and pulse until they form a smooth paste. The mixture should look velvety, like a natural jam; this is the foundation of your bars.
- Add the all‑natural peanut butter to the blender and blend again until the mixture is silky and homogeneous. The peanut butter should coat every date piece, creating a creamy matrix that holds the bars together. This step is crucial for achieving the chewy texture that makes these bars irresistible.
- Stir in the ground oat flour, honey or maple syrup, pure vanilla extract, vanilla protein powder, and a pinch of salt. Mix until a thick dough forms, but avoid overmixing; you want a slightly sticky consistency that can be pressed but not too wet. This is the moment where the flavors start to mingle like a well‑orchestrated symphony.
- Add the coconut oil and 1/4 cup water gradually, mixing until the dough holds together but remains pliable. The coconut oil should melt into the mixture, giving it a glossy sheen and a subtle tropical aroma. This step is essential for achieving the silky mouthfeel that sets these bars apart.
- Line a 9×9 inch pan with parchment paper, pressing the dough firmly into the pan and smoothing the top with a spatula or your palm. The dough should be flat and even; any gaps will cause uneven cooling. Pressing it firmly ensures the bars stay together when cut.
- Refrigerate the pan for 20 minutes to set the structure. The bars will firm up, making them easier to cut later. This chilling step also allows the flavors to meld together, enhancing the overall taste experience.
- While the bars chill, melt the dark chocolate chips with the remaining coconut oil in a double boiler or a heat‑proof bowl over simmering water. Stir constantly until the chocolate is silky smooth and glossy. The chocolate should not brown; keep the heat low to preserve its bright color.
- Pour the melted chocolate over the set bars, spreading it evenly with a spatula. Sprinkle a pinch of coarse sea salt on top, allowing the salt crystals to settle into the chocolate. Return the pan to the fridge for another 15 minutes so the chocolate sets into a firm, glossy coating.
- Once the chocolate has set, lift the slab out of the pan using the parchment. Place it on a cutting board, then cut into bars of your preferred size. Store the bars in an airtight container in the fridge for up to a week or freeze for longer storage.
That's it — you did it. But hold on, I've got a few more tricks that'll take this to another level.
Insider Tricks for Flawless Results
The Temperature Rule Nobody Follows
Maintaining the right temperature throughout the process is key to achieving the perfect chew. If the dough gets too warm, it becomes overly sticky and hard to press; if too cold, it won’t bind properly. I always keep my ingredients at room temperature and chill the pan only after the dough has been formed. This subtle control makes a huge difference in texture.
Why Your Nose Knows Best
Smell is a powerful indicator of readiness. As the bars chill, you’ll notice a faint scent of chocolate and coconut oil. If the aroma feels off or too sweet, give them a few more minutes in the fridge. Your nose will guide you to the exact moment the bars are ready.
The 5‑Minute Rest That Changes Everything
After pressing the dough into the pan, let it rest for five minutes before refrigerating. This brief pause allows the mixture to settle, preventing air pockets that could cause uneven texture. It also makes the dough easier to handle when cutting.
The Secret of Even Chocolate Coating
When pouring chocolate, pour it slowly in a thin stream, then spread it with a spatula. This technique ensures an even coat and prevents clumps. A thin chocolate layer also keeps the bars from becoming overly sweet.
The Quick Chill Trick for Perfect Texture
Place the pan on a metal rack in the fridge instead of a plastic tray. The metal conducts cold better, setting the bars faster and giving them a crisp edge. I’ve tried it several times, and the texture is consistently superior.
The Final Seal with Sea Salt
Sprinkling coarse sea salt just before the final chill adds a micro‑crunch that contrasts the chocolate. The salt crystals melt slightly into the chocolate, creating a subtle buttery finish that elevates each bite. Without this step, the bars would feel flat.
Creative Twists and Variations
This recipe is a playground. Here are some of my favorite ways to switch things up:
Nutty Explosion
Swap the peanut butter for almond butter and fold in a handful of chopped almonds. The nutty flavor deepens, and the extra crunch adds a delightful texture. This version is a hit with anyone who loves the classic almond butter taste.
Citrus Burst
Add a teaspoon of orange zest and a splash of lemon juice to the dough. The citrus brightens the sweetness and gives the bars a refreshing lift. It’s a perfect choice for warm weather snacking.
Spiced Delight
Stir in ½ teaspoon of cinnamon, a pinch of nutmeg, or a dash of cardamom. The warm spices mingle with the chocolate, creating a cozy, aromatic profile. This twist is ideal for fall or winter cravings.
Vegan Version
Replace the protein powder with pea protein and use maple syrup instead of honey. Swap the coconut oil for a neutral oil like sunflower. The result is a plant‑based bar that still delivers the same chewy, chocolatey goodness.
Berry Boost
Fold in a handful of dried cranberries or blueberries before pressing the dough. The berries add bursts of tartness that contrast the sweetness, creating a complex flavor profile. This variant works well for those who love a fruity snack.
Coffee Kick
Mix in 1 teaspoon of instant espresso powder with the protein powder. The coffee adds depth and a slight bitterness that balances the chocolate. It’s a great pick‑me‑up for early‑morning workouts.
Storing and Bringing It Back to Life
Fridge Storage
Keep the bars in an airtight container in the refrigerator for up to a week. The cold environment preserves the chocolate coating and keeps the bars firm. If you notice any moisture buildup, simply dry the surface with a paper towel.
Freezer Friendly
Wrap the bars tightly in plastic wrap, then place them in a freezer bag. They can be stored for up to three months. When you’re ready to enjoy, let them thaw at room temperature for 15 minutes before cutting.
Best Reheating Method
To revive the bars, microwave them for 10–15 seconds on low power. Add a splash of water before reheating to create steam, which restores moisture and keeps the chocolate from becoming brittle. This trick brings the bars back to their original chewy glory.