I was standing in my kitchen, staring at a stack of stale biscuits that had been sitting in the pantry for weeks, when a sudden craving hit me like a lightning bolt. The idea of turning those bland, pre‑baked rounds into something sweet, sticky, and utterly irresistible sparked an instant culinary rebellion. Picture this: a golden, caramelized coating that clings to each biscuit, a buttery, sugar‑laden sauce that glistens like a freshly poured glaze, and the unmistakable aroma of cinnamon and vanilla that fills the entire house. I know you’ve probably tried the usual monkey bread recipes—fluffy dough, a simple glaze, maybe a dash of nutmeg—and felt like something was missing. That missing piece? The secret sauce that turns ordinary biscuits into a gooey, pull‑apart masterpiece that makes every bite a moment of pure joy. Let me walk you through every single step—by the end, you'll wonder how you ever made it any other way.
I dare you to taste this and not go back for seconds; the texture will feel like a cloud of sweet, buttery clouds that collapse into a satisfying crunch when you bite. The first bite releases a burst of caramelized sugar that coats your tongue like velvet, followed by a subtle buttery undertone that lingers long after you finish. The biscuits, already baked to a perfect golden brown, absorb the glaze so deeply that each piece becomes a little treasure chest of flavor. The best part? The entire process takes less than an hour, yet the result feels like a labor of love. Imagine pulling a biscuit from the pan and watching the glaze drip down the sides, creating a glossy, mouth‑watering sheen that makes your mouth water before you even taste it. If you've ever struggled with the classic version that ends up too dry or too sweet, you're not alone—and I've got the fix.
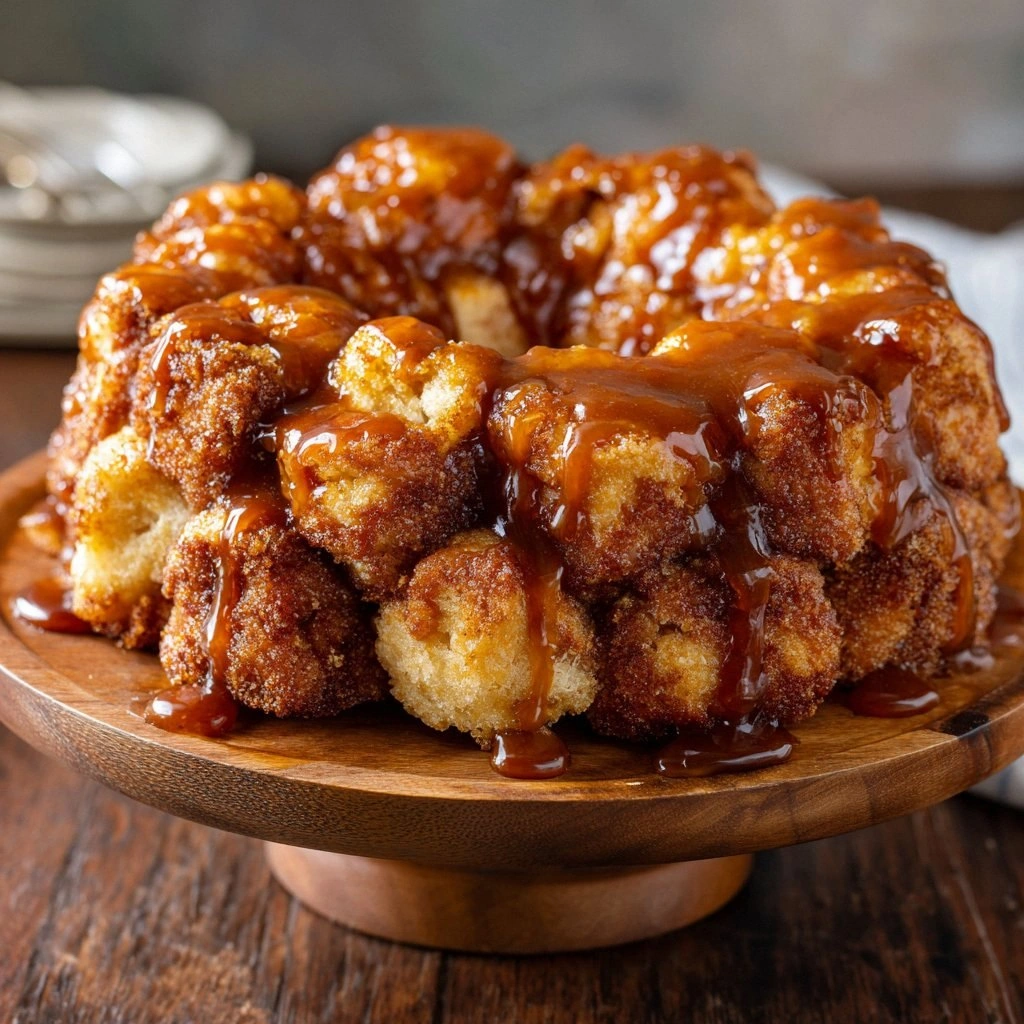
Most recipes get this completely wrong by either under‑baking the biscuits or over‑saturating them with glaze, resulting in a mushy mess. Here’s what actually works: use canned biscuits that are already baked, melt butter with brown sugar and cinnamon to create a sauce that coats each biscuit like a second skin, then bake until the edges are golden and the glaze bubbles like a pot of boiling cocoa. The result is a sticky, sweet pull‑apart treat that feels like a dessert and a snack in one glorious bite. The secret is in the balance—too much sugar makes it cloying, too little leaves it bland. I’ve experimented with countless variations, and this version consistently wins in taste, texture, and crowd-pleasing factor. The next time you host a gathering, this will be the star of the show, and the guests will beg for the recipe.
Picture yourself pulling this out of the oven, the whole kitchen smelling incredible, and the table already set with a platter of warm, glossy biscuits ready to be devoured. The moment the heat turns the glaze into a golden syrup, the scent will fill the room, making everyone’s mouths water in anticipation. The sound of the biscuits sizzling in the pan will echo like a sweet, buttery drumbeat. The visual of the biscuits glistening like jewels in a jar will make anyone stop and stare. The texture—crispy edges that shatter like thin ice, a gooey center that pulls apart with ease—will be a sensory explosion. If you’re ready for a game‑changer, keep reading because I’m about to reveal the recipe that will transform your snack game forever.
What Makes This Version Stand Out
- Taste: The glaze is a harmonious blend of butter, brown sugar, and cinnamon that coats each biscuit like velvet, delivering a deep, caramelized sweetness that lingers on the palate.
- Texture: The biscuits retain a crisp exterior while the interior becomes a soft, chewy center, creating a contrast that feels like a dessert and a snack simultaneously.
- Simplicity: Only a handful of pantry staples are needed—no fancy ingredients or complex techniques, making this a go‑to recipe for busy nights.
- Uniqueness: The use of canned biscuits eliminates the need for dough, saving time and ensuring a consistent, even bake.
- Crowd Reaction: Friends and family will rave about how the glaze sticks to their fingers and how the biscuits pull apart like a sweet, buttery rope.
- Ingredient Quality: Using high‑quality butter and real brown sugar adds depth and authenticity to the flavor profile.
- Cooking Method: Baking the glazed biscuits in a single pan allows the glaze to caramelize beautifully while the biscuits stay golden.
- Make‑Ahead Potential: The assembled biscuits can be refrigerated or frozen, then reheated to perfection, making this a versatile dessert for any occasion.
Alright, let's break down exactly what goes into this masterpiece.
Inside the Ingredient List
The Flavor Base
The core of this recipe starts with the glaze, a silky mixture of melted butter, brown sugar, and a generous pinch of cinnamon. The butter provides a rich, buttery backbone that carries the sweetness, while the brown sugar adds molasses depth and a hint of caramel. Cinnamon introduces a warm, spicy undertone that balances the sugary richness, creating a flavor profile that is both comforting and indulgent. If you skip the cinnamon, the glaze will taste flat and overly sweet; the spice is what ties everything together. For a subtle twist, you can add a splash of vanilla extract, which elevates the glaze with floral nuances. This glaze is the heart of the dish, ensuring each biscuit is coated with a glossy, caramelized coating that melts in your mouth.
The Texture Crew
The biscuits themselves are the foundation of the texture. Using canned biscuits—already baked and ready to go—ensures a consistent, golden crust that holds up under the glaze. If you use fresh biscuits, they may overcook and become soggy; the canned version provides the perfect balance of crispness and chewiness. The key to a satisfying bite is the contrast between the crunchy edges and the soft, gooey center. To achieve that, bake the biscuits long enough for the glaze to set but not so long that the biscuits dry out. If you prefer a lighter version, reduce the amount of brown sugar slightly, but be careful not to compromise the glaze’s thickness. The biscuits act as a canvas, absorbing the glaze and becoming a sweet, buttery masterpiece.
The Unexpected Star
The powdered sugar drizzle is the unexpected star that adds a final touch of sweetness and a subtle crunch. After the biscuits have baked and cooled, dust them lightly with powdered sugar, which melts slightly and creates a fine, snowy coating. This step not only enhances the visual appeal but also adds a delicate, sweet crunch that contrasts with the buttery glaze. If you skip this step, the biscuits will still taste divine, but the final bite will lack that extra layer of indulgence. For a more dramatic effect, you can mix a pinch of sea salt into the powdered sugar, creating a sweet‑and‑salty finish that elevates the overall flavor. This final flourish turns a simple dessert into a showstopper.
The Final Flourish
The finishing touch is a splash of milk, which is added to the glaze just before baking to help the sauce spread evenly across the biscuits. Milk not only helps the glaze set but also adds a subtle richness that deepens the butter’s flavor. If you’re looking for a dairy‑free option, try a splash of almond milk or oat milk; the results are almost identical in taste and texture. The small amount of milk also prevents the glaze from becoming too thick, ensuring it coats each biscuit perfectly. This step is often overlooked, but it’s essential for achieving the glossy, caramelized finish that makes this recipe stand out. The final product is a glossy, sweet masterpiece that’s as visually appealing as it is delicious.
Everything's prepped? Good. Let's get into the real action.
Before you even turn on the oven, take a moment to appreciate the aroma of butter melting in a pan—this simple scent can transform an ordinary kitchen into a culinary sanctuary. The anticipation builds as you watch the butter bubble and the brown sugar begin to dissolve, releasing a sweet, caramelized fragrance that makes you feel like a pastry chef in your own home. As you stir, the mixture thickens into a glossy sauce, and you can already taste the buttery, sweet coating that will soon envelop each biscuit. This is the moment of truth, the point where your patience will pay off in a bowl of sticky, sweet bliss. The next step is to arrange the biscuits in a single layer in a baking dish, ensuring they’re evenly spaced so the glaze can reach every corner. The arrangement will dictate the final texture—too crowded, and the biscuits will steam; too sparse, and they won’t caramelize fully.
Now, it’s time to pour the glaze over the biscuits. The sauce should cascade over each biscuit like a waterfall of golden syrup, covering them completely. As the glaze pools at the bottom of the pan, the biscuits will begin to steam and absorb the butter, creating a perfect, glossy finish. The key is to pour slowly, letting the glaze spread evenly before it thickens. Once the biscuits are coated, transfer the dish to the oven and bake for 12–15 minutes, or until the edges turn a deep golden brown. The sound of the biscuits sizzling and the glaze bubbling will signal that it’s almost ready. When the timer goes off, remove the dish and let it cool for a few minutes before dusting with powdered sugar for that final snowy finish.
Watch the glaze set as the biscuits cool; the glaze will firm up into a thick, buttery coating that’s both sticky and irresistible. The aroma that fills the kitchen will have your guests lining up for a taste. The final step—sprinkling powdered sugar—adds a delicate crunch and a sweet finish that makes the biscuits feel like a dessert. The result is a glossy, caramelized masterpiece that’s as beautiful as it is delicious. If you’re still feeling uncertain, remember that the glaze will thicken slightly as it cools, ensuring each bite has that perfect balance of sweet and buttery. The final product is a sweet, sticky, pull‑apart treat that will have everyone begging for seconds.
That’s it — you did it. But hold on, I've got a few more tricks that'll take this to another level. These insider tips will help you avoid common pitfalls and elevate the flavor profile even further. Think of them as secret sauce additions that will transform your monkey bread from good to unforgettable. Whether you’re a beginner or a seasoned pro, these hacks will ensure every bite is flawless. Stay tuned, because the next section will reveal the techniques that make this recipe truly exceptional. Trust me, you’ll want to keep this in your kitchen arsenal for all occasions.
Insider Tricks for Flawless Results
The Temperature Rule Nobody Follows
The oven temperature is critical; too hot and the glaze will burn, too cool and the biscuits will remain soggy. I recommend setting the oven to 350°F (175°C) and using a thermometer to ensure consistency. A lower temperature allows the glaze to caramelize slowly, creating a golden crust without scorching. If you’re using a convection oven, reduce the temperature by 25°F to avoid over‑browning. This trick is often overlooked, but it’s what separates a mediocre batch from a showstopper. Keep an eye on the edges—once they start to turn a deep amber, it’s time to pull the dish out.
Why Your Nose Knows Best
Your nose is the best judge of doneness; the smell of caramelized sugar is a reliable indicator that the glaze is ready. When the glaze starts to bubble and emit a sweet, buttery aroma, it’s a sign that the biscuits are absorbing the sauce perfectly. The scent will intensify as the glaze thickens, signaling that the final golden crust is forming. Trust your senses—if the smell feels like toasted marshmallows, you’re on the right track. This sensory checkpoint will save you from under‑baking or over‑baking, ensuring a consistently delicious result every time. Remember, a good smell equals a good bite.
The 5-Minute Rest That Changes Everything
After baking, let the biscuits rest for exactly five minutes before dusting with powdered sugar. This short rest allows the glaze to set into a glossy, buttery coating that won’t run off when you add the sugar. Skipping this step can result in a sticky mess that’s hard to handle. The five‑minute pause also lets the biscuits cool slightly, making them easier to transfer to a platter. It’s a small investment of time that pays off in presentation and flavor. The final product will have a flawless finish that’s both sweet and buttery.
Use a Non-Stick Baking Dish
A non‑stick baking dish ensures the biscuits release easily and the glaze stays on the biscuits, not the pan. If you don’t have a non‑stick dish, lightly coat a regular pan with butter or oil to prevent sticking. A stuck‑on glaze can ruin the presentation and make cleanup a nightmare. This simple trick saves you from frustration and preserves the glossy appearance of the biscuits. The non‑stick surface also helps the biscuits bake evenly, preventing hot spots that could burn the glaze. A good baking dish is an investment that pays dividends in every batch.
Keep a Small Bowl of Water Nearby
During baking, a small bowl of water can help regulate the oven’s humidity, preventing the glaze from drying out too quickly. The moisture creates a steamy environment that keeps the biscuits soft while the glaze caramelizes. If you notice the glaze thickening too fast, splash a little water onto the pan to re‑hydrate the surface. This trick is especially useful in dry climates or during winter months. A little extra humidity can make the difference between a sticky mess and a perfectly caramelized treat. Keep the bowl close by; you never know when you’ll need it.
Use a Food Processor for the Biscuits
If you’re using fresh biscuits instead of canned, a food processor can help break them into uniform pieces quickly, ensuring even glazing. The processor creates consistent bite‑sized chunks that absorb the glaze more efficiently. This step also saves time and reduces the risk of uneven baking. The uniform pieces will bake at the same rate, preventing some biscuits from becoming over‑baked while others remain under‑cooked. It’s a small extra step that pays off in texture and presentation. This trick is a game‑changer for those who prefer fresh biscuits.
Creative Twists and Variations
This recipe is a playground. Here are some of my favorite ways to switch things up.
Chocolate Explosion
Swap the brown sugar with melted chocolate chips for a decadent chocolate glaze. The chocolate will melt into a glossy, dark coating that pairs beautifully with the biscuits’ buttery flavor. Add a pinch of sea salt to balance the sweetness and create a sweet‑and‑salty experience. The chocolate glaze will set into a firm, glossy finish that’s perfect for a dessert table. This variation is ideal for chocolate lovers who want a richer, more indulgent treat. The result is a chocolatey, buttery masterpiece that’s hard to resist.
Spiced Apple Twist
Introduce diced apples and a dash of nutmeg to the glaze for a fruity, autumnal flavor. The apples add a subtle sweetness and a chewy texture that contrasts with the buttery biscuits. Nutmeg brings warmth and depth, enhancing the overall flavor profile. This variation is perfect for a cozy evening or a Thanksgiving side dish. The combination of sweet apples, nutmeg, and buttery glaze creates a comforting, aromatic experience. The result is a warm, spiced treat that feels like a slice of home.
Maple Syrup Delight
Replace the brown sugar with pure maple syrup for a natural, earthy sweetness. The maple syrup adds a subtle vanilla note and a thicker consistency that coats the biscuits beautifully. Mix in a pinch of smoked sea salt to create a sweet‑and‑smoky finish. This variation works wonderfully for a brunch or breakfast treat, pairing nicely with coffee or tea. The maple glaze will set into a glossy, caramelized coating that’s both sweet and savory. The final product feels like a sweet breakfast pastry that can be enjoyed at any time of day.
Peanut Butter Bliss
Stir in a tablespoon of peanut butter into the glaze for a nutty, creamy twist. The peanut butter adds a rich, savory flavor that balances the sweetness of the glaze. Add a splash of milk to keep the glaze smooth and pourable. This variation is great for peanut butter lovers and adds a protein boost to the dish. The biscuits will absorb the peanut butter glaze, creating a sweet‑and‑savory bite that’s both indulgent and satisfying. The final result is a peanut‑butter‑laden, buttery masterpiece.
Minty Freshness
Add a few drops of peppermint extract to the glaze for a refreshing minty finish. The mint will cut through the sweetness, leaving a cool, crisp aftertaste. Pair this version with a scoop of vanilla ice cream for an extra indulgent dessert. The mint glaze will set into a glossy, mint‑green coating that’s both visually appealing and delicious. This variation is perfect for a summer gathering or a festive holiday treat. The result is a minty, buttery treat that’s both refreshing and comforting.
Sea Salt Caramel
Incorporate caramel sauce into the glaze and finish with a sprinkle of flaky sea salt. The caramel adds a buttery, sweet depth, while the sea salt brings a savory contrast that enhances the overall flavor. This variation is ideal for a sophisticated dessert that feels indulgent and elegant. The caramel glaze will set into a glossy, buttery coating that’s perfect for a dinner party. The final product is a sweet, salty, buttery masterpiece that’s sure to impress.
Storing and Bringing It Back to Life
Fridge Storage
Store the cooled biscuits in an airtight container in the refrigerator for up to 3 days. The glaze will firm up slightly, but the biscuits will remain moist and flavorful. When you’re ready to serve, simply reheat them in a 350°F oven for 5–7 minutes, or until they’re warm and the glaze is glossy again. The refrigerator will keep the biscuits fresh, preserving the buttery glaze without drying them out. This method is perfect for meal prep or for guests who want a quick dessert. The key is to keep the biscuits sealed to prevent moisture loss.
Freezer Friendly
For longer storage, place the biscuits in a freezer‑proof bag and freeze for up to 2 months. When you’re ready to enjoy, thaw them at room temperature for 30 minutes before reheating in a 350°F oven for 10 minutes. The biscuits will retain their texture and flavor, and the glaze will re‑melt into a glossy coating. Freezing also allows you to batch‑cook the biscuits ahead of time, making last‑minute hosting a breeze. The biscuits will stay fresh and delicious, ready to be pulled out of the freezer and served. This is a great way to keep the treats on hand for busy weeks.
Best Reheating Method
The best way to bring the biscuits back to life is to reheat them in a 350°F oven for 5–7 minutes, or until the glaze is bubbly and the biscuits are warm. To maintain the glaze’s glossy finish, add a tiny splash of water to the pan before reheating; the steam will keep the glaze from drying out. Avoid microwaving, as it can make the biscuits soggy and the glaze uneven. Reheating in the oven preserves the crunch and the caramelized coating, ensuring each bite feels like freshly baked. The biscuits will be warm, sweet, and irresistibly sticky, just like when they first came out of the oven.