Picture this: it’s a blustery Saturday evening, the kind of night where you crave comfort food that feels like a warm hug. I’m standing in my kitchen, staring at a pile of small turnips that have been languishing in the fridge for weeks, and I’m thinking, “If I could turn these into something that’s silky, buttery, and just a little bit cheesy, I’d be the hero of the house.” That thought turned into a culinary experiment that began with a single, reckless dare from my friend: “I dare you to taste this and not go back for seconds.” And so, the quest for the ultimate mashed turnip began.
I had never imagined that turnips could be anything but a bland side, but as soon as the first bite hit my tongue, it was like a revelation. The earthy sweetness was instantly brightened by a splash of lemony zest, and the creamy texture made it feel like a decadent, low‑carb alternative to classic mashed potatoes. I could hear the crunch of the onions caramelizing, the gentle hiss of garlic sizzling, and the soft, comforting sigh that follows when you taste something that feels like home. The aroma was a mix of buttery richness and a faint peppery tang that made my kitchen feel like a cozy, rustic farmhouse.
What makes this version stand out is that it’s not just about making a side dish; it’s about creating a sensory experience that lingers on the palate and warms the soul. I’ve taken the classic mash and injected it with layers of flavor, texture, and a touch of indulgence that turns an ordinary meal into an unforgettable one. If you’ve ever struggled with bland mashed vegetables, you’re not alone — and I’ve got the fix. Picture yourself pulling this out of the oven, the whole kitchen smelling incredible, and your guests begging for a second helping. This is hands down the best version you'll ever make at home.
And that’s just the beginning. I’ll walk you through every single step, from selecting the right turnips to the final flourish of fresh herbs, so by the end, you’ll wonder how you ever made it any other way. Trust me, this isn’t just a recipe; it’s a culinary adventure that will have you shouting, “I can’t believe I didn’t know this existed!” So, let’s dive in.
What Makes This Version Stand Out
- Flavor: The combination of sautéed onions, garlic, and fresh herbs lifts the earthiness of turnips into a sophisticated, savory profile that feels like a gourmet side.
- Texture: The inclusion of cream cheese and heavy whipping cream creates a silky, almost velvety mouthfeel that’s a step above regular mashed potatoes.
- Richness: Butter and shredded cheese add depth and a luxurious richness that turns humble vegetables into a decadent comfort dish.
- Versatility: This mash works wonderfully as a side for roasted meats, a base for casseroles, or a creamy topping for baked potatoes.
- Make‑Ahead: It can be prepared a day in advance and reheated without losing its creamy integrity.
- Ingredient Quality: Fresh, organic turnips and real butter are the backbone; swapping in store‑brand ingredients changes the entire experience.
- Crowd‑Pleaser: Even turnip skeptics rave about the buttery, cheesy finish.
- Time Efficiency: With a prep time of 15 minutes and a cook time of 30 minutes, you’re ready in under an hour.
Alright, let's break down exactly what goes into this masterpiece…
Inside the Ingredient List
The Flavor Base
At the heart of this mash is a classic onion‑garlic sauté. The onions are diced until translucent, releasing a sweet aroma that forms the foundation of flavor. Garlic is minced finely so it distributes evenly, preventing any one bite from being overwhelmingly pungent. Together, they create a savory base that complements the turnips’ natural earthiness. Skipping this step turns the dish into a bland mash; you’ll miss the depth that makes guests keep coming back for more.
The Texture Crew
Cream cheese, heavy whipping cream, and butter are the dynamic trio that transforms the mash from starchy to silky. Cream cheese adds body and a subtle tang that brightens the flavor profile. Heavy cream brings a luscious, velvety texture, while butter adds a glossy sheen and buttery finish. If you’re looking for a lower‑fat option, you can substitute half the butter with Greek yogurt, but be prepared for a slightly tangier result.
The Unexpected Star
Shredded cheese—cheddar or Gruyère—injects a melty, gooey element that makes every spoonful feel indulgent. The cheese’s melt point is critical; it should be warm enough to stay fluid but not so hot that it loses structure. Adding cheese at the end, just before serving, ensures it remains creamy and doesn’t separate. If you’re vegan, a dairy‑free cheese can work, though the texture will be a bit firmer.
The Final Flourish
Fresh herbs—parsley, chives, and thyme—are added at the very end to preserve their bright flavor and vibrant color. The herbs bring a burst of freshness that balances the richness of the cream and cheese. A sprinkle of freshly ground black pepper adds a subtle heat that cuts through the heaviness. Salt, of course, is essential to bring all the flavors together; it should be added in stages to avoid over‑salting.
Everything's prepped? Good. Let's get into the real action…
The Method — Step by Step
-
Begin by bringing a large pot of salted water to a rolling boil. Toss in the diced turnips, letting them simmer for 15 minutes until they’re fork‑tender. The water should bubble steadily, and you’ll notice the turnips taking on a soft, translucent glow. This step is crucial; under‑cooked turnips will make the mash grainy.
-
While the turnips cook, heat a large skillet over medium heat. Add the butter and let it melt until it’s foamy but not browned. Then add the diced onions, sautéing until they’re golden brown and caramelized. The aroma should be sweet and inviting, a perfect prelude to the next steps.
-
Add minced garlic to the skillet and cook for 30 seconds, just until fragrant. Be careful not to let it burn; a burnt garlic note will ruin the entire dish. This is the moment of truth—if you’re tempted to rush it, pause and let the garlic soften.
-
Drain the cooked turnips, reserving a cup of the cooking liquid. Return the turnips to the pot and add the sautéed onion‑garlic mixture. Use a potato masher or immersion blender to begin breaking them into a coarse mash. The liquid will help create a silky consistency.
-
Now it’s time to add the cream cheese and heavy cream. Stir until the cream cheese is fully melted and the mixture is smooth. The mixture should feel like a thick, buttery custard. This step is critical; too little liquid can result in a dry mash.
-
Fold in the shredded cheese until it’s fully melted and integrated. The cheese should coat the mash like a glossy coat. If the cheese starts to separate, add a splash more cream to re‑emulsify.
-
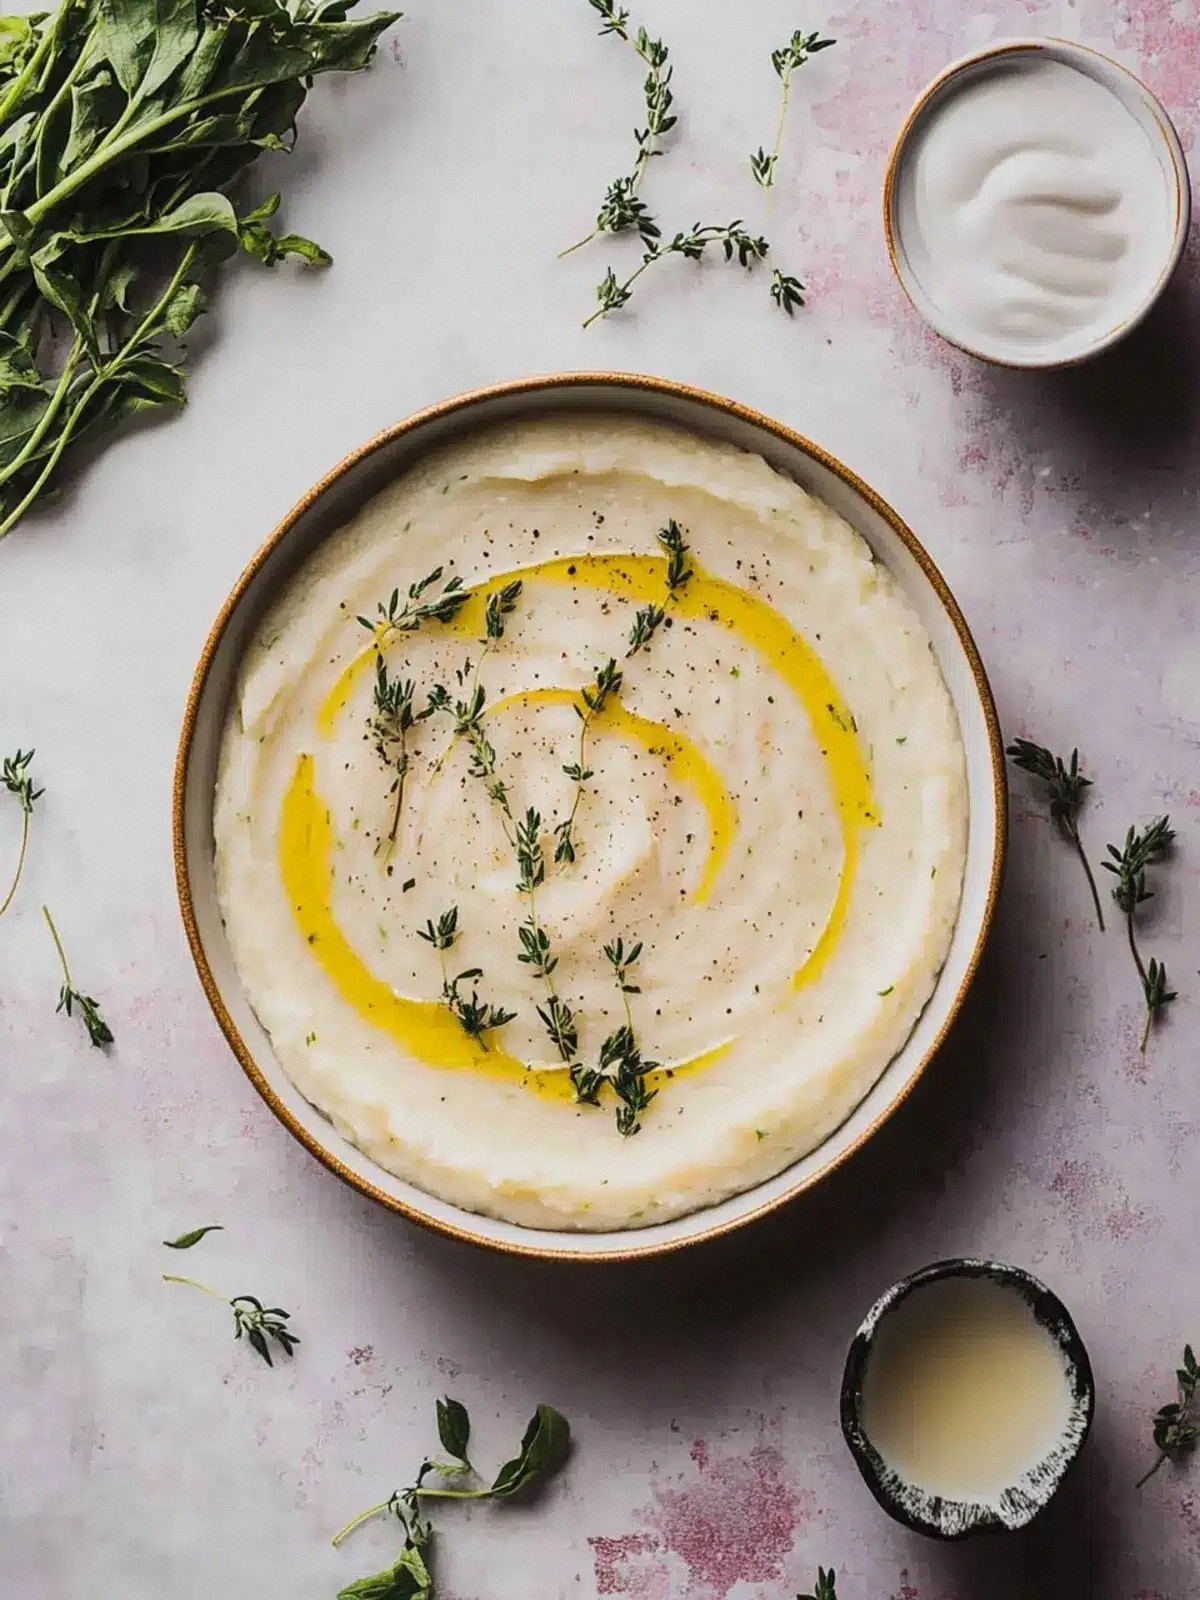
Season with kosher salt and freshly ground black pepper, adjusting to taste. Sprinkle the mixed fresh herbs over the top. Give the mash a final gentle stir, then transfer it to a serving bowl. The final result should look creamy, golden, and inviting.
-
Serve immediately with a drizzle of melted butter for extra shine. If you’re plating for a crowd, consider topping with a few extra herbs for color contrast. The dish should feel warm, comforting, and utterly irresistible.
That's it — you did it. But hold on, I've got a few more tricks that'll take this to another level. These insider tips will ensure your mash remains silky, flavorful, and crowd‑pleasing every single time.
Insider Tricks for Flawless Results
The Temperature Rule Nobody Follows
Keep the mash at a gentle heat after adding the cream and cheese. If it cools too much, the fats will separate, creating a greasy texture. I always keep the pot on low heat while stirring, which keeps the mixture warm without scorching. A friend once tried to finish on high heat and ended up with a lumpy mash that looked like a casserole.
Why Your Nose Knows Best
Smell the mash as you go. A faintly buttery scent indicates the fats are emulsifying properly. If you notice a sharp, sour note, it’s a sign that the cream cheese has started to curdle. Adjust the heat immediately to correct this. Trust your nose; it’s the best judge of freshness.
The 5‑Minute Rest That Changes Everything
After removing the pot from heat, let the mash sit for five minutes. During this rest, the flavors mingle, and the texture firms up just enough for easier spooning. I’ve seen people skip this step, only to find the mash too runny when served. That tiny pause makes a huge difference.
The Butter‑Infused Finish
Right before serving, drizzle a thin stream of melted butter over the top. The butter adds a glossy sheen and a burst of flavor that lifts the entire dish. It also helps the herbs cling to the surface, giving a pop of color. Don’t skimp on this step; it’s what makes the dish feel restaurant‑quality.
The Herb‑Herb Balance
Use a mix of fresh herbs like parsley, chives, and thyme. The combination provides layers of flavor—parsley for brightness, chives for a mild onion kick, and thyme for earthiness. If you prefer a single herb, thyme alone works, but the mix adds depth. Remember, herbs lose potency quickly, so add them last.
The Creamy Ratio Cheat Sheet
For every pound of turnips, use 1 cup of heavy cream and 2 ounces of cream cheese. This ratio ensures a silky consistency without being overly heavy. If you’re using a lower‑fat cream, increase the cream cheese by 1 ounce to maintain richness. This cheat sheet helps you scale the recipe up or down with confidence.
Creative Twists and Variations
Herbed Parmesan Crunch
Swap the shredded cheese for grated Parmesan and sprinkle breadcrumbs on top before broiling for 2 minutes. The result is a golden, crunchy topping that adds a satisfying contrast. This version is perfect for a holiday dinner when you want a bit more texture.
Smoky Chipotle Infusion
Add a teaspoon of chipotle in adobo sauce to the mash for a smoky kick. The chipotle’s heat pairs beautifully with the mild turnip flavor. This variation is ideal for a southwestern‑inspired menu.
Salsa Verde Swirl
Fold in a handful of diced green tomatoes and fresh cilantro for a bright, zesty swirl. The acidity from the tomatoes cuts through the richness, while the cilantro adds a fresh herbal note. Great for a spring or summer gathering.
Roasted Garlic Boost
Replace the sautéed garlic with roasted garlic cloves. Roast the garlic at 400°F for 30 minutes, then squeeze the soft, caramelized cloves into the mash. The result is a sweet, mellow garlic flavor that’s less sharp.
Vegan Creamy Delight
Use coconut milk instead of heavy cream and a dairy‑free cheese alternative. The coconut milk adds a subtle tropical note, while the cheese substitute keeps the mash creamy. This version is suitable for dairy‑free diners.
Maple‑Glazed Finish
Drizzle a teaspoon of pure maple syrup over the mash before serving. The syrup’s natural sweetness complements the savory elements and gives the dish a glossy, caramelized finish. This twist is perfect for a cozy winter brunch.
Storing and Bringing It Back to Life
Fridge Storage
Store the mash in an airtight container in the refrigerator for up to 3 days. When you’re ready to reheat, add a splash of milk or cream to restore moisture. Stir gently over low heat until warmed through. This method preserves the creamy texture and prevents drying.
Freezer Friendly
For longer storage, portion the mash into freezer‑safe containers and freeze for up to 2 months. When reheating, thaw overnight in the fridge, then warm gently on the stove, adding a little water or cream to loosen it. The mash will retain its flavor and texture if handled correctly.
Best Reheating Method
The best way to reheat is in a saucepan over low heat with a splash of milk or cream. Stir constantly to prevent scorching and to keep the mixture smooth. A quick microwave reheat works too, but be sure to stir halfway through to avoid hot spots. A tiny splash of water before reheating steams it back to perfection.