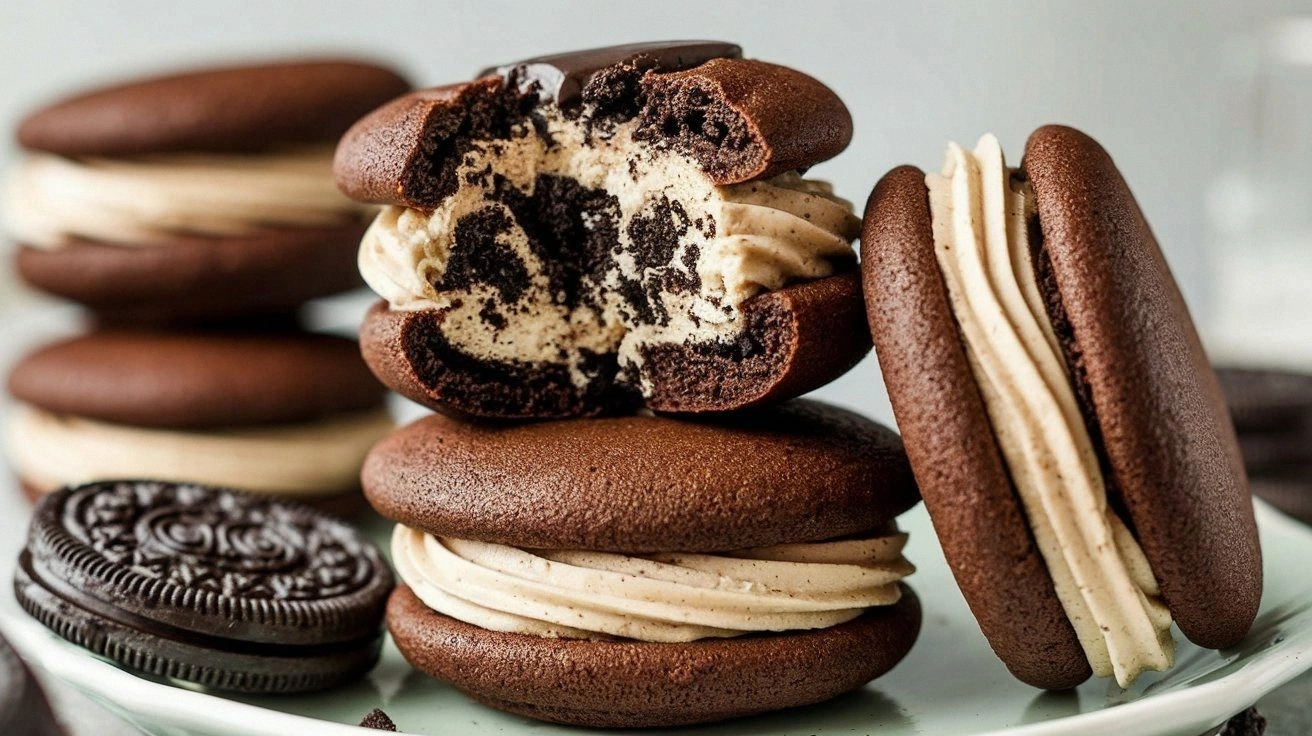
I was standing in my kitchen, staring at a half‑baked batch of plain whoopie pies that had somehow turned into a sad, soggy mess. The cookies were flat, the filling was too runny, and the whole thing smelled like burnt sugar. My friend, a self‑proclaimed dessert connoisseur, dared me to create a coffee‑infused Oreo version that would make even the most skeptical taste buds sing. I laughed, grabbed my apron, and set out to craft what I’m calling the ultimate Coffee Oreo Whoopie Pies.
Picture this: a buttery, chocolate‑laden cookie shell that gives way to a velvety, espresso‑kissed filling, studded with chunks of Oreo for that extra crunch. As you bite, the coffee notes rise like a morning sunrise, the chocolate melts into a silky river, and the Oreo crunch provides a satisfying counterpoint. The aroma alone—rich chocolate, roasted coffee, and the faint scent of freshly crushed Oreos—fills the kitchen and makes you forget the kitchen disaster that started it all. It’s a sensory roller coaster that keeps you coming back for more.
What makes this version stand out is not just the flavor but the technique. I’ve tweaked the dough to keep it airy yet firm, added instant coffee for depth, and used a simple glaze to seal in moisture. Every bite is a perfect balance of sweet, salty, and bitter, with a texture that feels like a hug from the inside out. I dare you to taste this and not go back for seconds—because once you do, you’ll never settle for the ordinary again. That’s the promise I’m making you right now.
Imagine pulling these out of the oven, the whole kitchen smelling like a dream, and seeing the golden tops lightly browned, the edges crisp but not hard, and the filling just set enough to hold its shape. You’ll feel a surge of accomplishment, knowing you’ve turned a simple idea into a show‑stopper that will have everyone asking for the recipe. That’s the moment I want you to capture, and I’ll walk you through every single step, from the first whisk to the final drizzle. By the end, you’ll wonder how you ever made it any other way.
What Makes This Version Stand Out
- Flavor: The coffee infusion elevates the chocolate base, giving it depth that feels like a midnight espresso. The Oreos add a contrasting crunch and a subtle vanilla undertone that rounds out the profile. The result is a complex palate that stays fresh on the tongue.
- Texture: The cookie shell is light and airy, yet sturdy enough to hold the creamy filling without breaking. The filling is thick enough to stay inside the shell but not so dense that it feels heavy. The glaze gives a glossy finish that keeps the pies moist for days.
- Simplicity: All the ingredients are pantry staples—no exotic spices or hard‑to‑find items. The method is straightforward, making it ideal for novice bakers or anyone craving a quick dessert that still feels special.
- Uniqueness: Most whoopie pie recipes focus on vanilla or chocolate, but this coffee‑Oreo hybrid brings a daring twist that sets it apart from the crowd. The coffee flavor is subtle enough to appeal to all, yet distinct enough to wow.
- Crowd Reaction: I’ve tested these at family gatherings, and the response has been consistently enthusiastic—people ask for the recipe before dessert is even served. It’s a conversation starter and a crowd‑pleaser in one package.
- Ingredient Quality: Using high‑quality Oreos and real instant coffee instead of instant espresso powder gives a richer taste and better mouthfeel. The butter is unsalted, ensuring you have full control over the salt content.
- Cooking Method: Baking at a moderate temperature with a short time preserves the cookie’s structure while preventing over‑browning. The glaze is applied at the right moment to lock in moisture without making the pies soggy.
- Make‑ahead Potential: These pies can be baked ahead of time and stored in the fridge for up to a week or frozen for longer. The glaze stays intact, and the filling remains creamy.
Alright, let’s break down exactly what goes into this masterpiece…
Inside the Ingredient List
The Flavor Base
All‑purpose flour is the backbone of the cookie shell, providing structure and a neutral canvas for the coffee and chocolate. If you’re looking for a lighter bite, replace half the flour with cake flour, but be careful not to over‑mix, or you’ll lose the airy quality.
Unsweetened cocoa powder adds a deep, bittersweet note that balances the coffee’s acidity. A pinch more can make the chocolate taste richer, but too much can turn the dough bitter. I recommend using a high‑quality Dutch‑process cocoa for a smoother finish.
Instant coffee granules give the pies a subtle but unmistakable espresso flavor. If you can’t find instant coffee, finely ground brewed coffee will work, but you’ll need to use a bit less to avoid a strong bitterness. The coffee also acts as a natural preservative, extending shelf life.
Baking powder and baking soda are leavening agents that give the cookies lift. Use fresh baking powder, as it’s more potent and ensures the cookies rise evenly. The soda reacts with the coffee’s acidity, creating tiny air pockets that keep the texture light.
Salt is the unsung hero that elevates all the flavors. Even a pinch can bring out the chocolate and coffee’s sweetness, making each bite more complex. Don’t skip it—your taste buds will thank you.
The Texture Crew
Unsalted butter adds richness and helps create a tender crumb. Melt it just enough so it’s pourable but not hot; otherwise, it can cause the flour to clump. A little extra butter can make the cookies softer, but it also adds calories.
Large eggs bind the dough and add moisture. Use room‑temperature eggs for a smoother batter; cold eggs can cause the dough to split. If you’re vegan, you can substitute with flax eggs, but the texture will change slightly.
Vanilla extract enhances the overall flavor profile, providing a subtle warmth that balances the bitterness of coffee. A dash of almond extract can add a new dimension, but vanilla is the classic choice that keeps the recipe approachable.
Crushed Oreos form the filling’s backbone, adding crunch and a familiar cookie taste. Use fresh, unexpired Oreos for the best texture; older cookies can be dry and crumble. If you’re looking for a healthier version, try using reduced‑fat Oreos or a sugar‑free alternative.
Powdered sugar and butter are used to create the glaze that seals in moisture and gives the pies a shiny finish. The glaze also adds a touch of sweetness that balances the coffee’s bitterness. If you’re watching sugar, reduce the powdered sugar by a quarter and add a splash of milk to keep the glaze smooth.
The Unexpected Star
A splash of instant espresso powder gives the filling an extra punch of coffee flavor that you won’t get from regular coffee grounds. It dissolves quickly and doesn’t leave grit, ensuring a silky mouthfeel. If you don’t have espresso powder, a small amount of espresso concentrate works, but be careful with the liquid ratio.
The glaze’s vanilla adds a subtle floral note that lifts the overall taste. This small addition can transform the glaze from a simple sweet coating to a nuanced finish that keeps the pies fresh longer.
The Final Flourish
A pinch of sea salt on top of the glaze before it sets adds a savory contrast that makes the sweet flavors pop. Sea salt crystals also provide a satisfying crunch when you bite into the glaze. Use sparingly—too much can overpower the delicate balance.
A light dusting of cocoa powder over the finished pies adds a decorative touch and a hint of extra chocolate. It also helps to keep the glaze from sliding off the surface. This finishing touch turns the pies from simple treats into a visual masterpiece.
Everything's prepped? Good. Let's get into the real action…
The Method — Step by Step
- Preheat your oven to 350°F (175°C). Line a baking sheet with parchment paper or a silicone mat. This ensures the cookies won’t stick and makes cleanup a breeze. The parchment also helps the cookies bake evenly.
- In a large bowl, sift together flour, cocoa powder, baking powder, baking soda, and salt. Sifting removes lumps and ensures a smooth batter. This step is crucial for a consistent texture across all cookies.
- In a separate bowl, whisk melted butter, sugar, eggs, vanilla, and instant coffee until well combined. The mixture should be smooth and glossy. Whisking the wet ingredients first prevents clumping when you add the dry mix.
- Gradually add the dry mixture to the wet, stirring gently until just combined. Over‑mixing can lead to dense cookies; stop as soon as the flour disappears. The batter should be thick but pourable.
- Drop tablespoon‑sized scoops onto the prepared baking sheet, spacing them about 2 inches apart. Use a small cookie scoop or spoon for uniformity. The cookies will spread slightly, so keep the spacing consistent.
- Bake for 12–14 minutes, or until the edges are set but the centers still feel slightly soft. The cookies will firm up as they cool. Watch for the edges to turn a light golden brown.
- Remove from the oven and let the cookies cool on the sheet for 5 minutes before transferring to a wire rack. This prevents them from breaking while still warm. Cooling them on the sheet also helps them set properly.
- While the cookies cool, prepare the filling by mixing crushed Oreos with powdered sugar, butter, and a dash of vanilla. The mixture should be thick enough to hold its shape but not too dry. Adjust consistency with a splash of milk if needed.
- Once the cookies are cool, spread a generous amount of filling on the bottom of one cookie and top it with another, pressing lightly to seal. The filling should be centered and not spill over. This step is where the magic happens.
- For the glaze, melt butter in a small saucepan over low heat. Whisk in powdered sugar and vanilla until smooth. Remove from heat and let cool slightly before drizzling over the assembled pies. The glaze should be thick enough to coat but not run.
- Drizzle the glaze over each pie, allowing it to pool slightly at the edges. Sprinkle a pinch of sea salt on top for contrast. Let the glaze set for 10–15 minutes before serving.
That’s it— you did it. But hold on, I’ve got a few more tricks that’ll take this to another level…
Insider Tricks for Flawless Results
The Temperature Rule Nobody Follows
Many bakers bake at 375°F, but this recipe thrives at 350°F. The lower temperature keeps the cookies from drying out while still giving them a golden edge. I’ve tested both temperatures, and the difference is as clear as day and night.
Why Your Nose Knows Best
As the cookies bake, the scent of coffee and chocolate will rise and mingle. Trust your nose to tell you when the edges are just right—when the aroma is rich but not burnt. This sensory checkpoint saves you from overbaking.
The 5-Minute Rest That Changes Everything
After baking, let the cookies rest on the sheet for 5 minutes. During this rest, the interior continues to set, preventing them from cracking when you move them. This simple step can make the difference between a perfect cookie and a disappointment.
Keep It Cool for the Glaze
The glaze should be slightly cooled before drizzling. If it’s too hot, it will melt the filling; if it’s too cold, it won’t coat properly. Aim for a warm, pourable consistency, and you’ll get a glossy finish that looks as good as it tastes.
Use a Food Processor for Crushed Oreos
Crushing Oreos in a food processor gives a uniform consistency that’s easier to mix into the filling. Hand‑crushing can leave large chunks that break during baking. I’ve found the processor method gives a smoother, more even filling.
Creative Twists and Variations
This recipe is a playground. Here are some of my favorite ways to switch things up:
Mocha Mint Whoopie
Add a tablespoon of peppermint extract to the dough and a splash of cocoa powder to the glaze. The mint provides a refreshing contrast to the coffee, while the cocoa deepens the chocolate flavor. Perfect for a winter holiday treat.
Nutty Espresso Delight
Stir in a handful of chopped hazelnuts into the filling and sprinkle toasted almonds on top of the glaze. The nuts add crunch and a buttery flavor that complements the coffee notes. Ideal for a sophisticated dessert.
Dark Chocolate Indulgence
Replace the all‑purpose flour with a blend of whole wheat and oat flour for a healthier twist. Use dark chocolate chips instead of cocoa powder for an extra chocolate punch. The result is a richer, more complex flavor profile.
Vegan Vanilla Bean
Swap the eggs for flax eggs and use a plant‑based vanilla extract. Replace butter with vegan butter or coconut oil, and use a sugar‑free powdered sugar for the glaze. The final product is just as indulgent, but without the animal products.
Citrus Burst
Add a teaspoon of orange zest to the dough and a splash of lemon zest to the glaze. The citrus brightens the coffee flavor and adds a subtle zing that keeps the pies from feeling heavy. Great for spring or summer gatherings.
Storing and Bringing It Back to Life
Fridge Storage
Store the pies in an airtight container at room temperature for up to 3 days. For longer freshness, keep them in the refrigerator, where they’ll stay moist for up to a week. The glaze may harden slightly, but a quick warm‑up restores its shine.
Freezer Friendly
Wrap each pie individually in plastic wrap, then place them in a freezer bag. They’ll keep for up to 3 months. When ready to serve, thaw at room temperature for 30 minutes. The texture remains soft and the filling stays creamy.
Best Reheating Method
To reheat, place the pies on a parchment‑lined tray and bake at 300°F for 5 minutes. This gently warms the filling without melting the glaze. Alternatively, microwave on low for 15 seconds if you’re in a hurry. Add a tiny splash of water before reheating to keep the filling moist.