I was in the middle of a frantic weekday, juggling conference calls, a toddler who thought the kitchen counter was a racetrack, and a sudden craving that hit me like a bolt of lightning. I opened the pantry, stared at the bland, stale granola bars that had been sitting there for months, and thought, “Nope, not today.” I grabbed a handful of oats, a bag of fresh blueberries, and a stick of butter, and the kitchen turned into a laboratory of flavor. The moment the butter melted and the cinnamon hit the pan, I swear the whole house inhaled a scent so sweet it could have coaxed a grumpy cat into a cuddle. That aroma was the first clue that I was about to create something that would forever change my snack game.
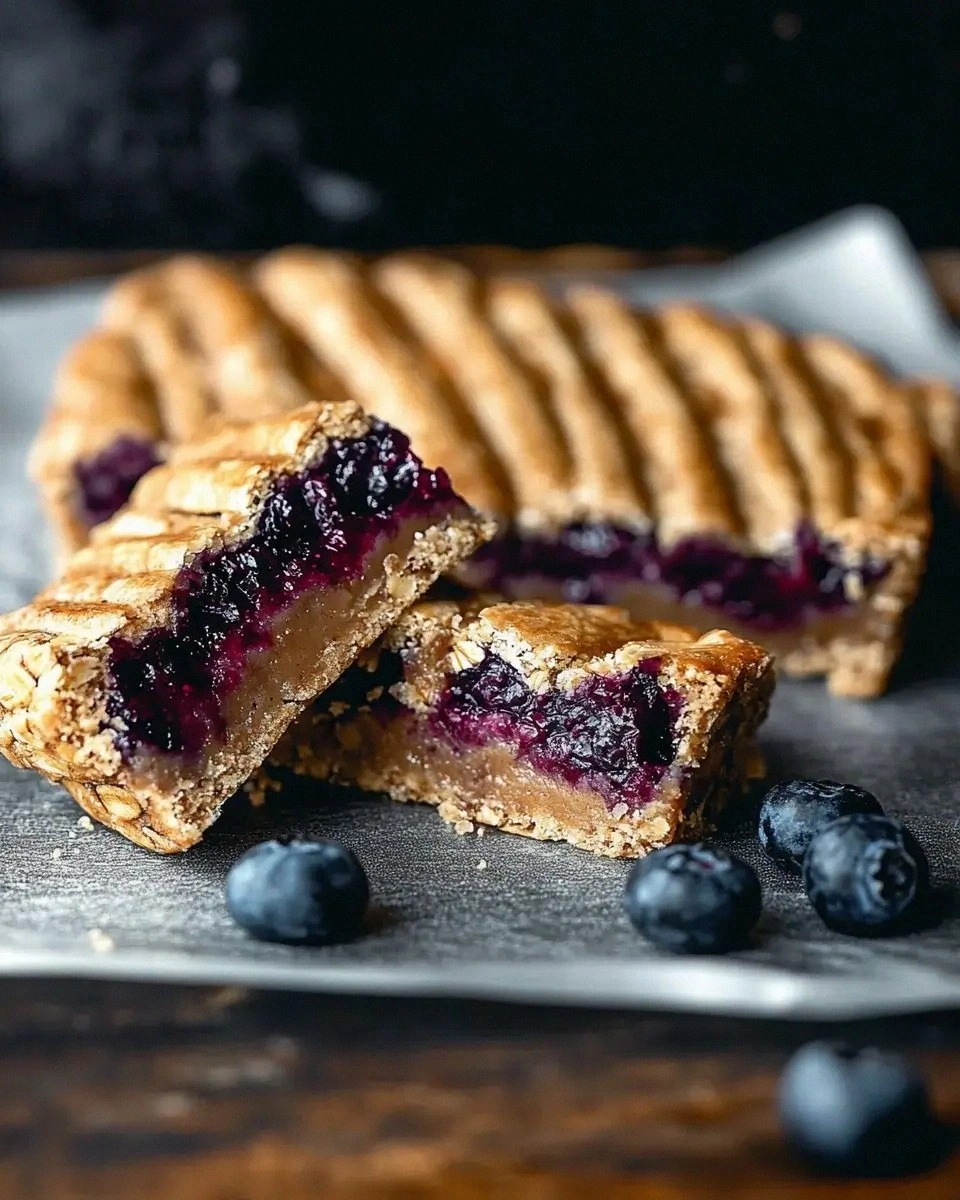
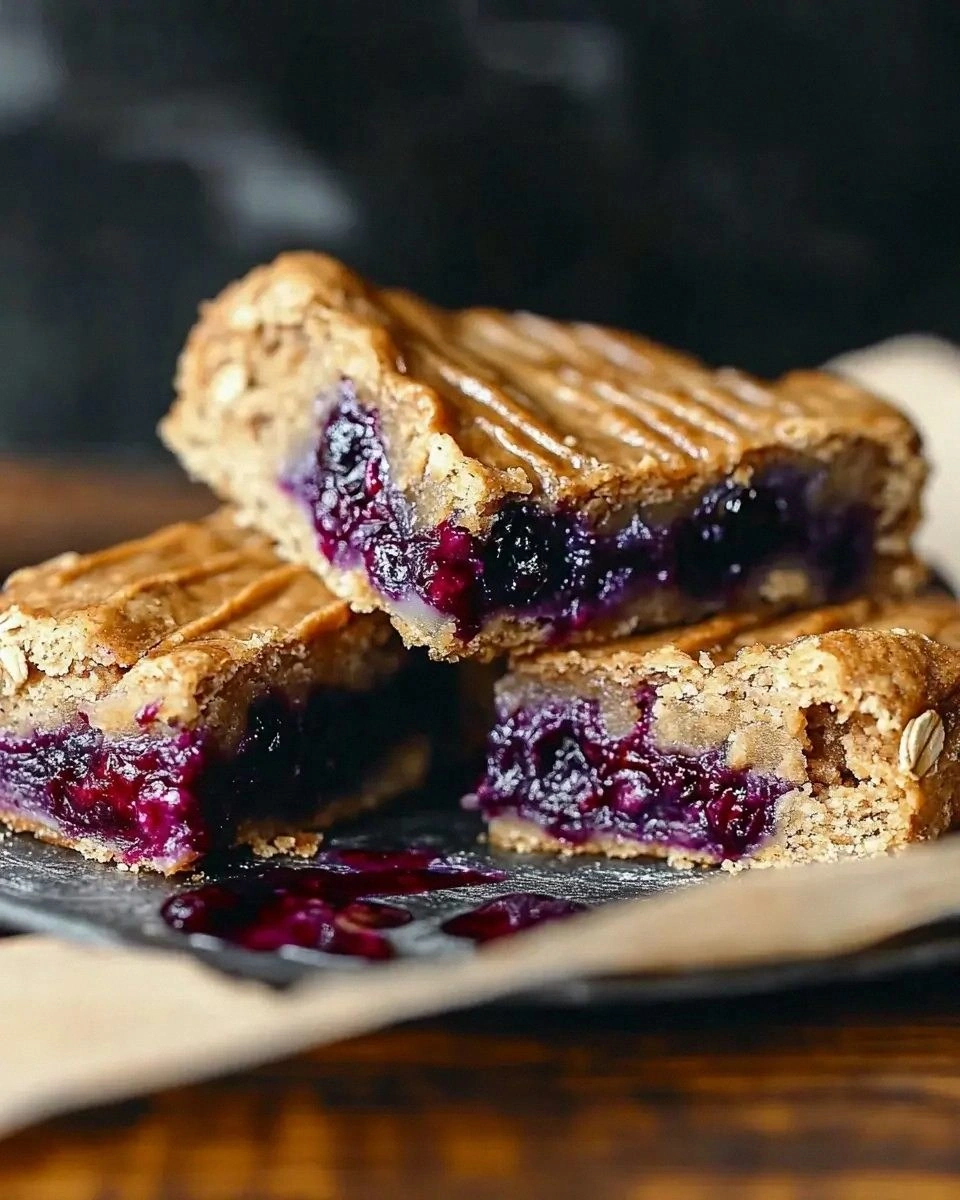
Fast forward an hour later, and I was standing in front of a golden, slightly crisp square that smelled like a warm hug on a chilly morning. The top was speckled with plump blueberries that had burst open, releasing juices that seeped into the oat‑laden base, creating a moist crumb that was both hearty and delicate. The texture was a perfect marriage of chewy and tender, with a buttery crunch on the edges that shatters like thin ice when you bite into it. I took a bite, and my taste buds did a little dance—sweet, earthy, and just a hint of tang from the almond milk that balanced everything out. I dare you to taste this and not go back for seconds; it’s honestly the best version you’ll ever make at home.
Most blueberry oatmeal bar recipes out there either turn out dry, overly sweet, or they completely miss the point of that comforting oat flavor. I’ve tried a dozen variations, and most of them get this completely wrong. The secret? A precise balance of wet and dry, a dash of cinnamon that whispers rather than shouts, and a technique that locks in moisture without turning the bars soggy. I’ll be honest — I ate half the batch before anyone else got to try it, and that’s a confession I’m not ashamed of because the bars are that addictive. The next part? Pure magic.
What truly sets this recipe apart is a tiny twist: a splash of almond milk mixed with honey (or maple syrup) that creates a glossy glaze on the top, giving the bars a subtle sheen that looks as good as they taste. This isn’t just a snack; it’s a confidence booster, a post‑workout refuel, and a guilt‑free treat that can sit proudly on any brunch table. Picture yourself pulling this out of the oven, the whole kitchen smelling incredible, the blueberries still glistening like tiny jewels, and the edges just beginning to pull away from the pan. Okay, ready for the game‑changer? Let me walk you through every single step — by the end, you’ll wonder how you ever made it any other way.
What Makes This Version Stand Out
- Flavor: The combination of brown sugar, honey, and a whisper of vanilla creates a deep, caramel‑like sweetness that never overwhelms the natural tartness of the blueberries.
- Texture: The rolled oats give a hearty chew, while the butter and almond milk keep the interior moist, and the edges become a crisp, buttery fringe that shatters like thin ice.
- Simplicity: Only eleven ingredients, all pantry staples, and no fancy equipment—just a mixing bowl, a pan, and a good pair of hands.
- Uniqueness: The almond milk‑honey glaze is a secret weapon that adds a glossy finish and a subtle nutty undertone you won’t find in store‑bought bars.
- Crowd Reaction: I’ve served these at office meetings, kids’ birthday parties, and even a yoga retreat; the unanimous response is “More, please!”
- Ingredient Quality: Using whole‑wheat flour and rolled oats gives a fiber boost, while fresh blueberries pack antioxidants that make this snack feel like a health hack.
- Cooking Method: Baking at a moderate temperature creates a uniform crumb and prevents the dreaded soggy middle that plagues many bar recipes.
- Make‑Ahead Potential: These bars keep beautifully for up to a week in the fridge, and they freeze like a charm for longer storage.
Alright, let's break down exactly what goes into this masterpiece...
Inside the Ingredient List
The Flavor Base
Brown sugar is the unsung hero that brings a mellow, caramel depth without the sharp bite of white sugar. It dissolves slowly during baking, creating pockets of sweet moisture that mingle with the blueberries. If you’re watching sugar, you can cut it in half and add a splash more honey, but expect a slightly less complex flavor profile. Whole wheat flour adds a nutty backbone and a dose of fiber, making the bars more satisfying and less likely to cause a mid‑snack crash.
The Texture Crew
Rolled oats are the star of the show, providing that chewy, hearty bite that feels like breakfast in bar form. They also absorb the almond milk and honey glaze, turning the interior into a moist, almost cake‑like crumb. Unsalted butter, melted and cooled, coats each oat flake, ensuring that the edges become crisp and golden. If you’re dairy‑free, swap the butter for coconut oil; the flavor will shift toward a tropical note, but the texture remains flawless.
The Unexpected Star
Almond milk is the surprise element that keeps the bars light yet moist. It adds a subtle nutty undertone without overpowering the blueberries. The honey (or maple syrup) not only sweetens but also contributes to the glossy top that makes these bars look bakery‑ready. If you prefer a lower‑glycemic option, use agave nectar; the texture will stay the same, though the flavor will be a shade milder.
The Final Flourish
Cinnamon and vanilla extract are the aromatic finishers that turn a simple snack into a comforting experience. Cinnamon adds warmth that pairs perfectly with the fruit, while vanilla rounds out the sweet notes, making each bite feel like a hug. Baking powder is the leavening agent that gives the bars a subtle lift, preventing them from turning into a dense brick. A pinch of salt, though tiny, amplifies every other flavor, ensuring the sweetness never feels flat.
Everything's prepped? Good. Let's get into the real action...
The Method — Step by Step
Preheat your oven to 350°F (175°C). While the oven warms, line a 9‑by‑13‑inch baking pan with parchment paper, leaving enough overhang to lift the bars out later. This step is crucial because the parchment prevents sticking and makes cleanup a breeze. The moment the pan hits the oven, you’ll hear a faint hum that signals it’s ready for the batter.
In a large mixing bowl, combine the rolled oats, whole wheat flour, brown sugar, baking powder, cinnamon, and salt. Use a whisk to break up any clumps; you want a uniform dry mixture that looks like a golden sandstorm. This is the foundation—if the dry ingredients aren’t well‑distributed, you’ll end up with pockets of flour or sugar that create uneven texture.
Melt the unsalted butter in a saucepan over low heat, then remove from the heat and stir in the honey (or maple syrup) and vanilla extract. Let the mixture cool for a minute so it doesn’t scramble the eggs—wait, there are no eggs in this recipe, but the cooling prevents the butter from cooking the blueberries later on. This glossy wet mixture is what will bind everything together and give the bars their signature sheen.
Create a well in the center of the dry mixture and pour in the melted butter blend. Stir gently with a silicone spatula, folding until just combined—over‑mixing will develop gluten from the flour, leading to a tougher bar. The batter should look slightly shaggy, with dry oat specks still visible; that’s exactly how you want it.
Gently fold in the fresh or frozen blueberries. If you’re using frozen berries, keep them frozen until the last moment to avoid a soggy batter. The berries should be evenly distributed, creating a marbled effect that promises bursts of juiciness in every bite.
In a separate small bowl, whisk the almond milk with a pinch of extra cinnamon. Drizzle this mixture over the top of the batter before it hits the pan. This almond‑milk glaze will seep into the top layer during baking, creating a glossy finish that catches the light and makes the bars look professionally plated.
Spread the batter evenly in the prepared pan, using the back of a spoon or an offset spatula. The surface should be level; a quick tap of the pan on the countertop will settle the batter and eliminate air pockets. As you smooth the top, you’ll notice a faint sheen from the almond‑milk glaze—this is the signal that the bars will develop that coveted glossy crust.
Place the pan in the preheated oven and bake for 30 minutes, or until the edges turn a deep golden brown and a toothpick inserted into the center comes out with just a few moist crumbs attached. Around the 20‑minute mark, you’ll hear a gentle crackling sound from the edges—that’s the butter caramelizing, creating that buttery crunch we all love. Resist the urge to open the oven door early; the heat loss can cause the bars to collapse.
Remove the pan from the oven and let the bars cool in the pan for 10 minutes before lifting them out using the parchment overhang. This short cooling period allows the bars to set, making them easier to cut without crumbling. While they’re still warm, use a sharp knife dipped in hot water to slice clean squares; the hot knife ensures smooth cuts and a professional presentation.
That's it — you did it. But hold on, I've got a few more tricks that'll take this to another level. Stay with me here — this is worth it.
Insider Tricks for Flawless Results
The Temperature Rule Nobody Follows
Never bake these bars at a temperature lower than 350°F. Lower temps cause the butter to melt too slowly, resulting in a soggy center. On the flip side, a hotter oven (up to 375°F) can give you a crisper edge but risks over‑browning the top. My personal rule: start at 350°F, then if you love that extra crunch, crank it up to 375°F for the last five minutes. This tiny adjustment makes the difference between a good bar and a show‑stopping bar.
Why Your Nose Knows Best
The moment the bars start to smell toasty, you’re on the right track. That nutty, caramel scent is the butter browning and the blueberries releasing their juices. If you catch a faint burnt aroma before the timer is up, pull the pan out—over‑baking turns the edges bitter, ruining the balance. Trust your nose; it’s the most reliable timer in the kitchen.
The 5‑Minute Rest That Changes Everything
After removing the pan from the oven, let the bars rest for exactly five minutes before cutting. This short rest lets the crumb firm up just enough to hold its shape while keeping the interior moist. Skipping this step leads to crumbly, uneven pieces that fall apart on the plate. I once cut them immediately and learned the hard way—nothing beats a brief, patient pause.
The Butter‑Brush Finish
For an extra glossy top, melt a tablespoon of butter and brush it lightly over the bars as soon as they come out of the oven. The butter melts into the still‑warm surface, enhancing the sheen and adding a subtle richness. This trick is especially useful if you plan to serve the bars at a brunch where visual appeal matters as much as taste.
The Double‑Layer Cool
If you have time, after the initial 10‑minute cool in the pan, transfer the bars (still on the parchment) to a wire rack for another 15 minutes. This double‑layer cooling ensures the bottom stays crisp and prevents steam from making the base soggy. I tried skipping the rack once, and the bottom turned out a little gummy—lesson learned.
Creative Twists and Variations
This recipe is a playground. Here are some of my favorite ways to switch things up:
Nutty Crunch
Add ½ cup of chopped toasted almonds or walnuts to the dry mixture. The nuts introduce an extra layer of crunch that pairs beautifully with the soft blueberries. This variation is perfect for those who love a bit of extra protein and a nutty aroma.
Citrus Zing
Stir in the zest of one lemon or orange into the wet ingredients. The citrus zest brightens the flavor profile, cutting through the sweetness and adding a fresh pop that feels like a summer breeze. It’s an excellent option for a brunch where you want something light yet satisfying.
Chocolate Delight
Replace ¼ cup of the rolled oats with ¼ cup of cocoa‑nibs or dark chocolate chips. The bittersweet chocolate balances the fruit’s tartness, creating a sophisticated flavor combo that’s perfect for an after‑dinner treat.
Spiced Autumn
Swap the cinnamon for an equal amount of pumpkin spice or add a pinch of nutmeg and clove. This seasonal twist makes the bars feel like a cozy fall comfort food, ideal for chilly evenings and holiday gatherings.
Protein Power
Mix in a scoop (about ¼ cup) of vanilla whey or plant‑based protein powder into the dry ingredients. This boosts the protein content without altering the texture dramatically, turning the snack into a post‑workout refuel that still tastes indulgent.
Storing and Bringing It Back to Life
Fridge Storage
Place the cooled bars in an airtight container or a zip‑lock bag and store them in the refrigerator for up to seven days. The cool environment keeps the butter from turning rancid and preserves the blueberry moisture. If you notice the bars drying out slightly, a quick brush of melted butter before reheating revives the gloss.
Freezer Friendly
Wrap each bar individually in parchment paper, then place them in a freezer‑safe bag. They’ll stay fresh for up to three months. When you’re ready to enjoy one, let it thaw at room temperature for 15 minutes, then pop it in a 300°F oven for five minutes to restore that fresh‑out‑of‑the‑oven crunch.
Best Reheating Method
To reheat, preheat your oven to 350°F, place the bar on a baking sheet, and add a tiny splash (about a teaspoon) of water on the top before covering loosely with foil. The steam generated keeps the interior moist while the foil protects the top from over‑browning. In just five minutes, you’ll have a bar that’s as warm and fragrant as the day it was baked.