Picture this: you’re halfway through a Sunday brunch, the kitchen is a chaotic swirl of sizzling pans, the oven is breathing out steam, and the fridge is empty except for a lonely slice of cheese and a box of bacon. That was me last week. I stared at the ingredients and realized I had a craving that no ordinary burger could satisfy. I was determined to turn that craving into a crowd‑pleasing masterpiece.
The moment I started cooking, the air filled with the sweet, smoky aroma of bacon frying. The sizzle on the skillet was a drumbeat that promised something special. I could hear the clink of a spatula, the hiss of butter melting, and the faint pop of onions caramelizing. My senses were on high alert: the heat was just right, the bacon was crisping to a golden‑brown, and the bacon jam was bubbling like a slow‑fire caramel.
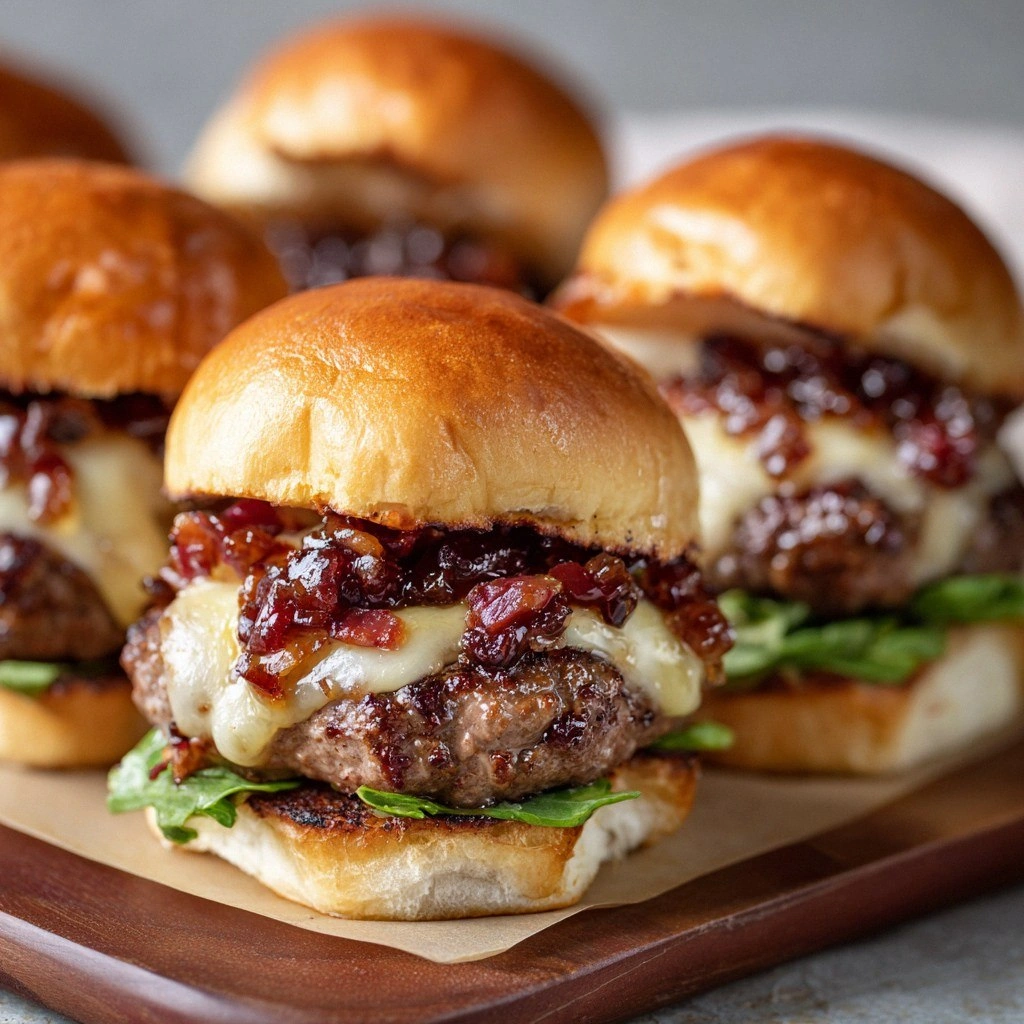
I’ll be honest—when I first tasted the first slider, I almost swallowed it whole. The savory beef, the tangy bacon jam, and the melty cheese were in perfect harmony, each bite a burst of flavor that left a smoky aftertaste lingering on the tongue. If you’ve ever struggled to make a burger that’s both juicy and flavorful, you’re not alone. This version is hands down the best you’ll ever make at home.
I dare you to taste this and not go back for seconds. Picture yourself pulling this out of the oven, the whole kitchen smelling incredible, and watching your guests’ faces light up as they bite into that first crunchy, caramel‑coated bite. The secret? A homemade bacon jam that coats the patty like velvet, and a burger bun that’s soft inside but crisp on the edges. Let me walk you through every single step — by the end, you’ll wonder how you ever made it any other way.
What Makes This Version Stand Out
- Flavor: The bacon jam isn’t just a topping; it’s a flavor foundation that infuses the patty with a sweet, smoky depth that ordinary burgers lack.
- Texture: The buns are lightly toasted, giving a satisfying crunch that contrasts with the juicy interior of the beef.
- Ease: All steps are streamlined—no separate sauce or complicated seasoning—so you can focus on the cooking rather than the prep.
- Uniqueness: The combination of caramelized onions, a splash of vinegar, and brown sugar in the jam creates a caramelized glaze that’s rarely seen in standard sliders.
- Crowd Reaction: Friends rave about how the bacon jam elevates the entire burger experience, turning a simple snack into a gourmet treat.
- Ingredient Quality: Using high‑quality bacon and sharp cheddar ensures each bite delivers premium taste.
- Make‑Ahead: The bacon jam can be made days ahead, and the sliders can be assembled and frozen for an effortless party fix.
Alright, let’s break down exactly what goes into this masterpiece…
Inside the Ingredient List
The Flavor Base
Ground beef is the heart of any burger, and for these sliders we choose a blend that’s 80% lean to keep the meat juicy without excess fat. Salt and black pepper are the first line of defense against blandness—season the meat right before shaping to lock in moisture. Cheddar cheese, sliced into four pieces, provides a sharp, melty counterpoint to the savory beef. Butter, a tablespoon in total, is added to the skillet to give the patty a golden crust and a buttery aroma that lingers on the palate.
The Texture Crew
Bacon is the star of the show; eight slices, crisped to a golden‑brown, deliver that iconic smoky crunch. Slider buns, eight in total, are lightly toasted to create a firm base that holds the juicy filling without becoming soggy. Lettuce leaves and tomato slices add a fresh, crisp bite that cuts through the richness of the meat and cheese. Pickles, sliced into thin rings, introduce a tangy bite that brightens the overall flavor profile.
The Unexpected Star
Bacon jam is the secret weapon that sets this recipe apart. Made by slow‑cooking bacon with onions, brown sugar, and a splash of apple cider vinegar, it becomes a silky, caramelized glaze that coats the patty and adds a sweet, smoky depth. The jam’s glossy finish is like velvet draping over the meat, creating a visual and textural contrast that’s both appealing and delicious.
The Final Flourish
Mayonnaise and Dijon mustard, each a tablespoon, are optional but highly recommended for a creamy, tangy spread that adds another layer of complexity. A pinch of pepper and a dash of garlic powder elevate the overall flavor without overpowering the burger. If you’re feeling adventurous, a splash of Worcestershire sauce in the meat mixture will add umami depth. These final touches ensure that every bite is balanced and unforgettable.
Everything’s prepped? Good. Let’s get into the real action…
The Method — Step by Step
- Begin by making the bacon jam if you haven’t prepped it. In a heavy skillet, cook the bacon over medium heat until it releases its fat and starts to brown. Stir in thinly sliced onions and let them soften for about 5 minutes. Add brown sugar, a splash of apple cider vinegar, and a pinch of salt, then reduce heat to low and let it simmer for 30 minutes, stirring occasionally, until the mixture thickens into a glossy, caramelized glaze. This process should produce a sweet, smoky aroma that fills the kitchen.
- While the jam is simmering, shape the ground beef into eight equal patties, about 2 inches in diameter and 1/2 inch thick. Season each side with salt and pepper. The patty should be firm enough to hold together but not over‑compressed, ensuring a juicy interior. Place the patties on a parchment‑lined tray and refrigerate for 10 minutes; chilling them helps maintain shape during cooking.
- Heat a skillet or grill pan over medium‑high heat. Add a tablespoon of butter and let it melt. Once the butter is foamy, place the patties in the pan. Cook for 3 minutes on the first side until a golden crust forms and the edges begin to pull away. Flip the patties, add a slice of cheddar cheese on top of each, and let them melt for 2 minutes. The cheese should be bubbling and slightly browned.
- While the cheese melts, toast the slider buns on the same pan or a separate toaster until lightly browned. This step adds crunch and prevents the buns from becoming soggy when the juicy patty is added. The buns should be warm and slightly crisp on the outside, with a soft interior that holds the fillings.
- Spread a thin layer of mayonnaise on the bottom bun, followed by a smear of Dijon mustard for a subtle tang. Add a leaf of lettuce, a slice of tomato, and a few rings of pickle. Then, place the cheesy patty on top, letting the juices mingle with the condiments.
- Generously spoon the bacon jam over the patty, allowing it to drip down the sides. The jam should coat the patty like a glossy glaze, adding sweetness and smokiness that caramelizes slightly when it contacts the hot cheese. This is the moment of truth: the aroma should be irresistible, and the visual contrast should be striking.
- Cover the slider with the top bun, press lightly, and let it sit for 30 seconds. This resting period lets the flavors meld and the cheese set just enough to hold everything together. The final slider should feel sturdy, yet the patty should still be tender and juicy.
- Serve immediately while the buns are warm and the cheese is still slightly melty. For a party setting, arrange the sliders on a platter with a side of extra bacon jam for dipping. The combination of textures—crispy bacon, crunchy lettuce, soft bun, and creamy cheese—creates a symphony of flavors that will have your guests asking for more.
That’s it—you did it. But hold on, I’ve got a few more tricks that’ll take this to another level.
Insider Tricks for Flawless Results
The Temperature Rule Nobody Follows
Cooking the patties at the right temperature is key. A medium‑high heat ensures a caramelized crust while keeping the interior juicy. If the pan is too hot, the outside will burn before the inside cooks. If it’s too low, the patties will steam and lose flavor. The trick? Use a thermometer; the ideal internal temperature for a juicy burger is 130°F for medium‑rare.
Why Your Nose Knows Best
Trust your sense of smell. The moment the bacon jam hits a low flame and starts to bubble, you’ll know it’s ready. The aroma should be sweet with a hint of smokiness. If it still smells raw, give it a few more minutes. Your nose is the best judge of doneness.
The 5-Minute Rest That Changes Everything
After cooking, let the patties rest for five minutes before assembling. This allows the juices to redistribute, preventing them from spilling onto the bun. It also lets the cheese set slightly, making the slider easier to bite without tearing apart. A quick rest is a game‑changer for texture.
Use Fresh, Crisp Lettuce
Lettuce should be crisp, not wilted. A fresh leaf adds a crunchy bite that contrasts with the soft bun and juicy patty. If you’re using romaine, wash it in cold water and pat dry. A wet leaf will release water and make the slider soggy.
Add a Splash of Worcestershire
A dash of Worcestershire sauce in the meat mixture adds depth and a subtle umami kick. It also helps balance the sweetness of the bacon jam. Add just 1 teaspoon per pound of beef to avoid overpowering the other flavors.
Creative Twists and Variations
This recipe is a playground. Here are some of my favorite ways to switch things up:
Spicy Chipotle Slider
Swap the cheddar for pepper jack and add a tablespoon of chipotle mayo. The smoky heat pairs beautifully with the bacon jam, creating a bold, spicy kick that will satisfy heat lovers.
Sweet Apple Bacon Slider
Add thin apple slices to the patty before cooking. The fruit’s sweetness complements the bacon jam and adds a crunchy texture. Finish with a drizzle of honey on top.
Mushroom & Swiss Variation
Sauté sliced mushrooms with garlic and thyme, then pile them on the patty before adding Swiss cheese. The earthy flavor of mushrooms adds depth, while Swiss offers a milder melt.
Vegan Bacon Jam Slider
Use a plant‑based burger patty, vegan bacon, and a dairy‑free cheese alternative. For the jam, substitute coconut oil for bacon fat and use smoked paprika for smokiness. The result is a cruelty‑free version that still delivers on flavor.
Mediterranean Twist
Replace the pickles with roasted red peppers and add a spoonful of hummus under the patty. The Mediterranean flavors bring a fresh, tangy profile that contrasts with the rich beef.
Breakfast Slider
Swap the burger for a fried egg, add a slice of cheddar, and top with a smear of maple syrup. The sweet‑savory combo is perfect for brunch or a hearty breakfast.
Storing and Bringing It Back to Life
Fridge Storage
Store assembled sliders in an airtight container for up to 2 days. Keep the buns separate until serving to prevent sogginess. If you’re short on time, keep the bacon jam and patties separate and assemble just before eating.
Freezer Friendly
Freeze the individual components—patties, bacon jam, buns—separately in freezer bags. When ready, thaw the patties in the refrigerator overnight, reheat in a skillet, and assemble. The bacon jam can be reheated in a small saucepan over low heat.
Best Reheating Method
Reheat assembled sliders in a preheated oven at 350°F for 5 minutes, or until the cheese is melted. Add a tiny splash of water before reheating to create steam, which keeps the buns from drying out and restores a fresh, warm texture.