Picture this: you’re in your kitchen, the air thick with the scent of soy and sesame, and your phone buzzes with a text from a friend daring you to bring the restaurant’s crispy sesame chicken to your table. I stared at the empty fridge, the silence of a Saturday night suddenly louder than any kitchen disaster I’ve ever survived. I had burnt a batch of fried chicken the week before, the skin so charred it could have been a charcoal art exhibit, and I was determined to turn that culinary blunder into a triumph. This is the story of how one misstep sparked a recipe that’s now the highlight of my dinner rotation.
When the first golden pieces hit the pan, the sizzle was like a drumroll announcing the arrival of flavor. The aroma of toasted sesame seeds mingled with the sharp bite of fresh ginger, and I could almost taste the sweet, umami‑laden sauce coating each tender bite like velvet. The sound of the pan, the gentle hiss of oil, and the visual of the crust cracking at the edges were a sensory orchestra that made my heart race. I knew immediately that this was not just another fried chicken; it was a culinary revelation that demanded a deeper dive into its secrets. Let me walk you through every single step — by the end, you’ll wonder how you ever made it any other way.
The first time I tried this dish, I was skeptical that the sauce could truly bind to the crispy coating without turning soggy. I watched as the sauce thickened into a glossy glaze, and I felt a surge of confidence that this recipe could be my new go‑to for weeknight dinners. The combination of a crunchy exterior and a silky, slightly spicy interior is a paradox that satisfies every craving. I’ll be honest — I ate half the batch before anyone else got to taste it. The next time you see a plate of these, you’ll be tempted to do the same. This is hands down the best version you’ll ever make at home, and I’m about to spill the secrets that make it so irresistible.
I’m not going to sugarcoat it; this recipe is a game‑changer. Most recipes get this completely wrong by over‑frying the chicken or under‑seasoning the sauce. I dare you to taste this and not go back for seconds. The next sections will reveal the techniques that keep the chicken crispy, the sauce perfectly balanced, and the entire dish incredibly easy to execute. If you’ve ever struggled with achieving that golden crunch, you’re not alone — and I’ve got the fix. Stay with me here — this is worth it.
What Makes This Version Stand Out
- Crunch Factor: The panko breadcrumb coating creates a light, airy texture that shatters like thin ice when you bite into it, leaving a satisfying crunch that contrasts beautifully with the tender meat.
- Flavor Harmony: The sauce marries sweet, salty, and spicy notes in a single glaze, coating the chicken like velvet while still allowing the natural flavor of the poultry to shine.
- Time Efficiency: From prep to plate, you’re looking at 45 minutes, which means you can enjoy a restaurant‑style dish without a weekend‑long commitment.
- Ingredient Simplicity: Every component is pantry‑friendly, and you can swap out a few items without compromising the overall experience.
- Make‑Ahead Friendly: The sauce can be pre‑made, and the coated chicken can be frozen before frying, making it a perfect dish for busy evenings.
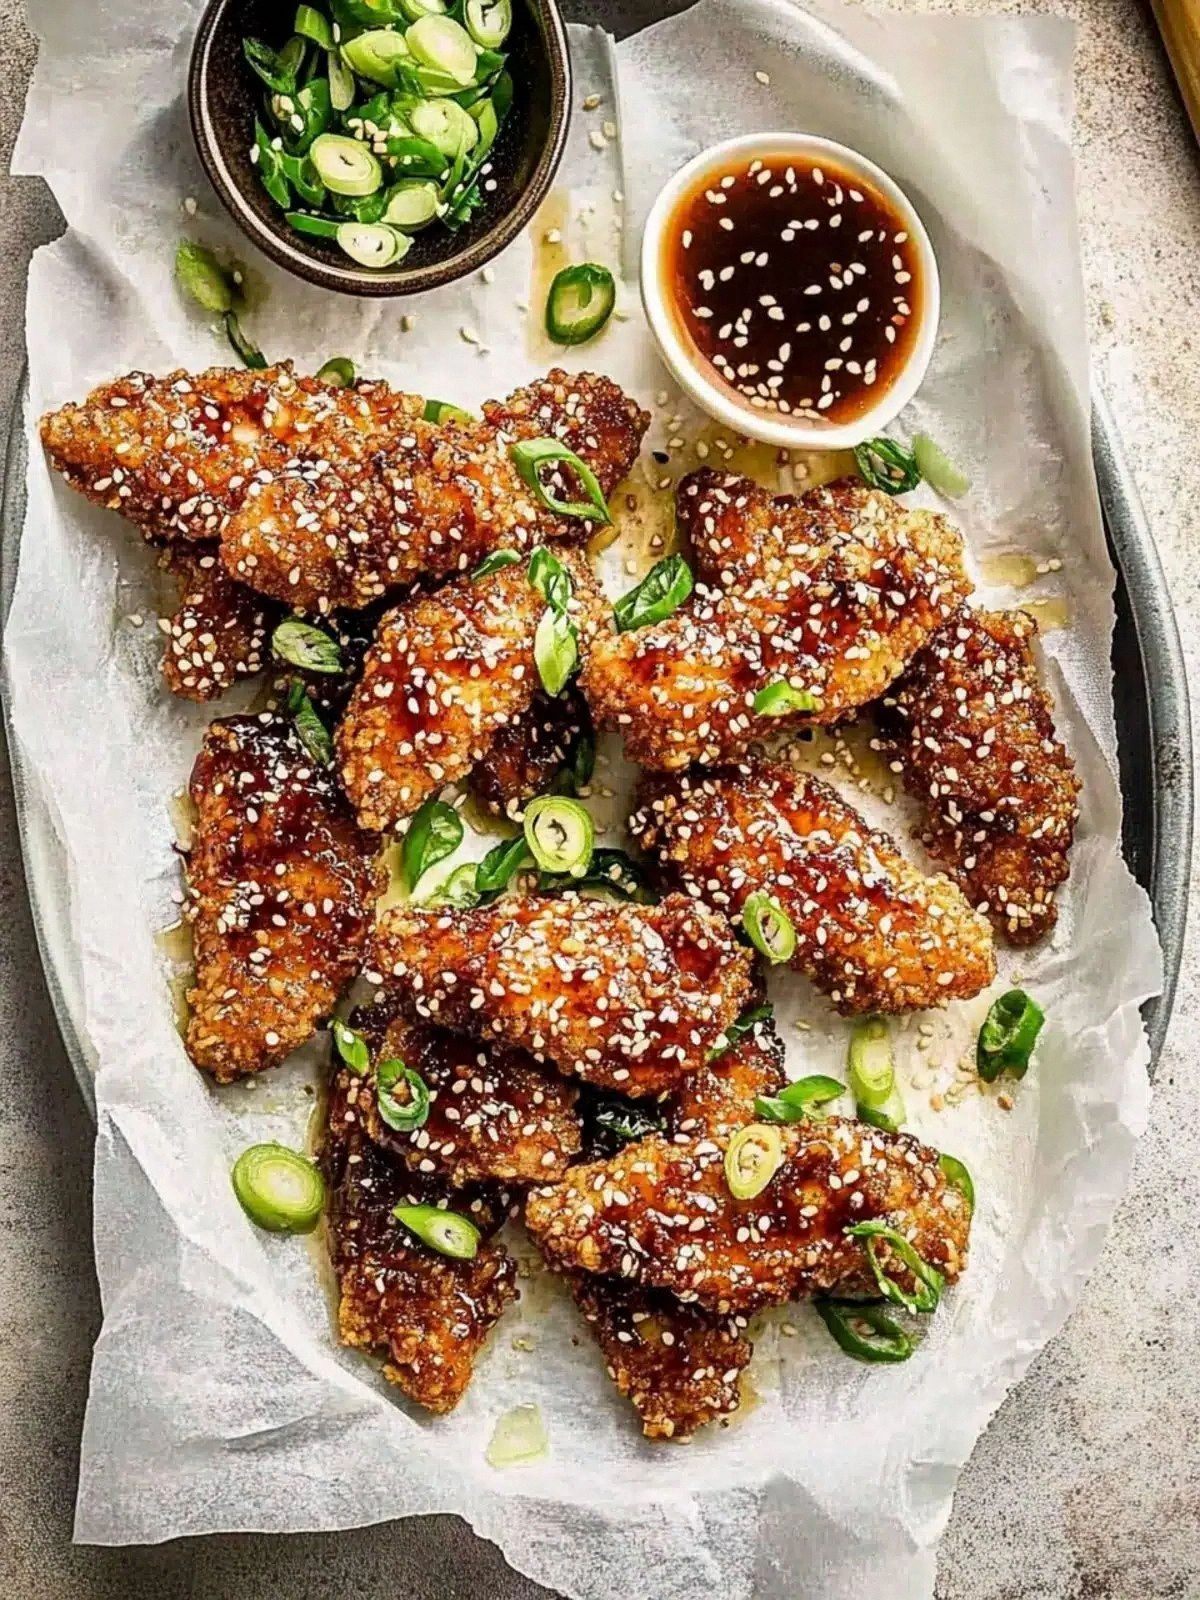
- Visual Appeal: The glossy glaze and speckled sesame seeds give the dish a professional, restaurant‑quality look that impresses guests and makes Instagram posts inevitable.
Alright, let’s break down exactly what goes into this masterpiece…
Inside the Ingredient List
The Flavor Base
The sauce is the soul of this dish. Soy sauce provides the umami backbone, while rice vinegar adds a bright acidity that cuts through the richness of the fried chicken. Brown sugar or honey introduces a caramelized sweetness that balances the heat from the chili garlic sauce. Fresh ginger and garlic infuse the sauce with aromatic depth, and sesame oil elevates it with a nutty aroma that lingers on the palate. If you skip any of these, the sauce will feel flat and underwhelming.
For an extra layer of flavor, you can add a splash of hoisin or oyster sauce, but be careful not to overpower the delicate balance. When selecting soy sauce, opt for a low‑sodium version if you’re watching your salt intake; you can always adjust the final seasoning later. The key is to taste as you go, because the sauce’s flavor evolves as it cooks.
The Texture Crew
The combination of all-purpose flour and panko breadcrumbs creates a dual‑layered coating that’s light on the inside and crunchily golden on the outside. The flour acts as a binder, allowing the panko to adhere firmly to the chicken. Sesame seeds add a subtle crunch and a nutty flavor that complements the sauce. If you’re gluten‑free, swap the flour for a gluten‑free blend and the panko for crushed rice crackers; the result will still be crispy.
The cornstarch slurry, made with equal parts cornstarch and water, is the secret to turning the sauce into a glossy, clingy glaze. It thickens the sauce without adding bulk, ensuring that every bite is coated in flavor. The final salt and pepper seasoning is what ties all the elements together, giving the dish a savory punch that lingers on the tongue.
The Unexpected Star
Sesame oil is a game‑changer. Its high smoke point makes it ideal for frying, and its distinct nutty aroma elevates the dish from ordinary to extraordinary. It’s easy to overlook, but a splash of sesame oil in the pan and a drizzle over the finished chicken transforms the flavor profile into something that feels both exotic and comforting. If you’re allergic to sesame, use a light olive oil instead, but you’ll miss that signature aroma.
The optional green onions add a fresh, crisp bite that cuts through the richness of the sauce. They’re best added at the very end, just before serving, so they retain their bright color and subtle onion flavor. If you’re looking for a vegan version, simply omit the eggs and use a plant‑based egg replacer; the coating will still stay crisp.
Everything’s prepped? Good. Let’s get into the real action…
The Method — Step by Step
- First, pat the chicken tenders dry with paper towels. This step is crucial because any excess moisture will cause the coating to steam instead of crisp. Once dry, season both sides with 0.5 tsp salt and 0.5 tsp pepper. Set the seasoned chicken aside while you prepare the coating.
- In a shallow bowl, whisk the eggs until the whites and yolks are fully blended. In a separate bowl, combine the flour, panko breadcrumbs, and 1 Tbsp sesame seeds. This dry mix will form the crispy shell that’s the hallmark of the dish.
- Dip each chicken piece into the beaten eggs, allowing excess to drip off, then dredge thoroughly in the dry coating mixture. Press the coating onto the chicken so it adheres firmly; this ensures a uniform crust. Place the coated chicken on a wire rack to rest for 5 minutes, which allows the coating to set.
- Heat 2 Tbsp canola oil in a large skillet over medium‑high heat. Once the oil shimmers, add the chicken pieces in a single layer, avoiding overcrowding. Fry each side for 4–5 minutes, or until golden brown and the internal temperature reaches 165°F (74°C). Flip gently to preserve the coating’s integrity.
- While the chicken cooks, prepare the sauce. In a small saucepan, combine 0.33 cup soy sauce, 2 Tbsp rice vinegar, 1 Tbsp brown sugar, 1 tsp minced ginger, 1 tsp minced garlic, and 1 tsp chili garlic sauce. Bring to a low simmer, stirring constantly so the sugar dissolves fully.
- Once the sauce is simmering, whisk together 1 Tbsp cornstarch with 1 Tbsp water to create a slurry. Slowly pour the slurry into the saucepan, whisking continuously until the mixture thickens into a glossy glaze. This should take about 2 minutes; the sauce should coat the back of a spoon.
- When the chicken is done, transfer it to a platter and pour the thickened sauce over the pieces, ensuring each piece is evenly coated. Toss gently to distribute the glaze, then sprinkle the remaining 1 Tbsp sesame seeds for an extra crunch and nutty aroma.
- Finish by adding a pinch of fresh green onions, chopped finely, for a burst of color and a fresh, sharp contrast to the rich sauce. Serve immediately with steamed rice or a crisp salad, and watch the compliments roll in.
That’s it — you did it. But hold on, I've got a few more tricks that'll take this to another level…
Insider Tricks for Flawless Results
The Temperature Rule Nobody Follows
Many cooks fry at the highest heat they can, hoping for a quicker crust. The truth is, a steady medium‑high heat (around 350°F/175°C) allows the coating to set slowly, preventing the chicken from drying out while still achieving a golden exterior. I’ve seen batches that turn out soggy simply because the oil was too hot and the coating blistered before it could firm up.
Why Your Nose Knows Best
The moment the sauce starts to bubble, the aroma will shift from sweet to savory. Trust that scent change; it’s your cue that the glaze is thickening correctly. A friend once skipped this step, thinking the sauce was ready, and the result was a watery, under‑seasoned sauce that made the dish feel flat.
The 5-Minute Rest That Changes Everything
After frying, let the chicken rest on a wire rack for five minutes. This brief pause allows the steam to escape, preventing the coating from becoming soggy. The rest also lets the sauce set a bit, so each bite is perfectly glazed.
The Quick Chill for Leftovers
If you’re planning to store leftovers, let the chicken cool completely before refrigerating. Place the coated pieces on a baking sheet to avoid them sticking together. Reheat in a hot skillet for a minute on each side; the coating will regain its crispness without becoming greasy.
The Sesame Oil Secret
Add 1 Tbsp sesame oil to the pan just before the chicken is finished frying. The oil’s high smoke point ensures it won’t burn, and its aroma will permeate the entire dish, giving that restaurant‑quality finish. This small addition is often overlooked, but it makes a huge difference in flavor.
Creative Twists and Variations
This recipe is a playground. Here are some of my favorite ways to switch things up:
Spicy Pineapple Kick
Add diced pineapple to the sauce and reduce it to a jam‑like consistency. The sweetness and acidity will pair beautifully with the heat from the chili garlic sauce, creating a tropical twist that’s perfect for summer evenings.
Miso‑Infused Depth
Stir in 1 Tbsp white miso paste into the sauce for a subtle umami boost that complements the soy base. This variation gives the dish a richer, more complex flavor profile that will impress even the most discerning palates.
Herb‑Laced Variation
Replace the green onions with a handful of fresh cilantro or basil before serving. The herbaceous notes will cut through the richness of the sauce and add a fresh, bright finish.
Crispy Coconut Crust
Swap the panko breadcrumbs for shredded coconut and add a splash of coconut milk to the sauce. The result is a sweet, tropical flavor that pairs wonderfully with a side of jasmine rice.
Gluten‑Free Edition
Use a gluten‑free flour blend and gluten‑free breadcrumbs to keep the coating crisp while accommodating dietary restrictions. The flavor remains unchanged, and the texture stays satisfying.
Vegan Version
Replace the eggs with a plant‑based egg replacer or a tablespoon of flaxseed mixed with water. Use a vegan soy sauce and ensure the sesame oil is certified vegan. The dish will still be crispy, flavorful, and entirely plant‑based.
Asian Fusion Twist
Add a tablespoon of sriracha or gochujang to the sauce for a Korean‑style kick. The heat and smoky flavor will elevate the dish into a new territory, making it a standout at dinner parties.
Storing and Bringing It Back to Life
Fridge Storage
Store cooked chicken in an airtight container for up to 3 days in the refrigerator. Keep the sauce separate to prevent the coating from becoming soggy. When ready to serve, reheat in a skillet over medium heat for 2–3 minutes, then drizzle a small amount of sesame oil to restore that fresh aroma.
Freezer Friendly
Freeze the coated chicken pieces on a parchment‑lined tray for 1–2 hours, then transfer to a freezer bag. This method prevents the pieces from sticking together. Reheat in the oven at 375°F (190°C) for 15–20 minutes, or until the coating is crisp again.
Best Reheating Method
The skillet is your best friend for reheating. A quick sear over medium heat restores the crunch without drying out the meat. Before reheating, add a splash of water to the pan, cover for a minute to create steam, then finish with a drizzle of sesame oil to re‑infuse the dish with its signature fragrance.