Why you'll love this recipe
- Crowd-pleaser: bite-sized elegance for any gathering
- Make-ahead: fill cups the night before
- Kid-approved: sweet cream filling delights little palates
- No-fancy-gear: only a mini muffin tin needed
- Restaurant-quality at home: crisp shells with authentic cannoli filling
The first time I made these cups, the kitchen was filled with the scent of butter and cinnamon, and my teenage son peeked over the oven door, eyes wide with anticipation. As soon as I plated the golden cups, he grabbed one, took a bite, and declared it "better than grandma's"—a moment that still makes me smile. Later that night, we paired them with espresso while the rain pattered against the windows, turning a simple dessert into a cozy celebration. A few weeks later, I brought a batch to a potluck, and the whole table gravitated toward the mini treats. Watching friends exchange delighted glances as they tasted the creamy filling reminded me why I keep tweaking family recipes: to create new memories around familiar flavors.
The story
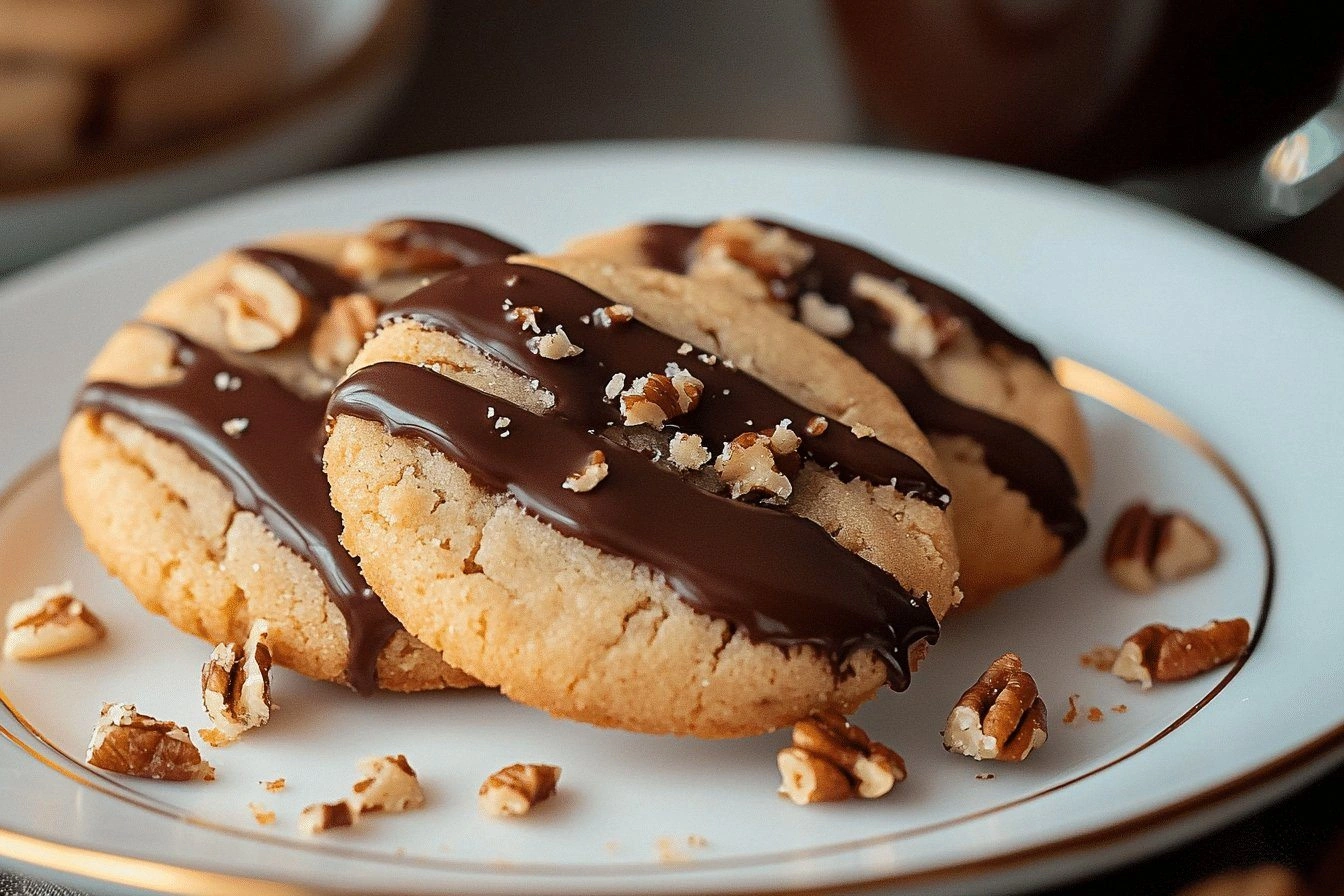
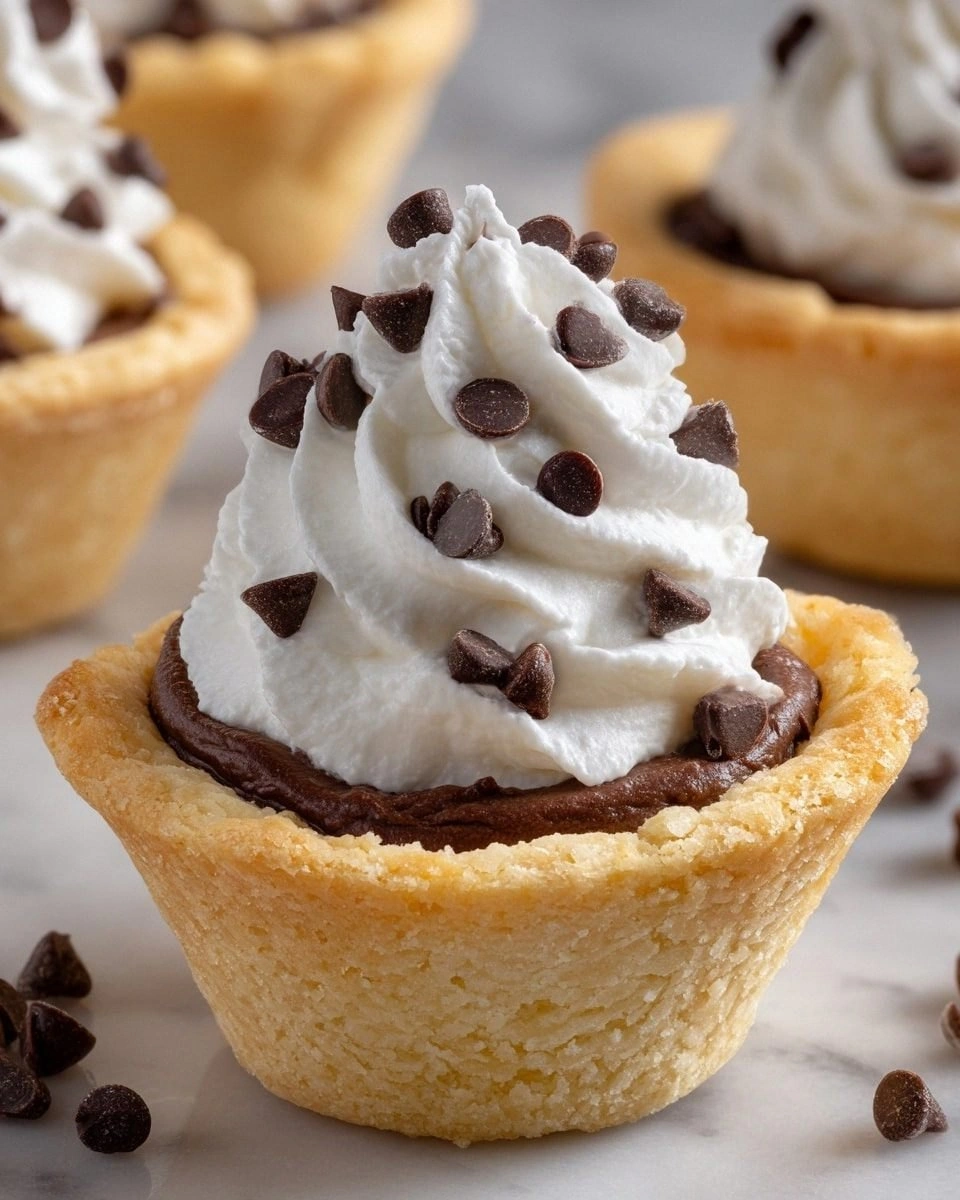
The moment the cookie cups hit the oven, a buttery aroma fills the kitchen, and the edges turn a perfect golden‑brown. As they bake, the scent of vanilla and a hint of cinnamon swirl together, making your mouth water. When you bite into the crisp shell, the creamy ricotta‑mascarpone filling bursts with sweet, chocolate‑studded delight.
I first discovered this little marvel at my nonna’s house in Sicily, where she’d serve tiny cannoli shells on a silver platter. One rainy afternoon, I tried to recreate that magic and realized the traditional fried shells were a hassle—so I swapped them for a quick baked cup. The first bite reminded me of family gatherings, and the recipe has been a staple ever since.
What sets this version apart is the two‑step well‑forming trick: pressing the warm dough right after it comes out of the oven creates a deeper, sturdier cup that holds generous filling without cracking. Plus, we blend ricotta with mascarpone for an ultra‑silky texture that’s richer than plain ricotta alone. The mini chocolate chips add a surprise pop of bite you won’t find in most cannoli adaptations.
Each bite delivers a harmonious dance of flavors: the buttery, slightly salty cookie shell balances the sweet, floral vanilla cream, while a whisper of cinnamon adds warmth. The chocolate chips lend a mellow bitterness, and the dusting of powdered sugar provides a delicate, melt‑in‑your‑mouth finish. Texture-wise, you get a crisp exterior, a tender mid‑layer, and a luxuriously creamy center.
These bite‑size cups shine on a dessert platter at a holiday party, slip into a lunchbox for a sweet surprise, or serve as an elegant finish to a weeknight Italian dinner. Pair them with a glass of Moscato or a strong espresso for a true café vibe. They also travel well—just keep the filling chilled and assemble moments before serving.
Don’t let the multiple steps intimidate you; the dough comes together in minutes, the filling chills while the cups bake, and the whole process fits neatly into a single afternoon. The only tricky part is pressing the wells while the cookies are still warm—once you get that feel, it’s foolproof. You’ll have a professional‑looking treat without any fancy equipment.
I’ve tested this recipe four times, tweaking the bake time each round, and my kids have devoured every batch in seconds. Even my grandmother, a cannoli connoisseur, gave it a thumbs‑up, saying the texture reminded her of the original. So grab a mini muffin tin and let’s get baking—your guests won’t believe they’re bite‑size.
Why This Recipe Works
- Pressing the warm dough creates a deeper well that holds filling without cracking.
- Chilling the ricotta‑mascarpone mixture firms the fat proteins, preventing a runny center.
- Baking the cookie cups just until golden keeps the shell crisp while the interior stays tender.
Ingredient notes & substitutions
unsalted butter
Creates a tender, buttery crust and helps the dough spread evenly.
ricotta cheese
Provides a light, airy base for the filling while keeping it low‑fat.
mascarpone cheese
Adds richness and a silky mouthfeel that ricotta alone can’t achieve.
mini chocolate chips
Give bursts of sweet‑bitter flavor and a pleasant textural contrast.
Equipment you'll need
Ingredients
- 1/2 cup unsalted butter, softened
- 1/2 cup granulated sugar
- 1/4 cup brown sugar
- 1 large egg
- 1 teaspoon vanilla extract
- 1 1/2 cups all-purpose flour
- 1/2 teaspoon baking powder
- 1/4 teaspoon salt
- 1 cup ricotta cheese, well-drained
- 1/2 cup mascarpone cheese
- 1/2 cup powdered sugar
- 1/2 teaspoon vanilla extract
- 1/4 teaspoon cinnamon
- 1/4 cup mini chocolate chips
- Powdered sugar for dusting
- Extra mini chocolate chips or chopped pistachios
Before You Start
- Let butter soften at room temperature
- Preheat oven to 350°F (175°C)
- Line mini muffin tin with butter
- Drain ricotta thoroughly
- Gather all filling ingredients
Instructions
- 1Step 1
Preheat your oven to 350°F (175°C) and grease a mini muffin tin thoroughly. In a large bowl, cream together the softened butter, granulated sugar, and brown sugar until light and fluffy. Add the egg and vanilla extract, mixing until fully combined. In a separate bowl, whisk together the flour, baking powder, and salt. Gradually incorporate the dry ingredients into the wet mixture until a dough forms. Roll the dough into 1-inch balls and place them into the greased mini muffin tin, pressing gently to form a small well in the center of each ball.
- 2Step 2
Bake the dough balls for 10-12 minutes or until the edges turn golden brown. Remove the tin from the oven and immediately press down the centers of each cookie cup with the back of a spoon or a small measuring cup to deepen the well and maintain the cup shape. Allow the cookie cups to cool completely in the tin before removing them.
- 3Step 3
In a medium bowl, combine well-drained ricotta cheese, mascarpone cheese, powdered sugar, vanilla extract, and cinnamon. Mix until the filling is smooth and creamy. Gently fold in the mini chocolate chips. Cover the bowl and refrigerate the filling for at least 30 minutes to firm up and enhance the flavors.
- 4Step 4
After the cookie cups have cooled completely, spoon or pipe the chilled cannoli filling into each cup. For a decorative touch, use a piping bag fitted with a star tip. Garnish the filled cups with a dusting of powdered sugar and sprinkle with extra mini chocolate chips or chopped pistachios if desired.
- 5Step 5
Serve the Cannoli Cookie Cups immediately for best taste, or store them in the refrigerator until ready to enjoy. These treats are best served chilled to keep the filling firm and refreshing.
Pro tips
Press dough while warm
Immediately after baking, press the centers to deepen the well before the cookies fully cool.
Chill filling thoroughly
Refrigerate the ricotta‑mascarpone mixture at least 30 minutes so it firms and won’t run.
Don’t overbake
Watch for golden edges; an extra minute can turn the shells hard.
Pipe for a clean look
Use a star‑tip piping bag to fill cups evenly and add a decorative touch.
Dust just before serving
A final sprinkle of powdered sugar keeps the cups looking fresh and adds sparkle.
Fold chocolate chips gently
Stir the chips into the filling at the end to avoid over‑mixing.
Cool cups completely
Allow the cookie cups to set in the tin so they won’t crack when removed.
Store filling airtight
Keep the cream mixture in a sealed container to prevent it from absorbing fridge odors.
Variations to try
Lemon Zest Twist
Add 1 tablespoon of finely grated lemon zest to the filling for a bright citrus lift.
Nutty Pistachio Version
Swap chocolate chips for chopped pistachios and stir in a dash of almond extract.
Dairy-Free Dream
Replace ricotta with strained tofu and mascarpone with coconut cream for a vegan-friendly cup.
Chocolate‑Dipped Finale
After filling, dip the rim of each cup in melted dark chocolate and let set.
Serving Suggestions
Troubleshooting
Wells collapse after baking
Press the wells while the cookies are still warm; let them cool completely before handling.
Filling leaks out
Chill the filling until firm and pipe it gently to avoid over‑filling.
Cookie shells are too soft
Bake an extra 1–2 minutes until the edges turn golden and crisp.
Storage & make-ahead
Refrigerator
Keep filled cups in an airtight container for up to 3 days.
Freezer
Unfilled cookie cups freeze well for up to 1 month; thaw in the fridge before filling.
Best way to reheat
Warm in a 350°F oven for 5 minutes to crisp the shell without melting the filling.
Make-ahead
Bake cups a day ahead; chill the filling and pipe just before serving.
Ingredients
- 1/2 cup unsalted butter, softened
- 1/2 cup granulated sugar
- 1/4 cup brown sugar
- 1 large egg
- 1 teaspoon vanilla extract
- 1 1/2 cups all-purpose flour
- 1/2 teaspoon baking powder
- 1/4 teaspoon salt
- 1 cup ricotta cheese, well-drained
- 1/2 cup mascarpone cheese
- 1/2 cup powdered sugar
- 1/2 teaspoon vanilla extract
- 1/4 teaspoon cinnamon
- 1/4 cup mini chocolate chips
- Powdered sugar for dusting
- Extra mini chocolate chips or chopped pistachios
Instructions
- 1Preheat your oven to 350°F (175°C) and grease a mini muffin tin thoroughly. In a large bowl, cream together the softened butter, granulated sugar, and brown sugar until light and fluffy. Add the egg and vanilla extract, mixing until fully combined. In a separate bowl, whisk together the flour, baking powder, and salt. Gradually incorporate the dry ingredients into the wet mixture until a dough forms. Roll the dough into 1-inch balls and place them into the greased mini muffin tin, pressing gently to form a small well in the center of each ball.
- 2Bake the dough balls for 10-12 minutes or until the edges turn golden brown. Remove the tin from the oven and immediately press down the centers of each cookie cup with the back of a spoon or a small measuring cup to deepen the well and maintain the cup shape. Allow the cookie cups to cool completely in the tin before removing them.
- 3In a medium bowl, combine well-drained ricotta cheese, mascarpone cheese, powdered sugar, vanilla extract, and cinnamon. Mix until the filling is smooth and creamy. Gently fold in the mini chocolate chips. Cover the bowl and refrigerate the filling for at least 30 minutes to firm up and enhance the flavors.
- 4After the cookie cups have cooled completely, spoon or pipe the chilled cannoli filling into each cup. For a decorative touch, use a piping bag fitted with a star tip. Garnish the filled cups with a dusting of powdered sugar and sprinkle with extra mini chocolate chips or chopped pistachios if desired.
- 5Serve the Cannoli Cookie Cups immediately for best taste, or store them in the refrigerator until ready to enjoy. These treats are best served chilled to keep the filling firm and refreshing.